Learn how to convert an electric screwdriver to lithium ion batteries with your own hands
The electric screwdriver is so tightly squeezed into the life of modern man that no repair or construction work at home and at work can do without it. The main convenience of the tool is its mobility, which is ensured by a removable self-contained battery. That’s why the device in question is called a “cordless electric screwdriver”. Often the question of how to convert the battery of an electric screwdriver arises during use, because nickel-cadmium batteries have a big disadvantage compared to lithium batteries. it’s low service life. To avoid buying a new power tool with a lithium battery, you can upgrade the old battery by replacing the nickel-cadmium cans in it.
The electric screwdriver is portable because it has its own independent power source. The battery is in this case a rechargeable battery that functions in the same way as a watch or remote control battery. Only the battery for power tools has a voltage several tens of times greater than that of an ordinary thumbtack battery.
The battery powers the electric screwdriver motor. Turning of the electric motor’s armature causes the torque to be transmitted to the gearbox. The speed reducer increases or decreases the rotation speed of the tool (depending on the mode of rotation) and the chuck in which the bits are fixed. The independent power supply as a battery in an electric screwdriver is a key element, without which the work of the device is simply impossible.
Often owners of inexpensive screwdrivers are faced with such a situation as a fast battery drain. The reason for this is the material used to manufacture the independent power supply. There are three main types of batteries for an electric screwdriver:
- Nickel-cadmium batteries are the simplest, inexpensive and short-lived. Another disadvantage of this material is the low charge reserve
- Nickel-metal hydride is an improved version of cadmium, which has increased resistance to frequent charges and discharges (but discharges quickly). Exposure to low temperatures has a negative effect on the life of the source
- Lithium-ion. this is a new era of batteries that not only hold a long charge (slow consumption due to high capacity), but can also last at least 10 years
Often owners only realize after purchasing an electric screwdriver that comes with a nickel-cadmium battery that they “should have chosen a power tool with a lithium battery”. The reason for buying a power tool with a nickel-cadmium source is also easy to explain, because with such a battery the device is several times cheaper. If you don’t believe me, you can compare the price of a screwdriver in the online store Cylinder.
Nickel-cadmium and metal-hydride batteries. why replace them
One of the very first batteries to be used in power tools were nickel-hydride sources. The advantages of these devices include an optimal capacity reserve and low heating rates of the cans when compared to hydride batteries. In addition, these sources are inexpensive, yet still do their primary job effectively when used correctly.
The advantages of nickel cadmium devices include:
- Low risk of overheating compared to hydride batteries
- The nickel-cadmium sources are contained inside a metal housing, which provides high stability and tightness
- If properly used, the nickel hydride will serve at least 3-5 years, but precisely because the device has to be used frequently in extreme conditions, the battery life is reduced sharply from the first day of purchase
- Low cost, which makes these devices popular
- Not afraid of deep discharge
To extend the service life of the battery, not to ask yourself how to convert the battery of an electric screwdriver to lithium, it is necessary to follow the simple instructions for the use of Ni-Cd batteries:
- The tool can and should be operated until the battery is completely discharged
- Charge the source until its capacity is completely replenished
- Unlike lithium batteries, it is better to store cadmium batteries in a discharged state
- The “memory effect” is a drawback, but it can easily be eliminated by repeating three charge-discharge cycles
Hydride batteries came after the cadmium ones, but they were not very popular because they run out quickly and are not suitable for high-powered screwdriver models. Hydride batteries have no “memory effect” and are less harmful to the environment than cadmium batteries. If your battery, which consists of cadmium or hydride sources, sooner or later will need to replace it. It is almost impossible to buy a new battery for an electric screwdriver of a little-known brand or outdated model, so it becomes necessary to upgrade the old one. From an old cadmium battery can be made even better, but to do this you need to figure out how to remake the battery electric screwdriver.
A budget conversion of an electric screwdriver to Li-ion with balancing in 100.
I have an old electric screwdriver, it was lying idle for a long time, so the batteries gave up their lives. And then I needed it recently, the kitchen to assemble. If you’re wondering how I got it back to life by converting it to lithium for less than 100, you’re welcome under the hood. My drill I have a. 18 volt, 9Nm At a glance I was three options 1. buy a new inexpensive electric screwdriver for 1500-2500. easy, fast, but it’s not our method, since the old drill will lie dead weight, and throw the hand will not dare, 2. order NiCd batteries. about 900-1200r. but the sense if you can get a new one for 1500r? 3. convert to lithium, but here the budget can be different. Familiarized with the question on my mother found that for the conversion to lithium, ideally you need:. board 3S, 4S or 5S, depending on the size of the battery (I need 5 banks of batteries for 18 volt drill, respectively 5S. about 800r). preferably the balance board (if the protection board without balancer), especially desirable if the batteries are not new or from different parties. Li-ion batteries themselves, preferably current, those are designed for high currents. from 350r per piece, for 5 pcs. from 1700r. Bottom line is a bit pricey for my cheap old drill (see 1 point), so I decided to do my ultra-budget version with blackjack balancing. I had an old laptop battery (given for free), disassembled it found these banks Samsung. Except for 2 cans the rest were quite working, charged each in the bank checked them after charging current short circuit (not more than 1 second. it can be dangerous, because the banks are without protection). As you can see, banks are alive with short-time output current from 10 to 20A. Laid out a scheme of modification, it and will do. Since the batteries are not current to facilitate their work was decided to put two acb in parallel (at operating current of 10A, for example, the current produced by each ac will be 10/2=5A). For this it is desirable to pick up a pair with similar characteristics of the current output. Correcting the diagram: In principle, my drill, judging by the characteristics of not particularly powerful, so in principle it would be possible and one bank to put, though they are likely to live less, but since the batteries I had in the amount of 10 pieces decided to put all 10. The process of assembling is not photographed, in principle, there is nothing interesting, the batteries can be soldered to the already welded petals without fear of overheating. Because all 10 batteries didn’t fit into the old one, it turned out awkward. So I took the blue (whatever was) electrical tape and hid the excess. Since I need 10 pins, I had to use a db15, if the battery less applied here would db9. they are easier to find Remained to solder the charger. As source of 5 volts took five unnecessary cell phone chargers, just found five pieces, though all different, at different currents from 600 to 900mA. Ideally use the same ones, so the charging would happen about the same time and you could estimate which banks take longer to charge. Important! It is necessary to do exactly according to the scheme using for each charge controller its own separate power supply 5-8V, that is, power supplies must be galvanically isolated from each other. One powerful power supply for all controllers can not be used. will be a short circuit battery (TP4056 common on the input and output case. minus). To reduce the size of the design took out of the charger cases. On the back side glued on a double-sided adhesive tape TP4056 charge controller and put the design in a separate case This is what it looks like when you turn on a 220V blue charge controller. indicating that the load is not connected (or acb charged), red and green. cell phone charger LEDs. Now connect the battery, you see that only 3 banks are charged (red LED is lit) and the remaining 2. do not (blue LED is lit). That’s because I charged it recently and only 3 of the 5 batteries were discharged. So, you can see that each time you charge the battery is balancing the whole battery. this is a major plus of this scheme, it is especially important when using such used batteries from a laptop battery. I made a video to illustrate, maybe I missed something in the story, then look at the video
To summarize. Pros 1. Cheap. I only needed to buy TP4056 charge controllers, which cost me 60 for 5 pieces, the rest were or got for free. Now shipping from this seller is only paid, about 1 more, you can find cheaper probably. 2. Balancing the batteries each time you charge them.
Disadvantages 1. No current protection, so I do not put the chuck latch to lock (drill icon) so the current protection is purely mechanical. chuck flicks and does not lock when clamped, no short-circuit current. In principle I think this protection is enough. 2. If you do not have the old chargers from cell phones, it will be a little more expensive. But you can ask around, many of your friends probably have them lying around. 3. No overdischarge protection. Well, you have to watch if the power has dropped. immediately to recharge! In general it’s lithium, you shouldn’t wait for the battery to run out like you do with nickel. It’s better to charge it when possible. it makes the battery last longer.
In general, I think this scheme has the right to life, especially for the reanimation of such inexpensive and not super-powerful screwdrivers. ps in the Комментарии и мнения владельцев gave a link 60r with shipping
Components needed for rework
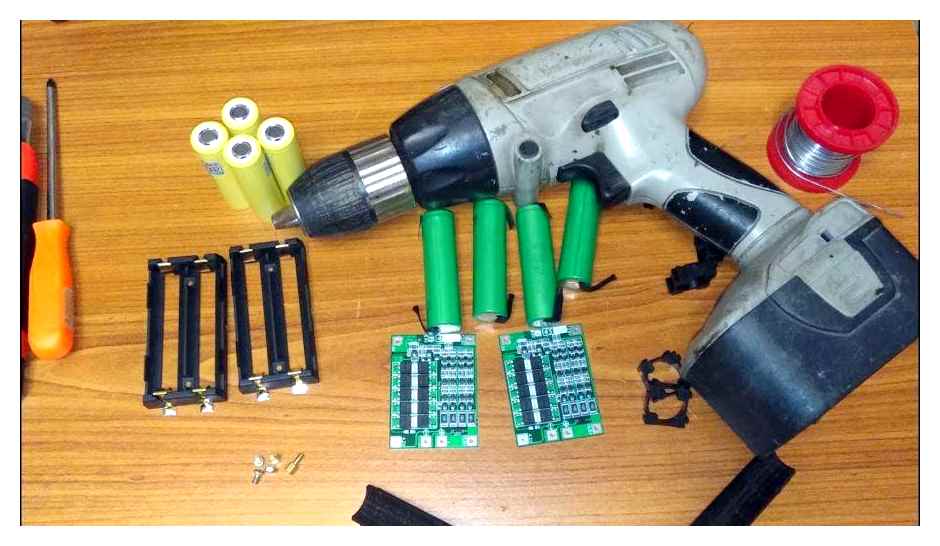
It is necessary to choose beforehand the components that will help to transform the electric screwdriver. The composition is determined by the characteristics of the process, namely by soldering, the use of special cassettes or spot welding. Cassettes are not recommended because of their vulnerability to current. The rest of the list includes:
- Li-ion18650 batteries;
- Protective card or module, providing a uniform load during charging;
- contact welding machine. It is preferable to soldering because lithium batteries are sensitive to heat and can fail;
- Wires with a cross section of 0.75 mm², 1.5 mm², 2.5 mm²;
- heat shrink;
- screwdriver;
- circular knife.
The battery should match the capacity of old components in the proportion of 1/3. Т.е. the lithium cell is a full-fledged replacement for the 3 nickel-cadmium battery. Usually use 3 pcs. Li-ion instead of 10 Ni-Mh, which will slightly reduce the power of the unit. It is possible to install 4 batteries, but this will reduce the operating life of the motor.
The key value is the current value given in the data sheet of the electric screwdriver. It varies in the range of 15-40 A, respectively selected elements with similar parameters of the output. This applies to both batteries and protection boards. Universal option BMS module for 25A or 30A. It is undesirable to use batteries from an old laptop, because they are not designed for high loads.
How to convert
The direct replacement of the batteries in an electric screwdriver does not depend on the capacity of the batteries. The process is carried out in several steps, beginning with the disassembly of the battery.
Disassembling the power supply for a new charge
It is better if it has a screw or rivet assembly. Worse is the adhesive bonding, in which case everything is done with extreme accuracy.
Then all elements are removed from the inside, except for contact plates or terminals. New batteries are connected together in series by the selected method (soldering, spot welding). Consistency is the key to success, ensuring consistent capacity and voltage. Wires with a cross section of 2.5 mm², capable of withstanding the high voltage of operation, are suitable for the connection.
Soldering of the wires to the stabilization module
Battery pack and BMS protection board are connected to each other by wires. It is desirable to use a cross section of 1.5 or even 2.5 mm². The direct wiring diagram is as follows:
- Connecting the wire going to the plus side to the corresponding pin of the board, marked B;
- Connecting the wire going to the minus to the corresponding terminal of the board, marked B-;
- The wires from the remaining contacts of the unit are connected to the terminals marked on the board as B1, B2, B3. Number of connections depends on the number of batteries.
To avoid short circuits, the protective module is insulated from the batteries with a heat shrink, this will prevent it from soldering or welding contacts.
Soldering the wires of the power supply with the module
On the BMS board itself, there are 2 more contacts labeled P and P-. From these the wires go to the corresponding terminals of the old chip.
Voltage setting
The output voltage is set on the resistors. Each cell should not exceed 4.2 volts.
Placing in the enclosure
The final stage is to assemble the battery. Body parts are thoroughly cleaned, battery pack is inserted into the cavities. Considering its smaller size, it is fixed to the surface by glue or sealant.
Wires plus and minus are soldered to terminals, terminal block is also placed in the case, after that protective BMS board is carefully placed. At the end of the body parts are connected with screws, staples or glue.
The difference between a battery charger and a power supply is the presence of charging current. It determines the voltage level and the corresponding limitations. Controller reacts to overload, incorrect polarity, mismatching output value. Typically, the device will simply turn off.
The transformation consists in adding a safety relay, which includes such an element as a BMS module, with adjustment of the resistors. It remains to set the desired values, after reaching which the charge stops. It is not uncommon when converting a charger, the green light does not come on. Instead of this, the red light simply goes out.
Most modern screwdrivers are equipped with universal chargers. They work for both nickel-cadmium and lithium. A ready-made charger is purchased, but it is an additional investment.
In summary, to remake the battery electric screwdriver to Li-ion 12 volt or 14, 18 volt, you need a set of components, experience with electrical equipment and a little free time. It is reasonable to calculate the total cost of investment beforehand. Repair is a long procedure, so sometimes it’s easier to buy a new electric screwdriver, their price today is not high.
Charger for an electric screwdriver converted to lithium
Another one of my dumb hands 🙂 Watch out for traffic! Lots of pictures! And a lot of letters 🙂 If you remember, I quite a long time ago converted the battery of my electric screwdriver to lithium. But it was dragging on and on with the normal charger for it. And now I need to charge it once a month, not every few days 🙂 When I was not too lazy. I used a lab-charger with limited voltage and current. When I was too lazy. I plugged it into an old local charger, which wasn’t designed for lithium and gave out about 18 volt and about three amps. Hoped for a protection circuit board inside the battery. But still the thought of normal charging did not leave me. And I even bought a power supply with a voltage and current regulator a long time ago:. PSU. www.aliexpress.com/item/Power-Supply-Module-AC-110v-220v-to-DC-24V-6A-AC-DC-Switching-Power-Supply-Board/32827334983.html. regulator. www.aliexpress.com/item/DC-DC-Step-Down-Adjustable-Constant-Voltage-Current-Power-Supply-Module-Drop-shipping/32787533675.html I chose a power reserve, and expect to give 20-24 volts to the regulator and limit it to 16.7 volts and up to 1 amp. Going forward there was a little problem with the PSU, but more about that later in the review.
Except this, all fasteners under the bolts (stainless steel) and screws, which also have long ago purchased on Ali. Took several diameters at a time, from M1 to M3 🙂 Bolts. www.aliexpress.com/item/500pcs-lot-DIN7985-Stainless-Steel-304-M2-Phillips-Pan-Round-Head-Machine-Screw-kit-m2x4-5/32765362652.html and the same seller has many other sizes Screws. www.aliexpress.com/item/400pcs-M2-Cross-pan-Head-Self-Tapping-Screws-Black-Oxide-Assortment-Kit-M2-4-5-6/32580525848.html and also the same seller has other sizes. than once have come in handy 🙂
This is what the native electric screwdriver charger and the battery itself looked like:
The battery was inserted upside down into it:
There are three pins inside the socket. two for power and one for the thermal fuse inside the battery: (here the contacts are already taken out)
The charger has a transformer and a board with simple analog electronics:
The power supply and regulator wouldn’t fit in the native charger case, so the case had to be made new. At first the idea was to make a separate “cap” with contacts to put on the battery, and separately the charger itself. But then I thought, there is no gain, only extra wires will get tangled underfoot. And decided to repeat the construction of a native charger. PSU with a regulator inside, and there in the case socket for the battery.
Lately, everything I’m going to do, I model first. Especially those things that need to match with the ones already in place. like the battery of an electric screwdriver. And to have something to base the design on I started with the model of the battery socket. The form is not complicated, it was enough only a caliper to take all measurements, the first printed model is perfectly compatible with the original: or so it seemed to me 🙂 After that I proceeded to model the nest, based on the already made model of the stem. Printed out the socket. the previously printed foot fits perfectly:
But the leg of the real battery somehow does not feel very cozy in the printed socket: I recheck all the dimensions. everything is correct, but the contacts are a little off, a little loose and it somehow sits awkwardly. In the end I saw that the stem does not taper upwards on all sides. The flat front edge goes straight, no constriction. I reprinted the foot and the socket taking this into account and everything fell into place 🙂 Then I modified it a few more times and printed the socket to the exact size. And several times it was due to my inattention. in the model I changed one size. external, and after printing I looked at the other. internal. And I was surprised that somehow nothing changes 🙂
After trying two legs and four sockets I was completely satisfied with the result. I added the top surface to the socket, the reinforcing ribs and the mounting for the board with pins: And then I went on to the next stage. the modeling of the case itself. I decided right away that the case would be made of upper and lower halves, only it was necessary to decide how to place the PSU and the regulator inside. For this I spent another half an evening and made their models. And started to virtually put them together and to the socket in different ways. In the end I decided on this layout:
And when you understand the layout, then the size of the hull becomes more or less clear, so you can start drawing it in final. I started with the top lid. Nothing complicated. extend the top plane to the size of the hull, raise the walls, add posts to hold the stabilizer. To small vertical elements. stands for 3D printing for example. it’s better to add ribs for reinforcement. And to the base of all vertical elements. especially thin ones, like walls. it is useful to add chamfers to increase the area of the base, this will give extra strength. I also did not forget about cooling. on the top side I made two rows of narrow slots, just above the regulator radiators. I rounded corners of the case, near the socket I rounded it more, just for design’s sake 🙂 I made holes for two LEDs. And I made the edge around the perimeter. The bottom half will have a mating edge so that the halves slightly fit into each other. Here it is: Trying on the regulator and the board with the pins: And the other side with the LEDs already plugged in:
By the way, the contact model I also made separately 🙂 Later I also added a small cutout for the power cord and fasteners to tighten the two halves of the cases:
With the lower half of the case even simpler. I copied the contour of the upper half, pulled out the walls, added a stand for the PSU, mounting to tighten the halves, ventilation holes and trailing edge: Trying on the PSU: And you can see how it all feels in height: It feels great 🙂
The battery charger for my electric screwdriver converted to lithium
dizzying hands 🙂 Watch out for traffic! Lots of pictures! And lots of letters 🙂 If you remember, I converted my electric screwdriver battery to lithium quite a long time ago. But with a normal charger for it all pulled. And now you need to charge it not every few days but once a month 🙂 When I was not too lazy. I charged it from PSU with voltage and current limitation, when I was lazy. I plugged it into an old native charger, which is not designed for lithium and gave out something about 18 volts and about three amps. I hoped for a protection circuit board inside the battery. But the thought of a normal charger did not leave me. And I even bought a power supply with a voltage and current regulator a long time ago:. PSU. www.aliexpress.com/item/Power-Supply-Module-AC-110v-220v-to-DC-24V-6A-AC-DC-Switching-Power-Supply-Board/32827334983.html. regulator. www.aliexpress.com/item/DC-DC-Step-Down-Adjustable-Constant-Voltage-Current-Power-Supply-Module-Drop-shipping/32787533675.html Selected with a margin of power and with the expectation to give the regulator 20-24 volts and limit it to 16.7 volts and up to 1 amp. Going forward, there was a little problem with the PSU, but this will be discussed later in the review.
In addition, all fasteners are accounted for bolts (stainless steel) and screws, which also have long ago purchased on Ali. I took a few diameters from M1 to M3 🙂 Screws. www.Aliexpress.com/item/500pcs-lot-DIN7985-Stainless-Steel-304-M2-Phillips-Pan-Round-Head-Machine-Screw-kit-m2x4-5/32765362652.html and the same seller has many other sizes Screws. www.aliexpress.com/item/400pcs-M2-Cross-pan-Head-Self-Tapping-Screws-Black-Oxide-Assortment-Kit-M2-4-5-6/32580525848.html and also the same seller has other sizes. Have come in handy more than once 🙂
This is what the native electric screwdriver charger and the battery itself looked like:
The battery was inserted upside down:
There are three pins inside the socket. two power and one for the thermal fuse inside the battery: (here the pins are already removed)
The charger has a transformer and a board with simple analog electronics:
The power supply and regulator wouldn’t fit in the original battery charger body, so I had to make a new one. At first there was an idea to make a separate “cap” with contacts to put on the battery, and separately the charger itself. But then I thought, there’s no gain, just extra wires getting tangled underfoot. And I decided to repeat the construction of a native charger. PSU with a regulator inside and there in the case socket for the battery.
Lately, everything I’m going to do, I model first. Especially things that need to go with the ones I’ve already made. like the battery of an electric screwdriver. And to have something to work with when modeling the case, I started with a model of the battery “foot”. The form is not complicated, it was enough only a caliper to remove all the dimensions, the first printed model is perfectly compatible with the original: Well, or so it seemed to me 🙂 After that I proceeded to model the socket, based on the already made model of the leg. Printed the socket. the previously printed stem fits perfectly:
But the foot of the real battery somehow does not feel very cozy in the printed socket: I recheck all the dimensions. everything is correct, but the contacts are a bit off, a little loose and somehow sits awkwardly. At last I saw that the leg is not narrowing upwards on all sides. The flat front edge goes straight, no constriction. Reprinted the leg and the socket taking that into account and everything fell into place 🙂 Then I slightly changed and printed the socket a few more times, trying to get the size right. A few times it was my own negligence. in the model I changed one size, the outer size, but after printing I looked at the other, the inner size. And I was surprised that somehow nothing changes 🙂
After trying two legs and four sockets, I was completely satisfied with the result. I added the top surface to the socket, the ribs and the mounting for the board with pins: And then I went on to the next stage. modeling the case itself. I decided at once that the case will be made of upper and lower halves, only it was necessary to determine how to place the PSU and the regulator inside. For this I spent another half an evening and made models of them. And started virtually putting them to each other and to the socket in different ways. In the end this was the layout:
And when you understand the layout, then the size of the hull becomes more or less clear, so you can start drawing it in final. I started with the top lid. Nothing complicated. just widen the upper plane to the size of the case, raise the walls, add posts to fix the stabilizer. For small vertical elements, such as uprights, for 3D printing, it is better to add ribs for reinforcement. And to the base of all the vertical elements. especially the thin ones, like the walls. it’s useful to add chamfers, to increase the area of the base, this gives more strength. Didn’t forget about the cooling. on the upper side I made two rows of narrow slots, just above the regulator radiators. I rounded corners of the case for design reasons 🙂 I added holes for two indicator LEDs. And made an edge around the perimeter. On the bottom half will be a mating edge, so that the halves slightly fit into each other. Here it is: Fitting the regulator and the board with the contacts: And the other side, with the inserted LEDs:
By the way, I also made the contact model separately 🙂 Later I added a small cutout for the power cord and fasteners to tighten the two halves of the housings:
With the lower half of the case it was even easier. to copy the contour of the upper half, stretch the walls, add posts for PSU, fasteners to tighten the halves, ventilation holes and trailing edge: Trying on the PSU: And you can see how it all feels in height: feels great 🙂
Power supply for charging
Note! The Li-ion assembly must be charged strictly with a battery charger for lithium batteries! The nickel battery charger will not work! To buy the right charger unit, you need to multiply the number of batteries in your assembly by 4.2. Т.е. 1х188650. 4.2v, 2. 8.4v, 3- 12.6v and so on. At aliexpress a lot of different power supplies, just type in the search Power supply 4.2v (or whatever voltage you need)
Silicone wire
Of course you need a wire as well. And to be blunt, a good solid piece of soft silicone wire comes in handy even without modifying or repairing your electric screwdriver.
Well, that’s pretty much it. On aliexpress there is absolutely everything you may need to replace your old 18650 batteries with new ones in your electric screwdriver or convert your electric screwdriver from nickel to lithium-ion batteries.
By the way, there also on aliexpress you can buy a lot of good cordless tools (selection one and two) and screwdriver attachments.
If you work with an electric screwdriver or any other tool, you will probably need a good headlamp. Now on aliexpress there is an opportunity to buy a really inexpensive and good model: with built-in charging, good brightness and color temperature light, a magnet in the end (ideal for work under the hood). If you’re interested, here’s my full review and comparison of the Sofirn SP40
Well and below, in the “about the author” section there are many other useful picks.
Silicone cord
Of course you also need a wire. And to be blunt, a good piece of good, soft silicone wire will come in handy even without modifying or repairing an electric screwdriver.
And there you have it. On aliexpress there is absolutely everything you may need to replace your old 18650 batteries with new ones in your electric screwdriver or to switch your electric screwdriver from nickel to lithium-ion batteries.
By the way, there at aliexpress you can buy a lot of good cordless tools (selection one and two) and nozzles for screwdrivers.
If you work with an electric screwdriver or any other tool, you probably need a good headlamp. Now on aliexpress there is an opportunity to buy really inexpensive and good model: with built-in battery charger, good for brightness and color temperature, a magnet in the end (ideal for work under the hood). If you’re interested, here’s my full review and comparison of the Sofirn SP40
And below, in the “about the author” section, there are many other useful picks.
Lithium batteries
Next, I bought 10 lithium batteries and assembled them into batteries of 2 in parallel, and then connected the 5 resulting units in series. The batteries are connected to each other by soldering with pre-tempered copper plates. For soldering you need one basic rule. do not overheat the battery! Therefore it is necessary to solder with a powerful soldering iron and as fast as possible in 1-2s. If you don’t succeed at once, it’s better to wait and not to boil the battery.
If you have a spot welder you won’t have any problems with the connection. As a result, the battery is assembled at 21V and a capacity of 5.2Ah. Connecting the battery to the control board is shown in the figure.
Then everything is packed in the case and tested under load.
I built an LM2596 module into the standard charger. Power supply should be a couple of volts more than the voltage of the charged battery. Set the idle voltage to 21 volts. Then I connected the battery and set the charging current of 0.8A. Why such a? Because I found a 24V power supply with max. at 0.8 amps. I did not buy it specially. Let it take longer to charge. This is not a production version, but a home version of the tool.
In the process of charging a small minus was detected. When the battery reaches full battery charging voltage transfer from phase CC to phase CV. That is, first the battery is charged with a set current (0.8A in my case), and when you reach 21V voltage is maintained at this level, and the current gradually decreases to 0.1Iust (in my case 0.08A, set by the middle potentiometer). At this point the charging process stops. On this module this is signaled by the middle LED, but only signals that the battery is ready to work, but in fact charging continues, which in principle is not critical. It won’t overcharge anyway. And the disadvantage is that because the control board has its own protection against overcharging, it shuts down the charger before it reaches the CV phase.
To get around this I had to lower the voltage of the charger module to about 20,7-20,8V. The CV phase begins earlier, but in any case the battery is charged more fully than without it at all. If you don’t know about this little disadvantage, you won’t notice the difference in operation.
Choosing the batteries for converting the electric screwdriver to lithium.
First of all lithium is not like lithium. In short, there are Li-Ion batteries for different current output (load). In our case we need a battery with a high recoil current. Also such batteries, as a rule, also have an increased charging current, and therefore by making the correct charging, you can quickly charge the batteries.
I chose these (see. photo). This is a 18650 Sony VTC4 (or similar) 2100mAh. I got it from the Chinese here.
Great value for money. High surge and charge currents. The maximum load current is 30 amps. Needless to say, such cans feel great in an electric screwdriver. Capacity 2100mAh against the standard 1100mAh (this capacity (1100mAh) usually also make the factory Li-Ion batteries).
Four cans is for an electric screwdriver with a rated voltage of 14.4В. For a 12 volt electric screwdriver take three cans. Less expensive you can get these HG2.