How to make a collet clamp with your own hands
Small electric drill required for everyone making electronic crafts or doing fine decorative work. Such a machine is ideal for carrying out small jobs on wood, plastic and metal, drilling circuit boards.
To assemble a mini drill at home you can use a chuck, a soap bubble bottle, a motor to rotate the chuck, a battery.
The motor can be taken from a hairdryer or an angle grinder. Suitable for making an article and electric motor from a video recorder, the motor from an old cassette recorder.
To make an electric mini drill you need:
- Connect the chuck with the motor. This is best done with cold welding. But it is necessary to work quickly and carefully: the welding quickly hardens and becomes as strong as iron. If you fail, you can not redo the connection.
- Place the chuck in the jar. For better fixation, the chuck should be treated with hot melt.
- Make a hole in the second base for the switch. It is better if the switch off will be small, key.
The handheld mic drill is ready! It remains only to solder to the switch wires from the motor and power, respecting the polarity. A 9-12v battery will be enough to power the mini drill. In addition, you can make a reverse on a six-pin switch.
Device, varieties
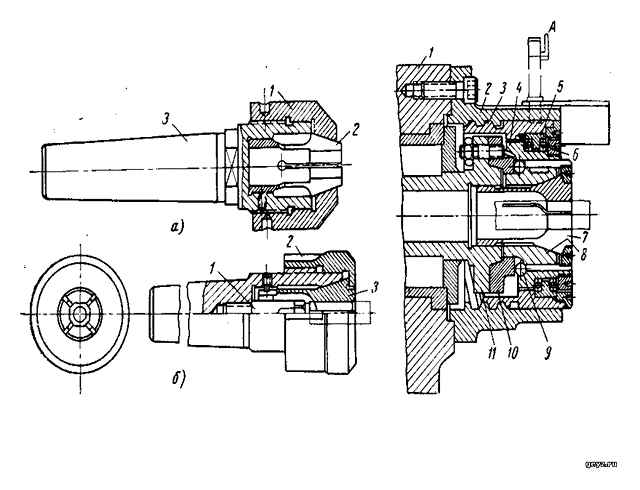
The collet clamping tooling for a milling machine includes three basic elements in its design:
Longitudinal axial slots in the sleeve form moving blades. Their number depends on the diameter of the part. elements are connected to each other by a locknut that transfers the pressure to the cone formed by the blades. the unit is tightened by the radial force. There are interchangeable collets on the construction equipment market that can be used to clamp the cylindrical tool. Polyhedron shaped workpieces are available. Collet clamp is mounted on the machine shaft and the workpiece is then milled, sharpened or straightened by the craftsman.
Depending on the function, the collets are divided into three types:
- Feeding. The sleeve, made of hardened steel, has three incomplete notches with spring blades pointing toward the center of the chuck. The diameter of the hole of such a clamp is selected with the condition: the workpiece must be tightly fixed in a stationary position, because in this case every millimeter is important. The feed collet is completed with exchangeable inserts of different diameters. Then it is possible to work with differently sized workpieces of any configuration.
- Clamping collet. Different from the previous model in that it has a through bore with two slots along the bush axis. The workpiece is clamped tightly in the collet during machining without any risk of falling out. If you plan to machine square parts, you’ll need a chuck with four slots, and a chuck with three slots for round and polyhedral parts. Collet kit for any workpiece geometry ensures machining of parts of any shape. Low radial runout is an advantage.
- Split (expandable) holds workpieces with small diameters. Expander collet has a spring to expander the paddles.
Each collet is designed for only one diameter, so they are suitable for working with long metal bars mounted on the cutter.
Thanks to the high precision of the fastener, taps, turning mills or replaceable nut tips can be attached to the collet.
Collets are indispensable if you need to fix a drill bit in a hand-held drill press or a drilling and boring machine. The collet has a polished inside surface that prevents the workpiece from being deformed during clamping.
In addition to machine tools, collets are also used for securing replacement parts to hand tools. Similar to standard products, there are also collets for installation in mini-drills. In woodworking shops you can find mechanical tools with collets that connect the working part to the handle. The miniature chuck allows files or screwdrivers to be changed as needed. This is the principle behind the manufacture of mechanical pencils with replaceable graphite rods. By pressing the button, the user extends the small collet, the petals open, and the rod extends to the specified length.
Pros and cons
- easy workpiece clamping and equally easy workpiece disassembly;
- possibility of fixation of miniature workpieces;
- Long service life depending on the material (hardened or cementitious steel);
- absence of workpiece rotation due to the large contact area
- Zero runout due to good centering of the part in the bush. The high accuracy of the process is thereby achieved.
- Versatility makes it possible to use the collet mount on all types of machines.
The only disadvantage of the collet is that each individual workpiece clamps the workpiece of the same diameter. For example, the 12 mm collet is only suitable for drill bits of the same size. This problem can be solved by purchasing a set of interchangeable workpiece clamps in order to adapt them to all workpiece diameters and configurations. There is an adapter cylindrical sleeve, which is installed in the chuck of the required size, and already in it the workpiece is inserted. Clamping nut clamps the collet, and it clamps the adapter sleeve with the workpiece. Self-clamping chuck with a set of interchangeable clips or adapter bushings ensures quality and safe work on any machine.
Collet with their own hands for a micro drill
Everyone knows that the drill at home is a very useful and versatile tool.
If you have a drill at home you can hang a painting on the wall, fix the furniture, repair a number of necessary subjects.
And what to do if there is no drill at home, and constantly ask the neighbors somehow uncomfortable?
You can buy it in a store, but this device is very expensive.
And you can assemble a mini drill with their own hands on the basis of improvised materials that are almost every home.
How to do it, we will tell in this article, presenting to your attention a few simple ways of assembling a mini drill with your own hands at home.
Mini drill made of electric chuck
The first option of assembling this device with your own hands is based on the use of electrical chuck, which can be purchased separately, or taken out of the light bulb. If you buy it, it is very inexpensive, but the cost will be justified.
Also to assemble a mini drill with your own hands from a chuck, you will need the following things:
- motor;
- soap bubble bottle;
- A construction knife;
- duct tape;
- Thermal glue;
- blowtorch;
- household switch.
The body and core of the mini drill
The work should begin with the preparation of the body of the mini drill, which will serve as a soap bubble jar. This is done as follows:
- Prepare the lid from the jar. To this end, heat a soldering iron and use it to make a small hole in the lid of the can.
- The diameter of this hole should be slightly larger than the diameter of the drill base.
- The bottom of the jar must be completely cut out.
- Connecting the cartridge with the motor. Most often the motors are taken from different tools that have already been used.
- Before the process of bonding, you need to degrease the whole motor with acetone.
- The cartridge can also be degreased, but it is not necessary to water it, like the motor, with acetone. An ordinary wipe will be enough.
The method of fastening is by means of cold welding.
If this method does not suit you, you can also use hot glue.
Remember that the more complex your future mini drill, the more serious materials will be needed to assemble it with your own hands.
During landing on the welding or glue to work very carefully, so that everything is as even as possible. You can not redo the work afterwards, take this into account.
- At the place of attachment on the cartridge there is a hole, which must be plastered before connecting the parts;
- Caulk is carried out with simple plasticine;
- Plasticine need to fill only the holes, it should not remain on top of the cartridge.
Process of manufacturing
When you have prepared the body and the core, you can proceed directly to the assembly of the drill with your own hands:
- Place the chuck and motor connected to each other in the jar. This should be done so that the wires that stick out of the chuck, then placed in the lid of the jar.
- When the cartridge is completely inside the jar, fix it. To do this, fill in the gaps on the sides with hot melt glue, and wait until it has completely set.
- Attach the switch to the lid and connect the power wires to it. You can glue it on too.
- Connect all the wires to the switch, the connection diagram is standard. You can use an ammeter for accuracy.
- After you attach the wires, they need to be insulated with electrical tape or hot melt glue.
- Screw the lid to the jar and on the other side of the drill.
The good thing about the finished mini drill is that it can run on battery power, as well as on electric power. We looked at assembling a universal model.
Naturally, it’s not going to be easy to assemble such a drill with your own hands if you don’t have any electrical skills. Below we suggest you consider options for assembling simpler drills for small household needs.
How to assemble with your own hands a drill based on the body of the pen
One option for the simplest drill is a homemade device based on an ordinary ballpoint pen.
To make it, you will need the following materials: a ballpoint pen; a drill with the required diameter; thermal glue; a strong stick with handles on the end, with which it can be rotated.
Particular attention should be paid to the choice of handle for making your future drill, and specifically, its body, because during the work the main load will fall on the body.
- It must be as strong as possible to withstand the stresses;
- The best option is a body based on quality metals;
- if you do not have a handle with a metal body, choose a handle based on thick plastic.
The assembly process is as follows:
- Disassemble the pen until only one body remains.
- The lower part of the body, where the writing stick usually sticks out, must be unscrewed.
- Instead of this part, insert the drill in the body in such a way that its working part sticks out from under the bottom, and the second part is inserted into the hole that is in the stick.
- The wand is inserted into the body at the same time as the drill.
- To make the construction of the drill whole, it is fixed to the wall of the housing with hot melt glue.
- When you twist the mechanism by the special knobs, the drill will rotate, providing the desired work by pushing on the body of the knob.
Making a drill based on a toothbrush
Electric toothbrushes are very handy to use, but they are impractical in the sense that the bristles on them can not be replaced and after using, this expensive device, as well as a simple brush, have to be thrown out.
But you can not do this, using the body of an electric brush to make a drill with their own hands.
Take an old electric brush and saw it all the way down to the body. Next, you need to connect the motor shaft to the drill bit with a collet clamp, which must be purchased separately.
Special cam: a modern replacement for any collet chuck
Today, anyone can easily purchase a special cam for any type of drill. You can do this both in construction boutiques that provide equipment for sale, and online (on auctions such as Ebay or Amazon).
Such a cam will be screwed onto the threaded connection of the rotary shaft. The more the cam is screwed in, the stronger it compresses the drill placed in it.
Buying a cam will save you forever from finding the right collets to use different drill bits.
Of course, it is better to buy a cam made of high-carbon steel. To tighten it, it is recommended to use the special wrench that is included in the set.
- Learn about how you should connect the photoelectric relay to the lighting fixtures in your apartment.
- Recommendations for choosing a construction lamp, without which the electrician can not work effectively at the site. https://euroelectrica.ru/kak-vyibrat-stroitelnyiy-fonar/
Read also: How to make a chain saw with your own hands
Technical advisor Anton Pankratov will demonstrate the above technique of making a homemade collet on a
Collet chucks are a type of lathe chucks. They hold the workpiece during machining at high speed. There are several types for different workpiece shapes, machining types and uses. Collet chuck, unlike quick-clamping chucks (QCL), does not require any additional attachments such as pins, screws, or stops. This is why it is also called a self-clamping collet. This simple and reliable device is widespread in the equipment of lathes. The most common collet type is ER.
The economical version without the case
The most budget model of mini drill is a regular electric motor, to which the power unit is connected through the wiring without a housing. You need a power supply for a 12-volt motor, which consists of a 30-watt transformer and a rectifier bridge, for example, on a diode 1N1007.
To prevent the motor from the pulsating oscillations of the winding in the process of rectifying the voltage you can include in the circuit a simple capacitor, up to 25 V with a capacitive characteristic of 1000 microfarads.
The circuit works reliably, but with increasing load, for example, drilling out dense material, the voltage will drop, leading to a stop rotation. The voltage can be stabilized by adding stabilizers in the circuit KR142EN8B or L7812CV
After the drive unit is ready, you make or buy a chuck. for home drilling of miniature holes, even a rod from a pen, in which the glue is fixed drill. Also the chuck can be replaced by the previously suggested collet or screw terminal.
What to make from
A lot of video material is available on the internet for making home-built models of miniature devices. The most popular designs of mini drills present the following list:
- CBM from an electric cartridge.
- Full analog of the factory “dremel”.
- Drill from a toothbrush.
- MD from a printer drive.
- Economical version without housing.
- The second life of an old tape recorder.
- Idea with antiperspirant.
CBM from an electric socket
Antenna for digital TV with their own hands
Every home has an electric socket for a light bulb. The housing can be made out of it. Standard bulb sockets and housings for mignon bulbs can be found. Both are suitable for selfmade. Everything depends on the outer diameter of the electric motor.
Fabrication proceeds as follows:
- The core of the hardware is removed.
- Unscrew the back cover.
- A motor is inserted inside the housing, the side surface of which is covered with hot melt glue or cold welding.
- Adapt the thickness of the shaft to the size of the hole of the collet.
- On the front of the case glue a polymer cover from a plastic container. Pre-cut a hole in the lid for the passage of the motor rod.
- The cartridge is secured to the shaft with a locking cross screw.
- Wires of the motor are put through a hole in the screwed cover, which then connect to the output terminals of the rectifier.
- If a microswitch can be placed in the back cover of the electric rectifier, it is easy to use the drill.
Note! Use the rectifier regulator to change the current and voltage and thus increase or decrease the rotation speed of the function tool. It should not be forgotten that when exceeding the allowable current values, there is a risk of “burning” the motor.
Full analog of the factory-made “dremel
Mini drill is often called dremel by the name. the leading manufacturer of this type of power tools. It’s almost impossible to make a fully analogous “Dremel” model.
It all depends on the master in terms of selection of spare parts. Making a homemade DIY in your home workshop will never compare to a professional CBM production. Although with some effort you can achieve some success in this direction.
Tip. Don’t blindly copy an industrially made model. It is better to buy a ready made tool.
Drill from a toothbrush
Those who have used electric toothbrushes know how quickly the cleaning heads wear out, and new brushes are impossible to find on sale. If one is stashed in the household, it is a suitable option to make a mini drill.
The difficulty of making it is to remove the vibrator and install the chuck on the motor shaft. The device is powered by a battery or rechargeable 18650. Such a device will not have a large number of revolutions of the motor shaft. But MD will serve well as an engraving tool.
The dynamo from the printer drive
An old printer is an excellent “supplier” of parts for making a mini drill. Remove the motor and the power supply from the device. If the shaft of the electric motor is too thick, it is ground on a grinder. The motor is turned on and brought to the abrasive. Measuring the diameter at regular intervals, the machined rod is adjusted to the opening of the collet chuck. After completing all the work of installing the housing, fixing the chuck, installing the limit switch, the device is connected to the power supply unit. After that, it remains to install the necessary functional attachment and get to work.
Engine from an old printer
Economical version without housing
In order not to search for a suitable product for the drill housing, the motor is wrapped in 2 layers of heat shrink film. The heated coating seals the side of the motor and insulates the power tool reliably.
Mini drill without housing
A second life for an old tape recorder
The thrifty owner can find an old tape recorder or player. If the sounder is made in a stationary form, use the power supply unit, as in the previous case.
A motor from the player is also adapted to rotate the cartridge with the nozzle. The device will be mobile, because instead of batteries in the power supply put powerful AA batteries.
The electric motor from a tape recorder
Idea with antiperspirant
The body from the used ball deodorant is quite suitable for making a mini drill. The advantage of this option is the shape of the plastic bottle. It is made so that it is convenient and firmly held in the hand.
Deodorant ball casing
Further information. When making the MD’s case, try to place the trigger in the thumb reach of the employee’s hand. This will create an additional comfortable option to control the device.
What to make it out of
A lot of video materials on making homemade models of mini devices can be found on the Internet. The most popular mini drill designs present the following list:
- Connecting the CBM from the electrical cartridge.
- Full analogue of the factory “dremel”.
- Drill from a toothbrush.
- CBM from a printer drive.
- An economical option without the housing.
- The second life of an old tape recorder.
- The antiperspirant idea.
CBM from electric chuck
The antenna for digital TV with your own hands
In every home you can find an electric socket for a light bulb. It can be used to make a body. There are standard cartridges and housings for mignon bulbs. Both are suitable for homemade. Everything depends on the outer diameter of the electric motor.
It is made in the following way:
- The core of the fittings are removed.
- Unscrew the back cover.
- The motor is inserted inside the case, the side surface of which is covered with hot melt glue or cold welding.
- Fit the thickness of the shaft to the size of the hole of the collet clamp.
- On the front of the body glue a polymer cover from a plastic container. Pre-cut hole in the lid for the motor rod passage.
- Fix the cartridge to the shaft with the locking cross-head screw.
- The motor wire is fed through the hole in the screw-on cover, and then connected to the output terminals of the rectifier.
- If you are able to put a microswitch in the back cover of the electric cartridge, it will be convenient to use the drill.
Please note! Voltage and amperage levels are changed with the rectifier controller, allowing the speed of the function tool to be increased or decreased. It should not be forgotten that if you exceed the allowable current values there is a risk to “burn” the motor.
Full analog of factory-made “dremel
Mini drill is often called dremel by the name of the leading manufacturer of this type of power tool. It’s almost impossible to make a do-it-yourself model, completely analogous to the “Dremel” model.
It all depends on the master in terms of the selection of spare parts. Making a self-made device in the conditions of the home workshop will never compare with the professional production of CBM. Although with some effort it is possible to achieve some success in this direction.
Tip. You shouldn’t blindly copy an industrial model. It is better to buy a ready made tool.
Drill from a toothbrush
Those who have used electric toothbrushes know how quickly the cleaning heads wear out, and new brushes are impossible to find on sale. If you have one in the household, it’s a good way to make a mini drill.
The complexity of making is to remove the vibrator and install the chuck on the shaft of the engine. Battery or 18650 battery-powered. Such a device will not have a large number of revolutions of the motor shaft. But CBM will serve you well as an engraving tool.
A dynamo from a printer drive
An old printer is an excellent “supplier” of parts for making a mini drill. The motor and power supply are removed from the unit. If the motor shaft is too thick, it can be turned on a sharpening machine. Motor is turned on and brought close to the abrasive. Measuring the diameter at regular intervals, the machined shaft is adjusted to the diameter of the collet chuck. After all the work to install the housing, fix the chuck, install the limit switch, connect the device to the power supply unit. After that, all that’s left is to install the desired functional attachment and get to work.
Engine from an old printer
Economical version without housing
In order not to be engaged in search of a suitable product for the body of the drill, the motor is wrapped in 2 layers of heat shrink film. The heated coating tightly covers the side surface of the motor, thus creating a reliable insulation of the power tool.
Mini drill without housing
The second life of an old tape recorder
The thrifty owner can find an old tape recorder or player. If the sound-producing device is made in a stationary form, the power supply unit is used, as in the previous case.
A motor from a music player can also be adapted to rotate the chuck with the nozzle. The device will be mobile because they put powerful finger rechargeable batteries in the power supply instead of batteries.
Electric motor from a tape recorder
Idea with antiperspirant
The casing from a used ball deodorant is quite suitable for making a mini drill. The advantage of this option is the shape of the plastic bottle. It is made so that it is convenient and firmly held in the hand.
Deodorant ball casing
Further information. When making a PD body, one should try to place the trigger in the area accessible to the employee’s thumb. This will create an additional comfortable option for controlling the device.
Cam lathe chucks
The most convenient and functional. Operate both compression and uncompressing, so they can grip the workpiece from the outside as well as the inside. They differ in the number of cams and their drive mechanism. Unlike in metal turning, the two- and three-jaw chuck is almost never used for turning wood. Also not popular are variants with spiral drive and non-removable cams. The most common type of wood turning chucks are self-centering four-jaw chucks with a rack-andscrew mechanism and interchangeable cams. In Russian market they are supplied by Axminster, Jet, Barracuda and other, less known companies.
Cam lathe chuck
Four-jaw lathe chuck Ø150 mm
Four jaw turning chuck Ø100 mm
Types of jaws
By form and purpose, replacement cams for wood turning chucks are divided into several types with special markings:
- A, G, M. for compression, differ in size and depth of grip;
- D and F. act on unclamping;
- C and H. universal. Different shape of jaws;
- If you work with soft, compression-sensitive wood, use cams with rubber mounts.
Economical version without housing
Let’s go to the creation of a mini drill with minimum costs. We don’t buy anything except the motor itself (though you can find it for free in old appliances). Most compact electric motors are designed for 12 volt DC voltage. For it and create a power supply.
Since there will be no additional options (speed regulator, voltage regulator), the power supply is stabilized by the constant load. A typical 12 volt micromotor operates with a current not exceeding 2 amps. A simple calculation shows that the output power should be 24 watts. Add 25% rectification losses, you get a 30 W transformer.
To get 12 volts on load, you need to remove 16 volts from the secondary winding. You can make such a transformer in an hour, from any unnecessary power supply. Then. rectifier bridge on any diodes: for example, 1N1007.
Our motor does not need the ripple rectified voltage, so at the output connect an electrolytic capacitor at 25 volts with a capacity of about 1000 uF. It will smooth out the output current. Despite the simplicity, such a tandem works steadily, with only one drawback: when the load increases the voltage drops. That is, if it rotates evenly. the power supply outputs 12 volts. And if you’re drilling “heavy” material. you need to monitor the speed, not letting it drop. Otherwise, the shaft will just stop.
You can slightly complicate the circuit of the power supply by adding a suitable voltage regulator. For example, the KR142EN8B or L7812CV.
In this case there will be no voltage drop with the drill load.
Next you need to make a fairly accurate element of the design. a drill chuck. If you don’t want to spend money on a collet clamp, any bushing will do. It all depends on the application of the mini drill:
- If you will be drilling only printed circuit board textolite then there is no need to change the drill bit. So we mount it permanently. The adapter sleeve can be made from anything you like: a tube from a telescopic antenna, a needle from a medical syringe, a rod from a gel pen.
Given the miniaturization of the design, no clips are needed. You can fix it with glue or duct tape.
- If you want to make a multi-purpose drill that changes drills or sets other bits, a universal collet chuck is the better choice.
- You can use a standard jaw chuck by mounting it on the shaft with an adapter sleeve.
Design of the housing depends only on your imagination. Most craftsmen leave the “bare” utilitarian design: the supply voltage is safe, the size of the motor allows you to hold it in your hands without the housing.
If you want basic aesthetics. a lot of options: all of them conditionally free.
Handmade materials for your hands mini drill
There are many alternatives for using your inventive skills to create a mini drill with your own hands. The bases for the creation of such tools can be:
- Disk drive from a DVD;
- A motor from an old electric razor;
- An electric toothbrush;
- Glue gun handle with a suitable motor;
- A non-working electric screwdriver;
- Washing machine motor;
- An old hair dryer;
- Plastic tube.
All of these seemingly unnecessary little things can serve you well and become the main detail for creating the necessary tool.
Important! When working with a homemade mini drill, try to keep the drill perpendicular to the work surface. This keeps the drill from breaking and prolongs the life of your appliance.
The boron machine for small jobs with your own hands
The boron drill has long ceased to be solely a professional dental tool. Today, the drill with a flexible shaft is actively used for small decorative work, sanding, polishing, cutting various products.
You can make a rotary drill with your own hands like a mini drill.
In this case, it should be noted that for the quality work of the homemade machine will need a fairly powerful motor. So, for power drills great suit the motor on 18V from an electric screwdriver. The easiest way to make an engraver is to use an old blender.
To make a drilling machine you will need:
- Disconnect the upper part of the blender from the working part;
- Using a stationery knife, remove the rubber overlay on the button, and with a screwdriver, unscrew the screws located underneath it;
- With a screwdriver, from the side of the power cord, pry open the top cover of the housing, and carefully remove it;
- Remove the circuitry connected to the power cable from the blender housing;
- Remove the plastic part above the spinner from the housing;
- Remove the plastic tip from the shaft of the electric motor;
- Measure the diameter of the shaft with a caliper (if you don’t have one, a paper ruler will do);
- Clean the housing of the electric motor from oil and degrease its surface with an alcohol wipe;
- Put an appropriately sized collet chuck on the shaft;
- Install a push-button mechanism in place of the power button, which controls both turning the device on and off;
- Build a blender.
Parts for making a blender can be found at a flea market
Hand-operated rotary tool is ready! This tool will be powered through a power cable with a plug. You can also power the tool with batteries, but then the batteries will need to be replaced or recharged from time to time.
Flexible shaft for the drill with their own hands
If you need to transfer the rotation of the motor of an engraver, drill or boron to the nozzle, you will need a flexible shaft. This device consists of a flexible armor wire, stranded in several layers, and
can significantly expand the functionality of the rotary tool. You can assemble the flexible shaft yourself.
- Brass tube;
- Two M4 threaded bushings;
- An electrode shaft (5 mm diameter) with an M5 thread;
- The adapter from the internal thread M5 and external thread M8 to 0,75;
- Quick-clamp mini screwdriver;
- Clamp made of an axially drilled M12 bolt;
- Protector for the connection.
Assemble the flexible shaft. To do this, insert the shaft of the electrode into the brass tube and put the sleeves M4 on both sides of the tube. Screw the adapter from one side of the tube onto the sleeve and put the mini-mounting screw on top of it. On the reverse side of the tube, we place the clamp, with which we connect the shaft of the electrode with a flexible. You can grind the heads of the screws on the clamp for convenience. Put a special brass guard on the clamp, and fix it with fasteners. Insulate the connection. The flexible shaft is ready! For convenience, on the side of the chuck you can place a clamp with a plastic handle.
Mini drill with my own hands
All homemade mini-drills that you can make yourself can be divided into electric (driven by an electric motor) and manual mini-drills (manually rotated). The first option has significant advantages due to autonomous operation, but at the same time, you need both a motor and a power source for it. The second variant of mini drill requires neither power nor electric motor, and is therefore much easier to make if all necessary materials are available. Once you have chosen which type suits you best, you can move on to making it.
Electric
Note right away that this is exactly a reduced version of the classic device for drilling, so the work that can be performed with a mini drill is limited to plastic, circuit boards, plywood, soft wood. It can not work on steel workpieces and concrete, so the power of the device is relatively small.
What you need for an electric mini drill?
Each of us at home can find a huge number of hand-held appliances that we no longer use, but they can still be used to create a mini drill.
To assemble such a tool yourself you will need:
- A small motor. this is the most important part, because the capabilities of the mini drill will directly depend on its parameters. The most suitable options are engines from old hairdryers. they have good enough power and speed from 1000 to 1800 rpm, and hair dryers themselves are often sent to the category of junk even with a working engine. Also a good idea a motor from a blender or mixer (they can leave the body), from a tape recorder and children’s toys motors are less powerful, but for the mini drill quite suitable.
- Power source. depending on the type of device, the motor can be powered from 220 VAC, and from a reduced voltage of 6V DC. In the first case, it is enough to plug it into a socket through the power cord. If the motor runs on DC with a rated voltage of 3, 6, 12 volts, you will need a power supply with conversion to the appropriate level or several batteries.
- Chuck. a normal socket from a defective electric screwdriver or small drill would be perfect for the mini-drill. But not everyone can afford such luxury, so the universal option is collet. part for round elements clamping or self-made sleeve made of metal tubing with bolt clamps.
-
Casing. the main function of the casing is to protect both the device itself from clogging and external influences and also the human being by isolating the electrical part of the mini drill from the hands. Therefore, plastic parts, such as deodorant jars, plastic water pipes, housings from old flashlights, etc., are excellent for use as a casing of the mini drill. The issue of insulation is particularly relevant for devices powered from 220 V mains, if the drill is powered from a safe low voltage of up to 42 V AC and 110 V DC, the housing can be made from metal pipes, cylinders, etc.д.
How to make a collet chuck by yourself
In the manufacture of various products with their own hands there are situations when the available tooling does not allow to perform the necessary operations. It is required to make a collet chuck, which meets the requirements with the fulfillment of the product according to the developed sketch.
All works must begin with preparation of a sketch with elaboration of all necessary details. The chuck sketch allows you to take into account all the features in the manufacture of the necessary tooling and clamping mechanism with your own hands.
When making collets with their own hands, it is necessary to take into account several peculiarities:
- collet inside diameter is equal or less than the minimum diameter of the workpiece;
- In the collet, it is possible to increase the inner diameter by expanding the lugs;
- to increase the production of split collets after dilution and to improve the quality characteristics, additional grinding of the conical and guide part of the collet is necessary;
- Bear in mind that in the course of prolonged work the elasticity of the blades of chucks is lost and can cause a breakage.
Economical variant without housing
The most budget model of mini drill is the usual electric motor, to which the power unit is connected through the wiring without the housing. For 12-volt motor you need power supply, consisting of 30-watt transformer and rectifier bridge, for example on the diode 1N1007.
To protect the motor from the pulsating oscillations of the winding in the process of rectifying the voltage will allow the inclusion of a simple capacitor, up to 25 V with a capacitive characteristic of 1000 microfarads in the circuit.
The circuit works reliably, but as the load increases, e.g. when drilling through dense material, the voltage will drop, causing the rotation to stop. The voltage can be stabilized by adding regulators on the KR142EN8B or L7812CV
After the drive unit is ready, make or buy a chuck. for home drilling miniature holes can even fit a rod from a pen, in which the glue is fixed drill. Also the chuck can be replaced by the previously suggested collet or screw terminal.
Another modification of the mini drill
Consider the version of the creation of a mini drill with his own hands using as a container from antiperspirant. First, find a suitable size motor, a cassette from a tape recorder is the best option.
Cut a hole in the housing for the button (use the switch from an old portable phone as a button), cut off the bottom and make a suitable outlet in the lid for a chuck or collet.
Insert the motor with the chuck attached to the cut bottom into the housing. If you have sized the motor to the size of the housing, you won’t need glue. Put on and screw on the cover.
It remains to connect the button and power supply. After all circuits are closed, secure the button in the hole made.