Revitalizing an electric screwdriver. electric screwdriver conversion to lithium-ion 18650 batteries
The battery of an electric screwdriver sooner or later will get “tired” and need to be replaced. Buying a new battery is justified in a situation where the tool costs a penny. But if you have something more or less decent, or the battery is old on Ni-CD, then it definitely makes sense to change the dead 18650 batteries for new ones or completely convert the screwdriver from nickel to lithium.
Of course, as in any case, there are nuances, but if your hands are at least minimally straight, then independently convert the electric screwdriver to lithium is not difficult. You just need to know what to buy for conversion and understand the basic nuances of the process. And to buy everything for converting your electric screwdriver to lithium on aliexpress is elementary.
Why 18650 Li-ion? The advantages of lithium batteries are obvious:
1) An electric screwdriver requires high-current 18650 batteries (ideally Sony/Murata VTC5, VTC5A, VTC6. Acceptable: Samsung 25R), or less high-current batteries connected in parallel (if space allows).
2) You categorically can not use old laptop batteries and just different batteries. All assembled 18650 batteries must have minimal disparity in capacity and other characteristics. Of course, buying a high-current 18650 battery on aliexpress is the easiest solution. Just take into account in advance that the model name will not have anything to do with the cell inside. 4 batteries purchased in one lot from the same seller may differ significantly in capacity and internal resistance. Although the link below is a good option for those who do not want to solder.
Ideal option. Buy 18650 from a trusted seller on the same avito, or order 18650 on nkon In the latter case, you have to pay 10 euros for shipping, but the batteries will be 100% original and much cheaper than buying locally (which will reduce shipping costs to zero). I personally for many years I buy batteries in this store.
I did an article on how to choose a 18650 lithium-ion battery, if interested. read it here
3) The batteries are connected to the BMS board in a strictly sequential order: first 0V, then 4.2V, 8.4V, 12.6V, 16.8V. Will not work if BMS is broken!
4) The 18650 batteries in the assembly should be charged equally. It is best to charge each battery separately and then assemble.
5) How to calculate how many 18650 lithium batteries you need instead of nickel batteries? In general, the calculation is: 2-3 NiCd = 1 lithium, 5-6-7 NiCd = 2 lithium, 8-9-10 NiCd = 3 lithium, 11-12-13 NiCd = 4 lithium
6) Lithium batteries are very afraid of overheating. Ideal is spot welding. Soldering works quite well too. How to solder 18650? The most important thing is that you need as big a stinger as possible. Keep the contact time between the stinger and the 18650 battery to a minimum and not overheat the latter. Otherwise the process is the same as any other soldering. It’s best to get your hands on those old batteries that you will be replacing.
Aliexpress promo codes for July 2020.
So, current aliexpress promo codes for July2020. If they don’t work, see coupons and other ways in my updated list of coupons and promo codes.
Let me remind you, they add up with vendor coupons and special coupons, but not with Aliexpress coupons.
LIVE293, LIVE664, LIVE469. discount 250 (3.9) for orders from 2000
ENJOYAEPLUS. 350 off on orders of 4,000 or more for items marked Plus
BMS board
BMS (Battery Management System). a battery management system. BMS card is extremely important when you convert your electric screwdriver to lithium. Why it’s needed and how it works? It controls the charge and discharge, preventing the electric screwdriver battery from overdischarging and overcharging, and it has a built-in “balancer” that charges each Li-Ion battery separately in the assembly. The latter is extremely important! There are BMS’s without a balancer! 3S. 12v, 4s. 14v, 5s. 18v To choose a BMS board, note that the minimum current must be 30A, otherwise it will go into protection.
The BMS board option at the link is 2-3 more expensive than some basic versions, but you get 100A instead of 30A or 40A. In my opinion, in terms of functionality this is the best BMC board from aliexpress and deserves this token overpayment.
But is this a good replacement??
This point is worth mentioning. For the electric screwdriver user, the installation of lithium-ion batteries opens up some previously inaccessible “features”:
- 1. It is possible to recharge batteries after a short period of work, it will not reduce their capacity;
- 2. Batteries will work a greater number of charge-discharge cycles. When the resource is exhausted, they can be easily replaced.
- 3. Charging will be many times faster (about 1-3 hours, vs. 13-15 hours for nickel-cadmium batteries).
- 1. Lithium ion batteries are more expensive. You will have to pay 250 to 500 for one.
- 2. The next disadvantage is their fastidiousness to charging. they do not tolerate neither overcharge nor overdischarge and, frankly, it is better to charge them with a “smart” charger, which, when reaching a certain voltage, reduces the current supplied to the batteries.
Peculiarities of recharging
In most models, at least “Interskol”, “Makita”, “Hitachi” presents universal mechanisms. This means that the charger is designed to power Ni-Mh and Li-Ion type batteries.
Features are related to the capacity of the batteries. New and replacement products must match each other. Otherwise a failure or interruption of the circuit will occur, which is indicated by an indicator. Red and green lights flash simultaneously when overloaded or disconnected.
In the situation when the charger is not universal, it needs to be converted, as well as the power supply unit. The process depends on the type of charger and the manufacturer, involving almost complete unsoldering of the board elements, installation of the capacitor, resistors and their subsequent adjustment.
Along with this there is a universal way of transforming DC/DC. It is connected to the use of a BMS board, which stabilizes the input voltage and current. It is labeled DC-DC StepDown on the market, and there are tweaking resistors directly on the board. The module was soldered into the charger circuit, using the P and P- connections on the board and the old charger terminals.
Wiring methods for joining battery cells
An energy storage block is assembled in one of three ways:
- Spot welding. If you don’t have a welding machine at home, you can call in a specialist. This technique of connecting elements in a block is the most preferable.
- Soldering. Every home must have a soldering iron. But when soldering you should do it very quickly, because the solder cools down almost instantly. Avoid prolonged heating of the batteries. High temperatures will damage the cells. If you do not have soldering skills, it is better to entrust the work to a specialist.
- The tapes. An alternative, but not the most reliable method. The contacts obtained in the process will have a significant transient resistance. So, you must be prepared for the fact that at high currents it will quickly destroy. Using special tapes you can quickly connect the batteries in a block.
To sum up the voltage and not change the capacitance value, it is necessary to connect the elements in series.
Conversion to 12 volt lithium batteries
The above method applies to all batteries. Voltages are determined by power supply parameters. The differences are related to the number of batteries. The bulk of the transformation manuals refer to 14V units, where 4 lithium 18650 batteries are used for replacement. For a 12 volt device, that’s a lot of batteries. Three 18650 batteries will be enough here.
18 volt lithium battery conversion
A similar approach applies to 18 volt products. Here the differences are also related to the number of batteries. The battery consists of 5 units of 18650, which gives it an ultra-efficient performance. If the work process is too intensive, the electric screwdriver even reeks of burning. That is why the 5th battery is often removed afterwards.
Lithium Batteries
Next I bought 10 lithium batteries and put them together into batteries of 2 in parallel and then connected the 5 resulting units in series. Batteries were connected to each other by soldering with pre-tempered copper plates. There is one basic rule for soldering. don’t overheat the battery! So solder with a strong soldering iron and as fast as possible in 1-2 seconds. If it is not possible at once it is better to wait and not to boil the battery.
The consequences of overheating can lead to fire and burns. Be careful!
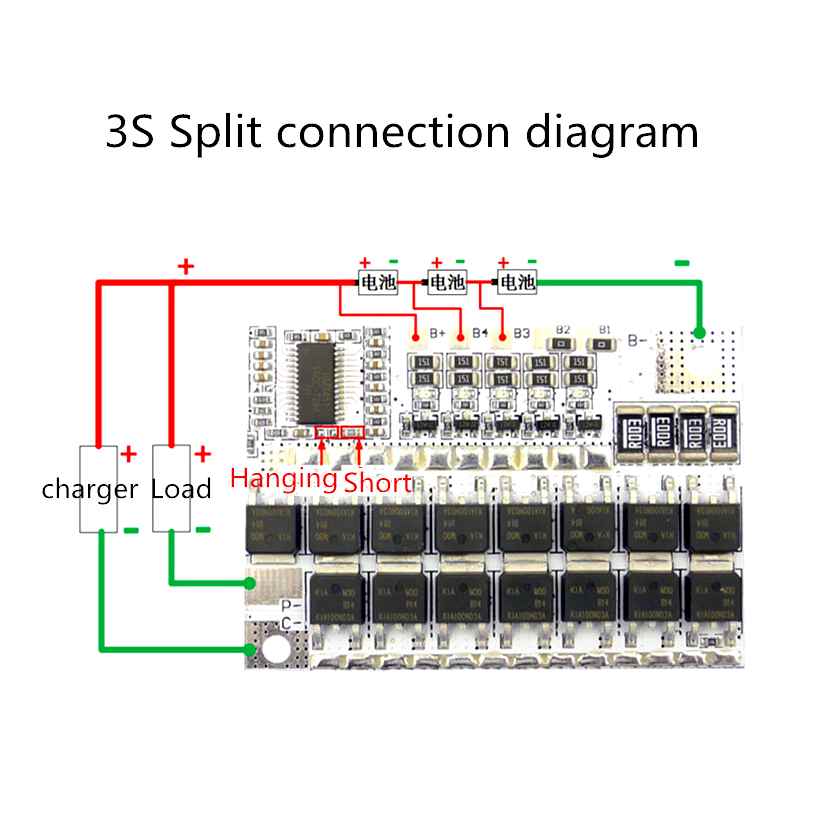
Who has a spot weld. there will be no problem with the connection. The result was a 21V battery with a capacity of 5.2Ah. The connection of the battery to the control board is shown in the figure.
Then everything is packed into the case and tested under load.
I have built in an LM2596 module in the standard battery charger. The power supply should be a couple of volts more than the voltage of the charged battery. Set the idle voltage to 21V. Then connect the battery and set the charging current of 0.8 A. Why not? Because I found a 24V power supply with max. with a current of 0,8 A. I didn’t need to buy it specially. It is better to let it charge longer. This is not a production version, but a home version of the tool.
In the process of charging revealed a small minus. When the battery reaches full charge voltage, the charger must switch from phase CC to phase CV. That is, firstly the battery is charged with the current set (0,8A in my case), and when you reach 21V voltage is maintained at this level, and the current gradually decreases to 0,1Iust (in my case 0,08A, set the middle potentiometer). At this point the charging process stops. On this module, it is signaled by the middle LED, but it only indicates that the battery is ready to work, but in fact charging continues, that in principle is not critical. the battery will not overcharge anyway. And the problem is that because the control board has its own protection against overcharging, it shuts down the charger before it reaches phase CV.
To get around this the charger module voltage had to be reduced to about 20.7 to 20.8V. The CV phase starts earlier, but in any case the battery is charged more fully than without it at all. If you do not know about this small disadvantage, then you will not notice the difference in operation.
All in all, I like the finished device. Compared to before you get the feeling this electric screwdriver won’t charge. Specially for the site Radioschemes. SssaHeKkk.
Forum to discuss the material FOR CONVENTION OF THE SHURUPWHEATER ON LITHUANIAN BATTERIES
What are OLED, MiniLED and MicroLED TVs. A brief overview and comparison of technologies.
Makeshift 0.1 Hz function generator. 100 kHz on the ICL8038 chip.
Review of the electromagnetic gun from the Chinese set for self-assembly.
Turning a toy regular tractor into a radio-controlled. Photos of process and result.
Modification of the electric screwdriver to Li-ion without BMS
Many craftsmen have a cordless electric screwdriver on duty. Over time, the battery degrades and holds less and less charge. Battery wear and tear has a big impact on battery life. Constant recharging does not help. In this situation it helps to “repack” the battery with the same cells. The most commonly used cells in electric screwdriver batteries are of the “SC” type. But the most valuable in the master, it is a repair with their own hands.Let’s convert an electric screwdriver with a 14.4 volt. Screwdrivers often use a motor for a wide range of supply voltage. So in this case we can use only three Li-ion 18650 cells. I will not use control boards. The discharge of the cells will be visible in the work. As soon as the screwdriver does not tighten, for example, it is time to put it on the charge.
Converting an electric screwdriver to Li-ion without a BMS board
First we disassemble our battery. Inside it there are 12 elements. 10 pieces in one row and 2 in the second row. The contact group is welded to the second row. We keep a couple of elements with a contact group, and recycle the rest.
Now we have to solder the wires for the rest of the work. The contacts are from a material that can not be tinned, so we solder the wires to the cells. The minus to the cell body, and the plus directly to the plus stud. The old parts are just like plugs, they don’t work.
I will use lithium-ion 18650 batteries. Elements are buu. I need high-current cells for rework. I used Sanyo shrink-wrap to “change” my cells, the old one was pretty worn out. Checked the residual capacity Imax.Connecting batteries in series and soldering head cells. The battery is almost done.
Now we will provide comfortable charging. It is necessary to install a connector for four contacts. I used the connector from an old motherboard for just the right number of pins. The mating part is from an old computer power supply.
Cut the hole for the connector. Fill the connector with epoxy or superglue and baking soda. I also solder the wire.
Solder the wires to the elements. The wire from the first contact of the connector to the plus battery. The wire from the second contact of the connector to the plus of the second element, the same minus of the first item, and so on. Since I will be charging with a “smart” charger, I need to make a balancing wire.
As a connector to connect to the charger, I will use the wire from the computer power supply. The wire that powered the floppy disk drive. Cut off all the keys from the connector and it fits perfectly under the charger. Easy to solder. Red wire to the first terminal of the battery connector. The black wire to the second terminal of the battery connector and so on. д.
Connect it to the charger and do not forget about the power wires. The wire we have is the balancing wire. We set the balance on the charger and wait for a full charge.
Protection for the battery and modification of the battery controller.
With the batteries disassembled, we continue our conversion of the battery of an electric screwdriver for Li-ion.
Lithium needs a protection controller. Which will protect the battery banks from overcurrent, overdischarge, overcharging, as well as balance the bank when charging.
From those that I have tried in terms of value for money, I like this controller better.
It works fine. It can handle the load. But there are some disadvantages. The protection is not automatically removed. To unbalance it, you need to apply voltage to the battery or just put it on the charge for a couple of seconds.
The second drawback on some screwdrivers can trigger protection when the trigger of an electric screwdriver, and in general it is not set up for our banks (which can easily handle currents and larger), but based on the datasheet on the key transistors (which are also designed for a larger current) battery protection controller it can be loaded.
Both defects I corrected as follows.
Modification of the lithium battery controller. On the picture of the circuit board we can see two diode resistors marked R010. Their rating is 0.01 Ohm each. They set at what current the load will be triggered by the protection.
I added another resistor like this 0.01 Ohm for the battery controller. schematic. You can also add a film capacitor to it, just useful for not triggering the protection when the trigger is pulled sharply.
The upper part of the circuit is responsible for the “Power” mode. The transistor switches don’t work at all when the trigger is on and there is no load on them. But so are the protections. So it’s better not to use this mode.
The 15 Amp fuse in this mode protects the current. We put it to our liking. The diode is more powerful. I have two parallel 6A pulse diodes (12A together), whatever I have got.
You can connect a small digital voltmeter, such as this, to monitor the discharge control.
Instead of a voltmeter I connected a homemade discharge indicator tuned to 12V. Its actuation coincides with the actuation of the protection board when it works in normal mode.
For clarity I have connected a discharge indicator (on the schematic it is a voltmeter) parallel to the LED with 2Kohm resistor to see immediately if the “Power” mode is on.
I practically do not use the “power” mode with my electric screwdriver but I need it to get rid of the overload protection. Just toggle it on and off and you’re good to go.
This is how I got the switch to the “Power” mode. It is also used to reset the protection.
At the back of the circuit are two indicators. A red LED indicates that the “Power” mode is on. The yellow light comes on when the “Power” mode is on, when the battery is down to 12 volts.
Also added a socket. USB with battery voltage. The main thing that no one by mistake did not put the phone to recharge:) I use at the construction site to listen to an adapted receiver and LED lamp.
For a month I’ve been testing the new lithium battery reconfiguration, now I like it. The battery doesn’t run out for a long time. The screwdriver can easily handle heavy loads.
There is only one more thing to do. Fast charging, like the top models:)
How to rebuild and assemble?
Often the craftsman already has an old cordless electric screwdriver that suits him completely. But the unit is equipped with outdated nickel-cadmium batteries. Since the battery needs to be replaced anyway, it makes you want to replace the old battery with something newer. Not only will it provide more comfortable operation, but it also eliminates the need to search the market for batteries of an outdated model.
The easiest thing that comes to mind is to assemble in the housing of the old battery power unit from an electronic transformer. You can now use an electric screwdriver by plugging it in to a household power outlet.
14V models.4 volt can be connected to car batteries. If you assemble the adapter-extender from the casing of the old battery with terminals or the cigarette lighter plug, you get an indispensable device for garage or work “in the field”.
If we are converting an old battery pack to lithium, we can take into account the fact that lithium cells of the 18650 standard are extremely widespread on the market. This way we can make batteries for an electric screwdriver based on readily available parts
over, the prevalence of the 18650 standard allows you to choose batteries from any manufacturer.
It is not difficult to open the casing of the old battery and remove the old stuffing
It is important not to forget to mark on the housing the contact to which the “plus” of the old battery pack was previously connected
Depending on the voltage at which the old battery was designed, you must find the number of lithium cells connected in series. The standard voltage of a lithium cell is exactly three times that of a nickel cell (3.6 volts instead of 1 volt.2 В). So each “lithium” replaces three “nickels” connected in series.
By providing a battery design in which three lithium cells are connected one after the other, it is possible to have a battery with a voltage of 10.8 volts. It is very common among nickel batteries, but not very common. If you daisy-chain four lithium cells, you get 14.4 volts. This would replace the nickel battery with both a 12 volt and a 14.4 volt are very common standards for nickel-cadmium and nickel-metal hydride batteries. It all depends on the particular model of electric screwdriver.
After you have managed to determine the number of consecutive steps, you will probably find that there is still room in the old case for. This will connect two cells in parallel in each stage, doubling the capacity of the battery. Nickel strip is used in production for connecting lithium batteries to one another. Tape segments are connected to each other and to lithium cells by contact welding. But soldering is okay in the home.
Solder lithium cells with extreme care. Thoroughly clean the connection area and apply good flux beforehand. Soldering is done very quickly, with a well heated soldering iron with high enough power.
Soldering itself is done by quickly and surely heating the connection point of the wire to the lithium element. To avoid the dangerous overheating of the cell the soldering time should not exceed three to five seconds.
Good thing that now there are ready-made electronic control and balancing modules at fairly low prices. It is enough to choose the solution that suits your needs. Basically, such controllers differ from each other by the number of “stages” connected in series, the voltage between which is to be equalized (balancing). In addition, they differ in the allowable load current and the way of controlling the temperature.
In any case, you can’t charge a homemade lithium battery with an old nickel battery charger now. They have fundamentally different charging algorithms and reference voltages. You’ll need a dedicated battery charger.
Converting an electric screwdriver to a 12v lithium battery
If you have read my previous writings, you may remember that after the standard batteries of an electric screwdriver gave out, and I urgently needed to continue working, I soldered together a fairly powerful converter for 8 A rating and up to 15 A short-term load. From 24v to 15v. Two 7 Ah 12 V batteries connected in series. I have a 14 amp electric screwdriver.4 В.
After enduring the last construction season building the formwork with this thing, I decided that in the new season I need normal batteries.
After poking around on the internet, I realized the Bosch marketing ploy for my native batteries. One new battery costs as much as a new electric screwdriver with two batteries in the kit. It didn’t make sense to buy this crap for that kind of money.
Li-ion batteries for my model of electric screwdriver was not available. The new Li-ion screwdrivers were inadequately priced. It’s like a bacchanalia of scamming suckers.
It occurred to me to convert my electric screwdriver to lithium. Li-ion cans for 3.7 V, and we need 15-16 V. Put four batteries in series and you have 16.8V in the fully charged version (at 4.2 V per bank).
If you have a 12 volt electric screwdriver you can connect three of the batteries in series.
The battery bank, that is, individual batteries from which our battery is going to form a single large battery, I decided to take a type 18650.
These are now fashionable to use in flashlights. They are also found in laptop batteries.
This is a battery type Sony vtc4. Is able to give the load (max) as much as 30 amps. Perfect for our purpose.
All is fine, but lithium is a dangerous thing, you can make a boom if you overcharge.
In addition, our individual batteries are connected in series and over time there will be a big imbalance.е. Some banks will be overcharged and others will be undercharged. In consequence, such a battery will fail quickly.
Once again our friends from China came to my rescue. There is such a thing called a balancer. controls the voltage in the process of charging at each individual bank and if it is fully charged it shuts down, while the rest continue to charge and so on until all the individual banks in our chain of batteries will not be fully charged.
The price of this thing from the Chinese is pennies. But I got something a little more serious from them.
Slightly more expensive, but well worth it. The thing is that these batteries have no protection. In general I also ordered a battery controller. This thing includes the balancer mentioned above, as well as a whole set of protections. In particular, contains: short circuit protection, overheat protection, overcurrent protection, etc.д.
- B: Batteries plus;
- B3: 1st battery.B: minus and 2nd battery plus;
- B2-: 2nd Batteries.minus and 3rd battery plus;
- B1-: 3rd battery.minus and 4th battery plus;
- B: 4th battery.minus;
- P: load/charge V (to the screwdriver and/or to the charger);
- P-: load/charge V- (to the screwdriver and/or to the charger).
After piecing everything together, I tried the electric screwdriver in action and oops nothing works. What the hell, did the Chinese slipped me a fake, but no they were not. It turned out that in the process of assembling, I must have shorted something somewhere, in general, it triggered a defense, completely disconnecting the battery from the load.
To remove protection (you can guess yourself, it’s not mentioned in seller’s manual) you need to supply voltage from load side, i.e.е. you can just put the battery on the charger. Protection is instantly removable.
I put everything into the regular battery case, taking out old nickel-cadmium banks beforehand. Soldered in the contact pads. I put some hot melt glue on the battery to keep it from falling out.
The received battery normally charges regular charger, although the voltage is a little low (recommended 18V), but I have not got around to it yet. No need to worry about recharging. The controller will disconnect the banks when they are fully charged.
DIY Li-ion battery for an electric screwdriver is rated at 2.1 Ah (2100mAh). Versus regular capacity of 1.2 Ah. The new battery weighs three times less.
Tested the product on the disassembly of floor slabs. Just super, very happy with the result. Runs great, doesn’t sit still for long, pulls hard.
Then I faced a little disadvantage. When you forget to set the force on an electric screwdriver (drilling mode), especially when it gets low, the protection trips when there are large loads stalling the motor. I do not know whether it’s good or not. If you also buy a full controller, but not a balancer, then buy a higher current load, otherwise you’ll be sick of removing protection. Or look for a controller with auto-disconnect.
My controller for a load current of 8 amps.
At first I took the second battery with me and by connecting to it removed the protection. Then I made a button, switching circuit to work directly without controller and at the same time removing protection with the battery voltage itself.
If you want you can buy a bank with a large capacity, but be careful in this plan solid fakes. The seller from whom I bought and always buy I have already checked and his stated capacitance corresponds to the real one.
Choosing batteries for converting an electric screwdriver to lithium.
First of all Lithium is not the same as Lithium. In short, there are Li-Ion batteries for different current output (load). In our case we need a battery with a high recoil current. Also such batteries, as a rule, have an increased charging current, and therefore making the right charging, you can quickly charge the battery.
I chose these (see “Li-Ion batteries”). photo). This is a 18650 Sony VTC4 (or similar) 2100mAh. Bought from the Chinese here.
Excellent price to quality ratio. High current rate of return and charge. The maximum load current is as much as 30 amps. Needless to say, that in an electric screwdriver such banks feel great. Capacity 2100mAh against the standard 1100mAh (such capacity (1100mAh) is usually made and factory Li-Ion batteries).
Four cans are for an electric screwdriver with a rated voltage of 14.4В. For a 12 volt electric screwdriver, we take three cans. For less expensive, you can get these HG2.
Battery protection and rebuild of battery controller.
With the battery dismantled, continue our conversion of the battery electric screwdriver for Li-ion.
Lithium needs a protection controller. Which will protect the battery banks from overcurrent, overdischarge, overdischarge, as well as balance the banks when charging.
From those that I have tried in terms of price and quality, I like this controller better.
Works great. With a load copes. But there is a disadvantage. Protection is not removed automatically. To remove it, you need to apply voltage to the battery or just put it on charge for a couple of seconds.
The second drawback on some screwdrivers can trigger the protection of a sharp pull on the trigger of the electric screwdriver, and in general it is not set up for our banks (which can easily handle currents and larger), and based on the datasheet on the key transistors (which are also designed for a larger current) battery protection controller can overload it.
I fixed both of them as follows.
Lithium battery controller modification. On the board picture we can see two smd resistors labeled R010. Their rating is 0.01 ohms each. They set at what current load will trigger protection.
I added another resistor of the same value 0.01 Ohm to my battery controller see. the circuit. You can also add a film capacitor to it, which is useful to keep it from triggering when the trigger is pulled sharply.
The upper part of the circuit is responsible for the “Power” mode. With the position on, the transistor switches don’t work at all and there’s no load on them. But so are the protections. So it is better not to use this mode.
The 15 Amp fuse in this mode provides current protection. Set them to your liking. Take a stronger diode. I have two pulse diodes in parallel of 6A each (together 12A), whatever I could find.
You can connect a small digital voltmeter, such as this, to monitor the discharge control.
Instead of a voltmeter I connected a home-built discharge indicator tuned to 12v. Its trip coincides with the tripping of the circuit board when working in normal mode.
Also for clarity parallel to the discharge indicator (on the schematic it is a voltmeter) connected a LED through a 2Kohm resistor to immediately see when the “Power” mode is on.
To work with an electric screwdriver, I almost never use the “power” mode, but it is necessary to remove tripped protection. Just switch it on and off and you’re good to go.
This is how I got the switch to the “Power” mode. It is also used to reset the protection.
On the back are two indicators. A red LED indicates that the “Power” mode is on. The yellow light comes on in power mode when the battery is down to 12 volts.
I also added a socket. USB with battery voltage. The main thing that no one by mistake did not put the phone to recharge:) I use at the construction site to listen to the adapted receiver and LED lamp.
Been testing the new lithium battery conversion for a month now, now I like it all. Battery does not run out for a long time. The screwdriver can easily handle heavy loads.
There is one more thing left. Fast charging, like the top models:)
And how many batteries to buy?
A charged 18650 battery produces 4.2 volts. Divide the voltage on which the electric screwdriver works by 4.2 and round up (for a 12 volt electric screwdriver. 3 batteries).
After that, carefully open the battery compartment. It will contain a battery assembled from nickel-cadmium batteries.
The top batteries are spot-welded to the contact group of the battery compartment of the electric screwdriver. Disconnect the batteries from the terminals can be a knife, if you can not do this. bite the contact patch running from the terminal to the battery, above the welding. Dispose of the removed battery at a designated point.
Assembly.
The project implied a fast removal of the batteries (so that when the work was over, you could easily put them on a stationary charger, such as the NITECORE I4 (At https://sdelaysam-svoimirukami.So, for this reason I used 2 x 18650 holders and put them together with some other portable chargers (see also the article about assembling low cost charger for these batteries)).
To get the desired voltage it is necessary to connect the batteries in series (this connection connects the plus side of the battery to the minus side of the next battery). Since I used 2 holders, they need to be connected to each other for current exchange
The original holders wires were too thin, so they lost some heat, to avoid this, they were soldered to a larger diameter wire, taking into account the new location of the batteries.
For a rough indication of the battery charge level a 12v LED connected in series with a current-limiting resistor of 1 kOhm was used.
Power LED should be brought out in parallel with the power supply of an electric screwdriver. To do this, the thick wires of the plus and minus of the battery box are soldered to a wire with a smaller cross section.
Wires with a larger cross section should be soldered to the terminals of the battery pack of an electric screwdriver, in my case they are put on a separate plate, and then, the plate is returned to its normal position, if desired, fixing the glue.
To observe the LED in the body of the battery compartment is necessary to make a hole (a heated nail is good for this).
Since the LED is an indicator, not a lighting device, you can fix it in a hole, applying hot melt on it (this will make the glow softer). The photo of the electric screwdriver after rework.
Please note that for the correct operation of the batteries in series connection, they must be “married”, in other words, they must be taken from the same batch, the same capacity and model. If this rule is observed, they will be discharged at the same time. To check the batteries and prevent overdischarge, use an LED (the lower the charge, the dimmer the light it emits. It is not easy to do without proper training, so be sure to check the voltage on the batteries with a voltmeter).