How to cut ceiling baseboard corners: tips and a detailed plan
In order to choose the right saw, you need to pay attention to well-known, reputable brands. So, “Fit 41255” is made of hard plastic. It can cut wood, plastic, and metal workpieces
The workpiece width to be sawed is 120 mm. Workpieces can be sawed at 45, 90, 22.5, and 135 degree angles. Equipped with a shoe saw
It can saw blanks made of wood, plastic and metal. Workpiece width to be sawn is 120mm. Workpieces can be sawed at 45,90,22,5 and 135 degree angles. Complete with a shank saw.
- “Stanley1-20-112” is famous among craftsmen for its accuracy and quality of cut. Cutting is made at an angle of 22.5, 45 and 90 degrees in the vertical plane and 45-degree-horizontal. Eccentrics securely hold workpieces. Blade made of impact-resistant plastic.
- “Zubr15375-75” is also appreciated by craftsmen, it allows to make precise cuts. Made of durable ABS plastic, so it is strong and reliable for a long time.
- Jigsaw “Stayer 15402” is a professional carpentry tool, which differs from the others by the fact that the part can be sawn from 0 to 180 degrees, graduation step. 15 degrees. A fixing screw firmly holds the part.
- “Fit Profi 41321”.Swivelable jigsaw provided with the steel saw. workpieces can be securely clamped with a clamp. It is made of steel, aluminum or plastic. Working part length 60cm.
- “Stampion 180 is half a metre long. This pivoting office has a 45 and 90 degree angle setting, but can also work polygonal pieces (four, five, six, eight and twelve-corner pieces) The unit is equipped with a 1,4 mm pitch arbor saw. The maximum width of the workpiece 20 cm. Processing depth-20cm.
- Professional saw blade “Zubr-saw” works in horizontal and vertical planes. The swivel attachment allows you to saw off non-ferrous metal, alloys and steel workpieces. The scale defines the saw’s rotation by the required angle. The saw stiffness and strength of the rotating jigsaw helps cut the baseboard corner with filigree precision.
- The Stayer ” chisel saw ” allows to work without additional measuring tools, because its base is marked. Metal base plate is solid, the maximum width of the workpiece which can fit on it-160mm. Cutting depth 600 mm.Adjustable saw tension, different swivel and tilt functionality for precise sawing of workpieces.
- The “Kupper” slide has great functionality. Not only does it swivel to a defined angle, but also the carriage moves along the body of the jigsaw on a guide rail. This ability of the carriage facilitates its fixation in the right place of the workpiece. Part to be sawn. remains stationary and is secured by removable clamps. When working the material in the vertical plane there is a hinge with a scale. The workpiece can be machined both horizontally and vertically at the same time. On this jigsaw you can achieve the desired value of depth kerf, which helps in the manufacture of parts with spikes. The diameter of the workpiece can be up to 150 mm.
List of required materials and tools for work
It is not so difficult to make a cross cutter with your own hands, if you follow the recommendations of experts. First make sure that the materials prepared for the work are polished
For the manufacture of the cross cutter it is important to choose the wood, which must be dried, without dents, have a smooth surface without any defects. Do not choose plastic as a starting material, because it is not strong, and therefore can easily be damaged during the work. The boards that are made for the tool should be about 2 cm thick
The boards made for the tool must be about 2 cm thick.
Before starting work, it is worth preparing such devices:
- ruler and a pencil;
- A fine grit emery cloth;
- hacksaw for metal;
- vise;
- a drill with a different set of drills;
- Euro screws (screws);
- hacksaw with small teeth, designed for sawing the baseboard.
All of the above tools should be sufficient for the work. Among the additional tools can be useful hex key, with which it will be easier to screw fixtures. Also before starting work, it is worth preparing individual items for homemade tools
Before we proceed to the description of the instruction: how to make a jig with your own hands, let us pay attention to a detailed inspection of the manufacture of parts for the device
Tips and recommendations
There is a situation where you need to make repairs very quickly, but time, unfortunately, not very much. In such a situation, you can use the way of orientation on the ground, but it should also be competent, so that the joint was perfect.
Take a protractor and measured angles in the room. A good situation if it turns out that the angle is 90 degrees or 45. Unfortunately, this is not always the case. If the angle is correct, then a plane is used. If not, the marking goes on the spot. When marking on the spot is often the case that even after treatment with a knife corner is not perfect junction.
In such a situation, you need to cut off a piece of the first skirting board, which can cover the gap formed, cut it off so that the angle was perfect. This strip is inserted into the gap and neatly closes it. And also this method will help round the corner of the baseboard, which is often required when repairing.
How to join in the corners
If the installation of the first corner is passed, we can assume that you have almost all learned how to do. “Almost” because you still need to learn how to connect the corners and trim the strips to length. When some part is glued already and a little distance is left to the corner, how not to make a mistake with the length? The answer is simple: leave a reserve.
At the beginning you can cut a piece 10-15 cm longer: it will be possible to redo it several times, if something does not work at once. Then you make the angle as described above, try it on dry, adjust everything to your satisfaction. Only after that you can put the already cut bar in the corner and mark the place to which it can be shortened. It is necessary to trim exactly under 90°. It is not necessary to use a jigsaw. Just try to put the knife (hacksaw) perpendicular to the surface.
Ceiling plinth. fillet
To do it correctly, it is important to strictly follow the existing recommendations and rules of finishing works. And then you will be happy with the result
In fastening the fillet (as this element is called) there are no difficulties: in fact, all varieties of products are mounted on a reliable adhesive.
In order to. Even inexperienced repairmen have no difficulty. They are worried about something else: how to properly cut a ceiling plinth? Virtually every room, no matter how intricately shaped, is equipped with corners.
And here in the inner corners of the individual elements of the skirting boards must be beautifully and evenly docked. And in rooms of an especially complex configuration will have to fudge over the outer corners. Let’s try to figure out how to be in each of these situations, and how to cut the right part with the available tools.
Baseboard materials and cutting methods
First of all, let’s try to determine what can be used to make a fillet, and with what particular material is better to cut.
On sale today you can find products made of foam (PVC), wood, polystyrene foam and polyurethane.
Perhaps some of the cheapest are skirting boards made of foam, which is a fragile, soft and brittle material.
Even the fingers of the hand can leave dents on them, they are easy to form crimps and defects. It is quite difficult to cut a nice and even corner of a PVC baseboard.
An inexperienced craftsman can throw away a large amount of purchased material for this very reason. Also this polymer has high electrostatic properties, which explains its ability to collect dust.
It is more convenient to cut such a skirting board with a hacksaw or a sharp construction knife.
Products made of expanded polystyrene are also inexpensive, although this material is a stronger analogue of the traditional foam plastic.
It can also be processed with a sharp tool.
Skirting boards made of extruded polystyrene foam cost a little more, they are somewhat denser and more difficult to cut. But they are much less likely to crumble and break.
Therefore, it is more convenient and easier to cut them. For this purpose it is convenient to use a hacksaw or a sharp knife.
Polyurethane skirting boards for the ceiling are currently probably one of the most expensive.
But they are worth their price: they are moisture-resistant, quite strong and dense, and quite elastic.
Placed over the kitchen stove, the baseboard can warp and even crack a little.
They are perfectly cut with a special knife, without forming a crumb. But these products are very sensitive to temperature changes.
Wooden skirting boards for the ceiling. it’s quite heavy and dense products, hard and durable.
They lend themselves well to machining with a special fine-toothed hacksaw. It is also possible to use a reliable metal blade. So how to trim a ceiling plinth correctly?
Prefabricated corners
Note that each master has the opportunity not to pore over the precise cutting and fitting corners.
In a construction store you can buy a factory-made corner element, in which the prepared edges of the baseboard can be easily inserted.
It is enough to measure the required length of the workpiece, and cut it at right angles.
All defects and imperfections will be hidden by this special element. But such a convenient way to use is not always possible, because the standard sizes of these factory corners may differ markedly from the size of the baseboard itself.
Such corners will stand out for its disproportionality, and it will not look very neat. But if the design of the room and the size of the blanks allow you to use this method, then you should not neglect it.
For those who have to use one of the methods of trimming the ceiling plinth, the following tips are useful.
How to cut a ceiling plinth
Product, masking gaps fasten so that they fit snugly to both the wall and ceiling. The element has a special configuration, but to dock its fragments, you must first cut the material
Skirting boards are cut not under 90 degrees, but under 45 degrees. This solution allows you to then correctly align the baguette on both the outer and inner parts. You can buy models with a pre-cut of this type. In this case, the user has to cut elements only at right angles. But the model costs more and does not completely exclude preparatory work.
In practice, it is quite simple to cut the ceiling plinth at a 45 degree angle. Most often a special device is used for this purpose. a plier, but you can also do with other means.
Block: 2/7 | Number of characters: 785
Chisel. a tool for cutting baseboard corners
There are two ways to cut corners. with a tool (chisel) and without it. We will consider both methods.
Chisel. a carpenter’s tool, which is a small rectangular tray (it can be made on its own from wood or purchased ready-made from plastic or metal), in the walls of which there are grooves. Slots guide the blade of the hacksaw at a certain angle to the axis of the tray.
Important: the angle of cutting the edge of the skirting is always oblique and equals 45° when processing elements designed to be installed butt to butt in the corners of the ceiling. The oblique cut provides a snugger fit of fillets.
Block: 3/8 | Number of characters: 657
Chisel types
Chairs are divided into types according to three criteria:
Size
On the first sign is allocated two standard sizes:
Material
On the market, you can meet the cross cutter made of different materials:
Wood. Wooden models of the tool have good performance characteristics: ease of operation and cutting accuracy, which, together with the affordable price made this type of device for cutting materials at a given angle the most popular. Adds pluses to the tool from boards and the possibility of making a skirting board chair with your own hands.
Structurally, wooden tools are made of 3 boards, one of which. the base, the other two. the side bars with slots for different angles. Can be collapsible. fastened with screws and non collapsible. the connection of slats with the base is adhesive with the addition of self-tapping screws for rigidity.
To the disadvantages should include not much life. when working with a hacksaw for metal or a saw, the teeth of the cutting tool is undercutting the sides of the slot, as a result of which the slot is increased in size. There is a side shift of 1-2o, which immediately affects the quality of the connection of the baguette in the corners. That’s why tool models made of other materials are preferable for professional carpenters. But for housework, it is ideal.
Plastic. Tools made of plastic, mostly PVC, have a budget price (polyurethane tools are more expensive), a variety of sizes and low weight. It is a one-piece construction with slots on the sides. Used exclusively in domestic conditions, as the service life is even shorter than the wooden counterpart: the slots increase in size much faster, exceeding the permissible standard.
Metal. Chairs made of steel or aluminum are professional tools. Metal: these are durable, easy-to-use products with high cutting precision. To match the quality and price: it is very high.
Construction
According to the design features of the jigsaws are divided:
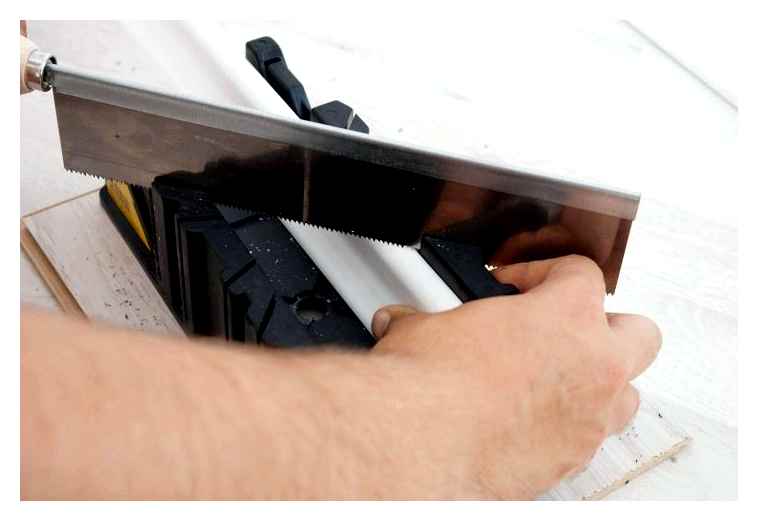
- to simple or, as they are also called. ordinary. These are templates with predetermined cutting angles. The classic version has three pairs of slots: for the right and left baguette in 45o and cross-cutting. In some models, you can find up to 11 pairs of slots. When working with such a tool it is necessary to fix it on the workbench with a clamp. The second clamp fastens the workpiece, from which a corner must be cut according to a given template. It is often necessary to work without clamps. In this case, the skirting board and the plinthole are held with one hand, and the other hand is used to file the corner of the fillet. If you work carefully in such conditions, do not rush, you can saw off the corner with the same quality as when using fixing tools;
- pivoting. Such tools are better known as precision jigsaws. It consists of a rotating platform and a segment of the disk, on which are marked degrees, which allows you to cut any angle. Some models can also be tilted, which allows you to cut the part at the end in two planes at once (called universal). With such a device it is convenient to work with a small number of operations. manual sawing is still exhausting.
Double plane plane tool.
- electric. These are the same rotary tools, but with an electric circular saw. Used mainly by professional builders for mass filing of corners, although such a mechanism can also be found among home tools.
Block: 4/11 | Number of characters: 3846
When it is used
It is wrong to think that the device was invented solely to cut corners at the baguette. Wort, on the contrary, in the finishing of walls and ceilings came from other areas of carpentry. This construction tool is actively used at:
- For making boxes for doors;
- Installation of door and window trim;
- the production of skirting boards for fixing the window glass;
- preparing the slats for picture and picture frames;
- Cutting cable ducts;
- Cut corners on floor and ceiling skirting boards.
The use of a mortiser as a device for working with fillets allows you to file the ends so that they contacted in the corners without gaps.
Block: 3/11 | Number of characters: 660
What to do if there are still gaps?
If the defects are found after the work is done, few will like the prospect of redoing it. In this case it is easier to mask them with one of the compositions. The best way to do this is with a final acrylic putty. It has a white color and is very plastic. Material is taken with the fingers, then it is pressed into the remaining gap, gently distributing in the hole, smoothing. Remove the remaining compound with a damp cloth. As a rule, no imperfections are left on the joints.
How to cut a ceiling plinth? Need to be equipped with the necessary tools and patience, as haste always provokes errors. The main thing in this case is to choose the best method. But care and accuracy are just as important: baseboards are not made of a very strong material (except for wooden baguettes). They are fragile, so excessive force when working with such products is contraindicated.
On how to cut the ceiling plinth, the author of the following video, which viewers consider the easiest and most understandable, will tell:
Selection of tools for cutting ceiling plinths
To properly and accurately cut the ceiling plinth, you need to use the right tool for cutting. It is chosen depending on the material from which the baseboards are made:
-
Styrofoam. Characterized by low strength and costs relatively inexpensive, and therefore foam models are becoming increasingly popular. Their strength does not particularly affect performance, because usually the ceiling plinth is not subjected to mechanical stress. For cutting a regular office knife is suitable.
It can be purchased in a construction store or make your own hands according to these instructions:
-
Three 5015 cm planks are nailed with a long edge into the shape of a three-sided, rectangular box. Pay attention, an angle of 90 degrees must be observed between the side planks and the transverse board.
To work with this homemade device was convenient and safe, planks should be well sanded before joining.
Technology of cutting ceiling plinths
For prompt and quality work, you need to choose a tool in accordance with the material of the baseboard and choose a way of cutting. If you have a plier, then there will be no special difficulties in the process. If it does not exist, then there are two options: to cut according to the template and measurements on the ceiling, or to make this tool yourself.
Features of cutting ceiling plinths in a jigsaw
Work with this device should be extremely careful not to blunt the tool and not to leave notches in unnecessary places. During the process, adhere to the following instructions:
-
Fix the baguette in the jig the way you plan to place it on the wall. The side that will be pressed to the ceiling on the chair, must fit the sidewall.
When cutting and trimming products from foam plastic and polyurethane remember that these materials crumble and press through, therefore tools should be sharp enough, and strong mechanical influence on them is undesirable.
Technique of cutting ceiling skirting boards on a template
This method can be used if your corners are straight, and you want to trim the baguette exactly 45 degrees. To do this, before you cut the ceiling plinth in the corners, you need to draw a jig on heavy paper. Draw two parallel lines and mark the angles at the desired degrees, using a protractor.
We place the fillet in this case in the same way as on a traditional mortiser. Take into account that the skirting board must be cut keeping the tool in a strictly vertical position.
Rules of cutting ceiling plinths according to the markings
This method is used to cut the baseboard in cases where there is no jigsaw, or parts from which it can be made.
To do this, you need to make a marking on the wall in this order:
-
We put the baguette in the corner to the place of attachment.
When cutting with this method, it is important to precisely draw all lines and mark points. A mistake of even a few millimeters will cause a gap. This method is suitable for cutting and joining both inside and outside corners of the ceiling plinth.
How to cut a ceiling plinth without a joiner
To dock neatly in the inner corners of the boards, you can do without a jigsaw.
-
We bring the end part of the baguette to a sheet of paper and trace the contour of the convex side. It is more convenient to use a small section of the skirting board (if it is available).
The first method. with a pitchfork
A professional grade wire with a rotary hacksaw
The drill bit usually looks in the form of a tray with vertical holes for a hacksaw. It can be made of wood, metal or plastic. This tool represents the oldest and simplest carpenter’s tool, designed for cutting wooden parts at 90° and 45° angles. There are types of such a device and for professional work, with a rotating mechanism, in them the cutting tool can be rotated and fixed in any position.
How to cut a ceiling plinth correctly
Ceiling corners are divided into internal and external, the way of joining them is slightly different.
If necessary, you can make a jig with your own hands. You will need three scraps of plywood or boards of equal size. First, they are applied in the form of an inverted letter “U” and make a marking of the corners. Then, according to the markings, cut notches under the hacksaw almost to the bottom, and the boards are twisted.
Inner corner
- Making the correct measurements.
- Install the baseboard plank in the jig so that this position is exactly the same as the placement on the ceiling.
- The skirting board must be pressed tightly against the opposite wall of the frame. Hold it and press it down with your free hand.
- Put a hacksaw at an angle of 45° in a special hole and cut off a detail.
When cutting soft materials (PVC, Styrofoam) use a metal saw or a regular construction knife. Then the work will be neat and with straight edges.
Outer corner
- Measure the length of the skirting board from the nearest wall to the outer corner, leave a trimmer line on the underside with a pencil, marking the desired length. It is necessary to take into account that the edge (its upper part) should come out a little bit.
- The skirting board is moved into the jig and cut off.
- The adjacent skirting board must also be measured with a margin and cut in a mirror reflection to the first piece.
Try on the skirting board: the join must be perfectly straight. If this is not the case, and the joints are uneven, you can trim the edges with a regular knife until they are a perfect fit.
The second method. without additional tools
For the inner corner, you can use the easiest way to perfect the joint. by marking on the ceiling. One more example how to cut a nice and flat corner.
The result is an even 45° angle if you run a trimmer line from the intersection point to the edge of the piece. Note that the above method of marking works only with perfectly straight corners.
How to Make and Use a Jigsaw?
Whichever tool you have for angular sawing, the principle of working with it is the same, so set forth in a few words, how to properly use the plinthole. Let’s say we’re cutting a baseboard, then the first thing we do is to measure the angle the walls meet at, divide it by 2, and mark the trimmer line of the cut on the product. Parts of the baseboard must already have the length of the wall and on each side, where the corner will be cut, must have a margin of 5 cm. The face of it is placed in the jig, the markings should coincide with the slit on the tool, t.е. Become an extension of it. Firmly press the skirting board to the box and cut it with a hacksaw. The adjacent part is cut in the same way, but it is placed on the other side of the slit. Grind everything with an emery cloth and try it on the wall, if it all matches without any gaps, you can fix the skirting board to the wall.
If you do not want to buy the factory version of the tool, you can develop your own plan, how to make a crossbeam, although over its accuracy will have to pokeoke, namely here it is important to measure seven times and only once cut. Find a board from a strong species of wood up to 1.5 cm thick, if very strong (deciduous) is not available, then coniferous will do, but the thickness should come to 2 cm. Grind and make blanks for the bed and sides, a width of 15 cm is enough. It remains to connect them into a box at right angles.
You can use only self-tapping screws, but our advice is to additionally dab the ends with glue and use wooden dowels. Fix the entire construction with a clamp and leave it to dry, removing the excess glue.
Now it’s time to mark and create slots, here you need to measure the angles, in the simplest case you will help angles. First, we put a mark on both ends of the 90 ° (two lines opposite each other), then indented 15 cm and draw oblique lines for the corners of 45 ° and others that you may need in the future work, between each following mark indented distance equal to the width of the box, this will ensure maximum service life of the product. It remains with a fine and well-sharpened hacksaw to saw through the cuts and grind them. So we have made our mortise, we already know how to use it, so we can proceed with the repair of the house.
Trimming the baseboard in the joiner
The plane. one of the most important tools in the processing of the baguette, which allows you to make cuts on the baseboard with the right slope for an even joint. Consider the peculiarities of working with fillets with this device.
To properly and evenly cut the ceiling plinth with a wire cutter in the corners, you must follow certain rules.
- Cutting blanks with a wire cutter is suitable only for right angles of 90°.
- When cutting the baguette intended for the ceiling, it is applied and sawed on the inner side of the chair closest to you.
- The workpiece is set in the position in which it will be mounted later on the ceiling.
- Cutting is performed on the front side of the baguette.
- The side which is subsequently glued to the ceiling must press firmly to the bottom of the tray when cutting.
- For each type of material, it is recommended to use a specific cutting tool: a hacksaw or knives are good for cutting soft materials like Styrofoam, a saw is preferable for wood.
Ceiling corners can be internal and external, or external, so there are differences in the preparation of baguettes, which are the ways of joining the slats and a different slope of cuts. To make it easier to work with the jigsaw, it is useful to make visual tips on it in the form of small stickers with inscriptions, as shown below.
Chisel with tip stickers for easier work Read also: How to make a cover for an angle grinder under a vacuum cleaner
The main attention should be paid to the accuracy of cutting blanks at the right angle. It is recommended to begin work with the inner corner, and then proceed to the outer corner. Otherwise, there may not be enough baguette length. Schematically, the action of cutting looks like the pictures below.
Schematic of trimming adjacent baseboards for interior corners
Trim diagram of adjacent skirting boards for outside corners
Cutting a skirting board for an inside corner
Interior corners are always present in rooms. so they are bound to be encountered when installing baseboards on the ceiling. In this case, when cutting baguettes, follow the algorithm
- We measure out the necessary length of the workpiece, placing it on the ceiling in the place of future installation;
- We place the bar in the jig along the near wall, so that its location coincides with how it will be mounted on the ceiling;
- Holding the skirting board, place the cutting tool in the groove at a 45° angle and cut the workpiece without unnecessary pressure;
- Do the same actions for the second, adjacent strip in the mirror reflection. For ease of cutting, you can turn the machine with a bar installed in it under the desired hand.
Knowing how to properly cut the inner corner on the ceiling plinth with the help of a wire cutter, you can easily form more complicated. outer corners.
Positioning the left plank for the inside corner with the direction of pressure when cutting
Positioning the right plank for the inside corner with a twist for a comfortable cut
Cutting the left inside trim
Cutting right inside strips
Cutting the outside corner trim
Exterior corners are not as common in the room, but they require a particularly careful cutting of the fillets and the exact joining of their sides. In contrast to the internal ones, small gaps in the external ones are more noticeable and difficult to hide. Also it is necessary to take into account some peculiarities when working with outer corners. This is easy to do, following certain rules:
- parts of the frieze should protrude slightly from the edge of the wall, forming a small margin;
- We measure the strip, applying it to the ceiling as it will later be glued;
- place the frieze in the jig, pressing it against the wall closest to you;
- Insert a hacksaw or other suitable cutting tool into the groove with a 45 ° angle, and without unnecessary pressure cut the workpiece;
Positioning the left outer bar in the jig
- put the adjacent outermost slat against the nearest wall of the frame and, holding it in place, insert the hacksaw or other suitable cutting tool into the groove at a 45° angle. For the convenience of work unfold the jigsaw with the workpiece “at hand”;
- proceed in the same way as in the previous case. neatly and evenly cut the bar.
Positioning the right-hand outside strip in the jigsaw with a twist for easier cutting
Cutting the left-hand outside strip