How to make a chain saw from an angle grinder?
Experienced homemade users also recommend not to use new angle grinders, but to give preference to used tools.
Tips & Tricks
If you are assembling a chain saw on an electric drive, then it is recommended to use the transverse arrangement of the motor, which will greatly simplify the work of the operator. If you decide to independently develop a drawing for the design of a homemade chain saw, you will also develop a start blocking system, which will make the new equipment even safer for the operator.
Experienced users of manual rework are advised not to forget about the liquid inside the saw. The reservoir should always contain lubricating oil for smooth and easy cutting. After using the saws, it must be well cleaned of sawdust and other contaminants, as well as lubricate the working units.
Chainsaw from an angle grinder. Tips & Tricks
A quality gasoline or electric chain saw with high power and performance is not a cheap pleasure. But the owners of country houses and private plots know firsthand how useful a chain saw is in everyday life. If you do not want to spend money on sawing equipment, which is used several times a season, you can make an electric or chainsaw from an angle grinder with your own hands.
Factory attachments of a chain saw on an angle grinder
For those who do not like to work a lot with their hands or due to poor knowledge of the structure of equipment and tools, some manufacturers of garden and repair equipment produce special ready-made attachments. The kit also includes all the necessary mounts. This is a very convenient option, but you should carefully choose the attachments so that they can work harmoniously with the power unit against the background of technical indicators and characteristics.
Powerful do-it-yourself electric hawk on wood [LIFEHACK]
The angle grinder is a universal tool. It is difficult to imagine almost any metal work without it. However, her sphere is not limited to this. not a day goes by that a new purpose is not invented for her.
How to make a hacksaw from an angle grinder. the topic of today’s article.
Making an electric hacksaw
Homemade electric hacksaw from an angle grinder
When working with an angle grinder, torque is used. For a hacksaw, we need translational movements. We will transform the rotation using an eccentric.
Step. preparing the hacksaw blade
Marking is carried out in arbitrary sizes.
Determine the place of contact of the hacksaw blade with the bearing. Marking the center.
Using a compass, we make the primary marking for the bearing. 3-4 points from the center.
We apply the bearing and outline it with a marker.
The resulting hole must be flared along the vertical level of the saw blade.
The hole needs to be shaped into an oval. The dimensions of its diameters are roughly 1 to 1.3. To accurately determine the shape of the hole, you need to try on the canvas in place.
Step. make a blank for attaching the nozzle
We will make it from a steel pipe.
We measure the distance to the lower level of the bearing.
Step. assembling the saw body
We form a bolted connection on the nozzle body
At this stage, you need to weld the cuffs (fastening) to one of the metal plates and form holes for fasteners.
We fix the workpiece in a vice, attach the fasteners and weld it to the plate. The bolts welded to the ring must be on top.
Mark 4 bolt holes in each plate.
Moving on to the next step.
Angle grinder electric saw test
The tests were successful. This saw is surprisingly good at sawing small logs in a couple of minutes.
What is required for manufacturing
To make an electric saw you will need:
- hacksaw for wood
- a small piece of pipe 1.5 inches
- bearing. inner diameter about 22 mm
- metal sheet 2 mm
- nut М8
- bolts and nuts М6
- reinforced washers М14
- welding inverter
- angle grinder
- vice
- drilling machine or drill
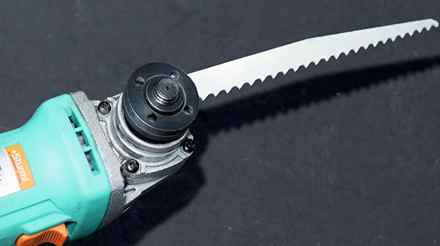
Reciprocating saw
KRESS 1200 will allow you to quickly and efficiently cut window and door openings in a new log house or frame walls. It is very good at dismantling old windows and door frames (nails are not a hindrance), old plumbing fixtures (complete safety compared to working with an “angle grinder“). With it, it is easier to install metal structures and perform plumbing work, and you can also cut firewood for the barbecue in the country, if such a tool is at hand. With the KRESS 1200 SPE reciprocating saw, they saw wood up to 300 mm thick, plastic (in particular PVC) up to 160 mm thick and steel pipes up to 130 mm in diameter.
Convenient and dual-mode speed control using the “wheel” and the start button. The electronic control wheel can be used to set the maximum number of revolutions required for the job being performed. By smoothly pressing the start button of the switch, they regulate the number of revolutions of the already switched on tool. As the load increases, the electronics ensure that the required power is maintained.
The saw fits well and comfortably in the hand. although it weighs about 4 kg. Thanks to the soft rubberized non-slip surface of the gearbox and the handle, additional comfort is created, vibration is smoothed and hands hold the tool securely, which ensures safe work even in high humidity conditions.
The saw blades in this tool can be changed without the use of a special wrench: just turn the ring counterclockwise (there is a mark on the ring) until it stops, insert the blade and then release the clamping ring. Be sure to check the strength of fixation of the blade before work. It can also be fastened “tooth up”. The support saw foot (platform) does not require the use of additional tools to set it in a position convenient for a specific job. It is fixed in the selected position with a special lever. If necessary, you can adjust the “exit” of the saw blade to improve access to hard-to-reach places. By using this adjustment, the length of the saw blade can be optimally used and thus the service life of the saw blade can be increased. Do not change the position of the lever during operation. The 4 m rubberized mains cable provides sufficient freedom of maneuver in the workplace. A special plastic case is intended for storing and carrying the reciprocating saw. Since the number of power tools in my workshop is gradually increasing, I treat the convenience of its storage with a certain pedantry.
For all tests on the KRESS 1200 SPE, I used one bimetal blade. It is versatile and allows you to cut metal and wood with equal success. In order not to waste the tool, I tried to cut firewood for the barbecue in the garden. When the pendulum mechanism was turned on, the speed of work increased noticeably. The number of revolutions was set to the maximum. And the tool did an excellent job with such a job. But what if the wood with nails? I did one of the most interesting experiments. I remember how, after “meeting” a nail, when processing wood, I usually had to re-sharpen or replace the knives and saws of any tool, both manual and electric, or replace the blade at the jigsaw. And in the test instrument, only a barely noticeable increase in the vibration of the body was observed during the passage of the blade in the place where the nail was. If I had not specifically expected this moment, then it might not have been noticed (photo 8). And then I tried to saw a metal water pipe 01 “. When sawing. no sparks, which is fire safe. Sawdust from the workplace then easily collected with a household vacuum cleaner You can work with this saw without fear that the particles of red-hot metal arising from the work of the “angle grinder” will damage tiles, plastic, leave them marked on wooden walls and interior decoration. there is a choice of relatively low revolutions. At the same time, it is convenient to “saw” at an even lower speed, without pressing the start key all the way. And the new blade cut the metal “like clockwork.” One cut took less than a minute. The edges of the processed metal turned out to be smooth and neat.
Now let’s evaluate the accuracy of processing with this saw. For precision carpentry work, such a tool with a thin vibrating blade is not always suitable. Although with a certain skill and experience, the quality of work will be no worse than using ordinary hand tools. But for construction work, where special accuracy is not required, it can be very useful. Another important point. Due to the possibility of smooth speed control by pressing the start button of the reciprocating saw, it is possible to “saw down” into the wood without preliminary drilling. To do this, the tool must be supported and held at a slight angle to the surface. Gradually, rotating it vertically above the fulcrum, immerse the saw in the material to be cut. The initial position of the tool y is shown in photo 11, which can be very useful when performing construction work.
Homemade saw attachment for small angle grinder
In this review, the author will share with us an idea of how to make a homemade saw nozzle for a small angle grinder with your own hands.
For this accessory, you can use a reciprocating saw blade for wood and metal. And accordingly, with the help of a homemade nozzle, you can cut metal and saw wood.
We also advise you to read how to make a universal sander for a small angle grinder (angle grinder).
First of all, from metal 5 mm thick, you need to cut out two main parts of a homemade nozzle. You will also need additional parts from pieces of metal.
We cut off a piece of a round pipe, make two slots in it (longitudinal and transverse), after which we weld an elongated nut.
The main stages of work
At the next stage, we grind all the cut and prepared parts, and you can start welding.
From a piece of metal 8 mm thick, the author cuts a round plate. You need to drill two holes in it: in the center and on the side. We’ll get an eccentric.
We make another piece from the threaded rod for attaching the saw blades. We make a slot at the end of the hairpin. We tighten the nut, install the canvas and fix it.
Then we make the support foot, and you can start assembling our nozzle. We install it on an angle grinder (it should be with speed control).
For details on how to make a homemade saw head for a small angle grinder, see the video below. This idea was shared by the author of the YouTube channel “KUI Iron”.
Homemade electric hacksaw from an angle grinder
The angle grinder is probably the most popular tool for making all kinds of homemade machines and fixtures. With its use, there are a great many different kinds of adaptations. Various adaptations improve the productivity of craftsmen, especially those who cannot yet afford to replenish their arsenal with a richer set.
The mechanism of the angle grinder can be used to make an electric hanger, which will completely change the functional purpose of the donor tool. For you a master class in which a do-it-yourself reciprocating saw for wood with a drive from an angle grinder will be made.
Making a nozzle
We disassemble the hand hacksaw into parts by removing the handle.
To ensure reciprocating movements, we will make an eccentric. To do this, a washer, bearing, washer and M14 nut are put on the spindle of the angle grinder. To shift the center of the structure, it is necessary to insert a piece of an M8 bolt into the gap between the spindle and the bearing. It needs to be cut to fit the height of the bearing. We fix the parts with a nut, now the eccentric can rotate without friction on the spindle thread.
To secure the saw, repeat the same steps as for the standard angle grinder guard. A piece of pipe with a length equal to the distance between the beginning of the gearbox and the center of the eccentric bearing. Partially divide it into 2 rings. The cut needs to be done more than half. the notch line runs opposite the edge of the seat for attaching the casing.
It is welded to the edges of the cut using an M6 nut. With their help, the ring will be pulled together like a clamp when tightening the bolt.
A hole is drilled in the hacksaw blade 1 mm larger than the outer diameter of the bearing. It is bored a little from above and below. This kind of work is not easy because the steel is hardened.
2 identical rectangular plates of any size are cut from sheet steel. A 40 mm hole is drilled in their center.
One plate is welded with a clamp tube.
Drill a 6 mm hole in the corners of both rectangles. They must be opposite each other.
Holes are marked on the hacksaw blade, like on plates. They are drilled and then bored with a file to enable the blade to move. You need to sharpen in both directions in the horizontal direction from the centers of the holes.
Can be spray painted for aesthetics.
To use the nozzle, you need to grease the contact surfaces of the blade and pressure plates with grease.
The parts are pulled together by bolts and nuts. You need to attract loosely. Locknuts are placed on top so that the blade does not unscrew and pinch.
An eccentric is assembled on an angle grinder, and the attachment is placed instead of the protective cover. All reciprocating saws can be used. After use, the tooling can be removed and the angle grinder can be used as usual. And we get to work on sawing.
Lathe
A wood lathe from an angle grinder is one of the most difficult ways to modify the latter. For its manufacture, a large number of materials and various components are used. An example of construction is shown in the photo below.
Lopper
This is a tool that is designed using a benzoin grass trimmer, or rather, a gimbal. The principle of its operation is preserved. only the driving unit and the cutting part itself change.
Instead of a line for cutting grass, a chain saw bar mount is installed.
How to make an angle grinder Grinder?
Grinder is a belt sander. This tool is produced by manufacturers in a self-modification. Alteration of the angle grinder will help to access the grinder functions without purchasing additional tools. There are many modifications of the homemade grinder. The main difference between them from each other is the degree of complexity of the assembly. Below is a description of how to rework an angle grinder in Grinder in one of the easiest ways.
You will need the following materials for assembly:
- 70 cm of metal tape 20×3 mm;
- three bolts with a thread corresponding to the thread of the fixing holes of the gear housing of the angle grinder;
- several washers and nuts of the same size;
- three bearings;
- small pulley with a bore equal to the diameter of the working shaft angle grinder.
Assembling the frame structure. The main frame of the grinder has the simplest modification: it consists of a horizontal part made of a prepared metal strip, and a fastening part attached to it, which has the shape of the letter “C”. The fixing part is designed to secure the entire grinder frame to the gear housing of the angle grinder. To do this, holes are drilled in it, which must match the holes in the gearbox. They are designed to screw in the handle of an angle grinder. The oval shape of the holes allows you to more conveniently attach the frame to the angle grinder.
The horizontal part of the grinder is welded to the fastener in such a way that the edge of the former is in the middle of the latter. When cooking, the correct position of the edge of the horizontal element must be observed. It should have the best resistance to lateral loads that occur during the operation of the grinder. Installation of a belt drive. The polishing machine works on the principle of a belt transmission of rotational force. An emery tape acts as a belt. To carry out the transfer, it is necessary to fasten the pulley to the shaft of the angle grinder using a nut of the appropriate size.
At the end of the grinder frame, which is opposite to the angle grinder shaft, a hole with a diameter of 6 to 10 mm is drilled. A bolt is installed in it. Its direction must match the direction of the gear shaft. Several bearings with an inner hole diameter exceeding the bolt section diameter by a maximum of 1 mm are put on the bolt. this will give the bearings the opportunity to sit tightly and not give vibration during the operation of the future belt sander. The bearings are secured to the bolt with a washer and a nut.
The final stage in the assembly of the hand grinder is the preparation of the emery cloth. A common abrasive belt used in factory-made grinders is cut longitudinally. The width of the cut should match the width of the pulley and the bearings on the opposite side of the grinder frame. Additional Information. When assembling this grinder model, it is worth considering the correspondence of the length of its frame to the length of the emery tape. Grinder attachment can be of a fixed size for a belt of a certain firm or with the ability to adjust the tension.
To introduce the adjusting properties into the product design, the existing holes in the frame must be pierced. These are the holes used to fasten the structure to the gearbox housing, as well as the one used to hold the bearings. In the process of grooving, the holes should acquire an oval shape. this will allow the frame to be shifted to the side, thereby adjusting the tension of the belt drive. To improve the properties of fixing the tension and prevent it from loosening during the operation of the tool, it is necessary to put ribbed profile washers under all the nuts.
A finished variation of the design of a homemade grinder is shown in the following photo.
Wood shredder
The shredder of branches and grass is a garden device that allows you to turn small branches and thick-stemmed weeds into a small-fraction form used for various agricultural purposes. When making such a tool, it is worth using only a large angle grinder operating at high speeds. To prevent overloads and breakage of the angle grinder, an additional gear system is used, which greatly increases the grinding effect. The device is mounted on a sturdy metal frame that can withstand high vibration and displacement loads. Such a device is shown in the photo below.
Homemade miter saw
Any model and size angle grinder can be retrofitted into a miter saw. A miter (pendulum) circular saw is an electric tool (rarely battery), used only in a stationary form for cutting workpieces from various materials at an acute and right angle. The differences between such a saw and others are in the high accuracy of cutting at a given angle and maintaining the integrity of the cut edge.
You can make an installable structure with your own hands that will allow you to use an angle grinder as a miter saw. To assemble the simplest modification, you will need to prepare:
- wooden blanks. a sheet of Fiberboard, corresponding to the size of the future working surface, various bars (it is possible from the same Fiberboard);
- wood screws;
- bolts and nuts;
- regular piano door hinge.
Tool required to make a miter saw:
Few people know about this function of the angle grinder !!!
- jigsaw or hacksaw;
- drill or electric screwdriver;
- two drills. 3 mm and 6-8 mm;
- plastic tightening clamp.
Build process. The future pendulum frame of the miter saw should be positioned on a firm, level, non-wobbly surface. A workbench table or a separately assembled structure can be used. The height of the plane on which the product will stand must be sufficient for comfortable work. The miter saw blade is always positioned at the edge of the table or workbench. This fact is taken into account when assembling a homemade miter saw.
The size of the working plane of the machine is determined by the size, weight of the angle grinder and the purpose of its use. For the smallest angle grinder, a 50×50 cm fiberboard sheet is suitable.It must be fixed on the workbench so that one edge of it protrudes 15 cm above the floor.A rectangular cutout is made in the middle of the protruding part, designed to lower the cutting element of the angle grinder into it. The width of the cutout varies from 10 to 12 cm, the length is 15 cm.
On one side there will be a machine operator, on the other. a piece of a piano loop 5-6 cm wide is fixed. The canopy, like all other wooden parts, is fastened with self-tapping screws. To do this, a 3 mm hole is drilled in the workpiece. this is necessary so that the self-tapping screw does not destroy the wooden material. Another hole is drilled in the same hole. 6 mm in diameter and 2-3 mm in depth. a sweat for the head of the self-tapping screw, which should not protrude above the working plane.
A bar or a rectangular piece of Fiberboard is screwed to the moving part of the hinge. Another workpiece of a similar profile is attached to it at an angle of 90 degrees. the part on which the angle grinder will be fixed. In this connection, you can use a reinforced mounting angle. this will reduce the backlash of the structure and eliminate the occurrence of errors when cutting.
The angle grinder is attached to the last bar from the bottom. To do this, a hole is drilled in it with a diameter equal to the diameter of the threaded hole in the angle grinder. A bolt of the appropriate diameter and length is threaded into it. Any inconsistencies in the dimensions of the frame and angle grinder are compensated for by additional washers, grovers, spacers. Its gearbox must be set in such a way that the direction of movement of the cutting disc is directed towards the operator of the machine.
Interesting idea for Angle Grinders Hack !!!
The back of the angle grinder is pulled to the support bar by a plastic strap. The start button must remain accessible for emergency shutdown of the power tool. A 5×5 cm wooden bar is screwed to the plane of the working area, designed to be used as a stop for cutting a workpiece made of wood or metal. Its presence will ensure smooth cutting and no beating of the material. The design in question upside down and with a fixed angle grinder can be used as a homemade sawmill. Depending on the intended purpose, it is possible to manufacture a portal frame for an angle grinder.
The above model of a miter saw based on an angle grinder is shown in the following photo.
There are also more complex modifications of an angle grinder to a miter saw. Factory variations are also available.
saw electric
an electric saw from an angle grinder is made using a tire from a chainsaw of the appropriate size. Since it is not possible to use an automatic rotation stop mechanism in a self-made design, special attention is paid to the design of a protective casing. According to a similar principle, a reciprocating saw based on an angle grinder can be designed with your own hands. The chain saw is shown in the photo below.
Grain crusher
A grain crusher is made of a round drum (from a broken or old crusher) with a perforated removable bottom, a plastic vent (from a conventional canister with a cut off bottom) and an angle grinder. the leading structural element. The angle grinder shaft is placed in the drum through the hole in the center of its top. In this position, its body is attached to the drum (the method of attachment is individual). A screw-shaped knife is attached to the gearbox shaft from the inside of the drum. It can be made from a circular saw cut-off wheel for wood. The knife is fixed with a fixing nut.
A plastic grain hopper is also installed at the top of the drum body. Through it, grain is fed, falling onto a rotating knife. The latter is crushed and poured out through the bottom perforation. The size of the grinding fraction depends on the size of the holes in the bottom. The photo below shows a model of a homemade grain crusher and drawings for its manufacture.
What else can be made?
The design of the angle grinder allows you to modify it yourself into many other tools.
Electric angle grinder
Materials and tools used by the author:
List of materials:. old hacksaw;. piece of iron pipe;. sheet metal;. bolts and nuts;. one bearing;. paint for metal.
Step one. The first thing we need is a hacksaw, an old tool will do, but it will need to be sharpened. We remove the handle from the hacksaw, it is not needed. If desired, the hacksaw blade can be significantly shortened, since its stroke will be small.
Step four. Let’s prepare the hacksaw tightly, we need to drill a hole in it of such a diameter so that the bearing mounted on the shaft of the angle grinder can fit in it. The author drilled the hole on a drilling machine with a step drill.
Next, the hole needs to be ovalized so that the canvas moves in only one direction. Here files and a drill will come to our aid.
Step five. FrameAlmost all the details are ready, it remains to make the frame, here we need sheet metal. We cut out two plates and drill in one hole along the diameter of the clamp, weld this part to the clamp, this will be the base.
Also, in both plates, you need to drill holes for bolts that will hold the plates together. Bolts need to be welded to the base.
In the end, it remains to modify the hacksaw blade, we drill 4 holes in it in those places where the connecting bolts are. The holes must be bored with a file to an oval shape. As a result, the bolts will serve as guides that will hold the hacksaw blade.
Step six. Painting and assembly We paint all the details so that the homemade product does not rust and looks good. Well, then everything can be assembled, we install the base and the eccentric, well, then it remains to put the hacksaw blade and the upper part of the frame. The homemade product is ready, you can test it, but do not forget to lubricate everything well! The tool cuts beams, and even a log. Of course, the performance of the saw is not very high, since the stroke of the hacksaw is too small.
In general, the homemade product deserves attention, since everything is done quite simply. This completes the project, I hope you liked it and found new ideas for yourself. Good luck and creative inspiration if you decide to do this again. Do not forget to share your ideas and homemade products with us!