How the disc tip works on the tiller
Hiller helps to preserve soil fertility, increase cultivation efficiency, and reduce fertilizer and irrigation costs. Some vegetable crops, especially potatoes, can’t be harvested without this procedure. But it is long and tedious to manually hoe. It’s quicker and more economical to use a tractor with a single-axle hillercutter. You can make such a device yourself. Let’s see what kind of riders for potatoes for the tiller and how to make them with our own hands.
A tiller is a mechanism used to plow and cultivate soils of varying lengths and complexities.
This tool is used to till crops, loosen soil, turn over the soil, and fight weeds. The device is made of metal, has blades or is equipped with rotating discs that are attached to the frame.
The headstock is mounted on a single-axle tractor with special mounting fasteners. Mounted equipment allows different working heights and penetration depths. Tillage is accompanied by loosening and aeration. Tilling width, height and angle varies depending on the model.
The disc planter
It is characterized by excellent efficiency, the efficiency and power of the planter is influenced by the speed of the cultivator, where less increases the power. The life span of the disc coulter is extended with the disc coulter. With its simple design and straightforward operating principle, the coulter requires little effort to operate. Also requires no special maintenance. Ideal for use before planting potatoes. Disk models are considered the most popular, if only because they are of several kinds. There are the following disc coulters:
- With a constant working width. the average constant width is 20-30 cm, set by the manufacturer. Recommended for use with power tillers of low power and weight.
- With variable working width. actively used for the perching of various crops, the adjustment of the working width will adjust the perching for potatoes, and after changing it, you can perch the beans with a smaller width. The maximum possible working width is 70 cm, so it is perfectly adjustable for different processes.
Many people also wonder how to set the disc coulter?
Why do you need a tiller for a power tiller??
This element is used for planting and tending vegetables. It works quite simply: after installing the addition and starting the motoblock, the part tows the machine over the cultivated area with planted seeds, thereby covering the future vegetation with the necessary layer of moist and slightly loose soil. Such an operation is of considerable importance, because it allows to protect the seeds from the negative atmospheric influence, increase the level of oxygen saturation, stimulate growth.
Experts note that power tillering also helps to rid the ground of excess moisture to prevent rotting. After treatment, sunlight penetrates the soil much better, and some harmful insects end up on the surface, where they are “cleaned” by birds. Some weeds are also destroyed, so the elementary treatment can safely be considered a partial substitute for the use of herbicides. It is important to note that the most common use of the perch is for the treatment of potato plantings.
Read also: Cutting depth of angle grinder 150
How to install an arrow on a single axle tractor?
Installing and adjusting the potato arrow to the power tiller is not a very complicated procedure. Bolts and washers are used to attach it to the hitch. When working with a simple planter, you need to adjust the angle and depth of plunge into the ground. The tilling depth of the rocker is shallower than that of the plough, so there is no need for the single-axle tractor to be on an elevated surface for adjustment. Simply adjust the shoulder bar vertically. The required angle of attack is determined by how deep the disc in the working position goes into the ground. This should be about 15 cm deep.
If you find that the tyre packer is sinking too far into the ground during work, tilt the stand forward. Otherwise, if the share is not going deep enough, the bar will be tilted backwards.
The setting and setting of the disc mower is a little more complicated. First adjust the distance between the bottom points of the share discs. It will be 40-70 cm, depending on the work to be done. Next, adjust the angle of the discs against the horizontal axis.
The settings of both discs must be identical, because otherwise the single axle tractor may skid to the side.
How to mount a rocker arm to a single-axle tractor?
Setting up and adjusting a potato spudger to a power tiller is not a very complicated procedure. Bolts and washers are used to attach it to the hitch. When working with a simple lawn rake, adjust the working angle and penetration depth. The tilling depth of the planter is shallower than that of the plough, so there is no need for the single-axle tractor to be on an elevated surface for adjustment. Simply adjust the bar vertically. The desired angle of attack is determined by how far the share goes into the ground in the working position. This should be about 15 cm deep.
If you notice during work that the packer is sinking too far into the ground, swivel the bar forwards. Otherwise, if the rocker arm does not go deep enough, the stand is tilted backwards.
Setting up and installing the disc coulter is a little more complicated. First, the distance between the lower points of the discs on the arrow should be adjusted. It will be 40-70 cm, depending on the work to be done. Next, the angle of the discs is set in relation to the horizontal axis.
The settings of both discs must be identical, because otherwise the single-axle tractor could drift sideways.
Motor or do it yourself?
Potato ploughing can also be done in half-rows (above right in Fig. in the beginning), where each bed is worked in 2 passes, and in a row (bottom left in the same place). Ploughing in two half-row passes is useful only for certain crops grown on thin topsoil in dry conditions. the trough on the mouldboard ridge acts as a water retention trap. Potatoes can only be effectively tilled in one row.
Manual hoeing by one worker is possible only in half-row on light, loose, poorly moistened soils, up to 30-35 cm wide. Already for hoeing potatoes on normal garden soil without mechanical traction, you need at least two (pos. 1 in Fig. The front one creates the actual pull, and the rear one holds the furrow and the working depth. A perfect exercise for feminists who want to prove themselves no worse than vile male harassers. But the liberal-tolerant ladies prefer public action, on the internet or in kind. Maybe because there’s no useful work to be done? And you can get more money for useless work.к. 100% reliable criteria for assessing unproductive work are impossible in principle. But back to the subject.
Manual and mechanized plowing options depending on traction source
If you have a power tiller with 0,5-1 kW power, you can do the ploughing in a row. 2 in Fig. Neva single axle tractor and t.п. The 2-hulled rocker can pull a tillage width of up to 0.8m, pos. 3, with 0.5 rows 1 row 0.5 rows. Any mini-tractor can be fitted with a 3-fold rocker of the same type (pos. 4), for 0,5 1 1 0,5 or 2-bucket for 1 1. This method increases labor productivity per pass by a factor of 2 to 3 as compared with working in a row, but the cost of acquiring special equipment increases several times over. So next we will focus on how to make an arrow for a power tiller with his own hands, with the possibility of using the same “self-propelled”, and how to make a manual arrow for small areas, approx. up to 20 acres.
Note: although the mounted implements for mini-tractors in general is not the subject of this article (mini special equipment get competent already dispossessed owners), but, suddenly you got a tractor unexpectedly-unexpectedly, below give the video, how to make a 3-row fingerboard for a mini-tractor himself:
disc or ploughshare?
There are no less than 10 types of planter used in large-scale farming. The patents on this type of mounted implements for cultivating the land are known to hundreds, and everything is added. But given the possibilities of home technology and the requirement to work also on the human muscle traction, the choice of prototype turns out to be small: it is a general purpose plow, or a disc one for potatoes. For more on both, see. But in the meantime let’s see which one is best suited to which conditions. The most important of these are the grain size distribution and the physical properties of the soil. If your plot on loose not sticky sandy or sandy loam soil (which is known to be the best for potatoes), you can, without wisecracking, build a manual mini mower for light soils, which you can work with alone, see. e.g.
or a hand-hoe for light soils, which may have to be pulled by two people:
In all other cases the characteristic features of pre-selected plough bodies have to be taken into account. For the ploughshare they are as follows:
- The required pulling force depends relatively little on the soil type. two medium-sized people pulling a single-hooded plow with a type 2 body (see Fig. Further) on medium-humid chernozem, but it is big enough that one cannot pull it by oneself.
- Otherwise ploughshare may “dive” and get stuck in the ground or get sideways and make a mistake.
- The ploughshare is multifunctional, t.к. a variety of implements can be fitted to the frame, see Catalogue 33. Figure.
Replaceable tools on the plough
The disc coulter has a mark on the disc coulter. features:
- The qualification requirements for the operator are minimal: a properly adjusted disc coulter (see “Adjusting the disc coulter” on page 54). The plough automatically maintains its set working parameters (see later).
- Lower tractive forces are needed on light, free-flowing soils than on the plough.
- The opposite is true on medium to heavy soils.
- On silt, heavy alluvial, etc., the plough has a choice of interchangeable tools.п. Even the tractor can’t handle sticky soils. the engine would choke, the coupling would break or the tool would be damaged.
- On soils that are optimal for potatoes, a high, full-row, sharp-edged prism is possible by hand.
- Working width of the single-row disc coulter up to 630 mm to 650 mm.
- High mowing in 2 half rows is possible: the discs going close to the root coma either roll over the roots or damage them insensibly to the plants.
- If the implement hits an obstacle, it rolls on top of it. A small mistake is possible, but there is no forced interruption of work.
- Whether winched or pulled by an internal combustion engine or an electric winch, it performs just as well as a direct pull.
- For this, we need semi-finished or made-to-measure components. more.
And finally we have to take into account that potatoes are an excellent insurance crop for farms of any size. Potatoes can not be called a record breaker in profitability, but the demand for the “second loaf” is stable, and the storability of potato tubers makes it possible to sell the crop with the highest possible profit. On complex farms, therefore, a large proportion of the total area is planted with potatoes. Which one, it’s a matter of economics in relation to specific local conditions, but the first thing that makes sense to make a disk opener. The exception is the case if your site is above average severity on the ground, and you have not yet acquired mechanical traction.
How to adjust the disc coulter?
Setting the machine properly in relation to the furrow. It should be parallel to the seedbeds on the ground with a specific angle and furrow width. Good technique adjustment lets you avoid mistakes and get good results during work.
To set the angle, there is a special screw adjustment on the machine that tilts the entire device relative to the tiller. The depth of the furrow depends on the adjustable part. In addition, adjustments are made when installing the header to the tiller. This is done with the aid of the fixing holes in the post. If there are movable riders installed, it is possible to adjust the width and height of the ridges made.
The disc coulter is of higher quality than the plow, despite the fact that it takes longer to work the land. The work is not done on two furrows, as in the case of a two-row plow, but with one.
It is easy to adjust the disk harrow. The lower points of the discs are separated to the sides by about 40-70 cm (it all depends on the distance between the rows, the recommended width between the furrows for potatoes is 60-65 cm). When adjusting the equipment one must not forget about the angle of inclination and make sure that the discs are symmetrical to each other.
place the single axle tractor in the furrows so that the cultivated furrow is between the working discs. Drive evenly between the rows, without affecting the vegetable crop. The discs pick up the soil, forming a ridge, at the same time loosen and crush large lumps of soil.
During the whole growing season, the potatoes are scarified three times. The first time the work is done when the height of bushes will be about 16 cm, the second time when they will be about 23 cm and the last time after the end of flowering.
How to make a potato mower with your own hands
It is important to follow the rules and strictly follow the installation instructions. Drawings and dimensions must be accurate.
To make the nozzle yourself, you will need:
It is strictly necessary to observe the dimensions and symmetry, otherwise deviations from the norm will affect the operation of the machine.
Tools and materials
Before starting the work, prepare the inventory and necessary materials:
- arc welding machine;
- bolts, fasteners;
- Angle grinder with discs and nozzles;
- files of different sizes
- Electric drills with drills;
- workbench;
- Grinder, working from the mains;
- gas torch.
To make the nozzle, you need strong metal, preferably high-alloy steel. The material is resistant to mechanical impact and rust.
Designing a lister
It is not difficult to make the mechanism. Step-by-step instructions:
- Take a sturdy 3 mm thick sheet of metal. Cut a piece out of it, according to the drawing.
- Sharpen the side where the bottom edge will be.
- Bend in the middle over a fixed tube. Pierce the leading edge with a hammer.
- Spread the wings of the nozzle.
- Use a crossbar to fix the distance between the blades by welding it to the back of the flats.
- Pierce the bottom of the piece so that the blades are ploughshare-like.
- On the front part of the bar, mount the bar with holes by welding.
- Screw the bar to the power tiller to the stand.
If an adjustable nozzle is required, attach the wings with hinges and a rod.
Double
Instructions for creating the structure:
- Cut or saw a 2 mm thick strip of sheet iron.
- Create rectangular slits on each side.
- Bend the blade in the middle so that it wraps around the square bar at the back at a 90° angle, forming a front double eye.
- Thread the hitch stand into it.
- Drill a hole for the bolt in the mount.
- Make holes at the left and right sides of the hollow shaft with the same distance between them.
- Thread by hand. Use a tap and a screwdriver.
- Screw the bolt through the thread in the boom to the stop at the back of the mount.
- In the middle part of the crossbar, weld a stand to secure the attachment to the power tiller.
Adjust the width of the rows and make a double twist by moving the construction along the rod. Set the blade mode by sliding the wings. For proper operation of the mechanism, pay special attention to the quality of attachment of the rack in the eyelet.
Plow-shaped
Step-by-step creation of the mechanism:
- Make a frame. Take an iron tube 52×40 mm with a wall thickness of about 7 mm. Cut the opposing bars and make a fork.
- Mark on the frame in the middle. Weld up the hole in the front part of the frame.
- Secure plow rack. Drill a 3.1 x 1.6 cm hole through the tube for the support part. Make holes in the narrow walls of the frame to a maximum size of 1,02 cm.
- Make a handle out of a half-inch diameter pipe.
- Make a hitch. Use U-shaped channel mount and mount underneath steering section.
- For the main working parts take metal sheets up to 5 mm thick. Firstly make the ploughshare. Use an old circular saw blade for this. Use an anvil for sharpening.
- Use a 0.6m long pipe to make the dozer blade. To do this, take cardboard or paper as a template, attach to the pipe, trace. Cut it out with a welding machine. Grind with emery board or angle grinder.
- Reassemble plow. Weld the parts to a 0.25 square metre sheet of steel. Use a hammer or chisel to detach the base on which the preparatory work was carried out.
- Trim seams, grind mouldboard and ploughshare.
Important! It is imperative to maintain dimensional accuracy.
Dutch
To make the attachment, follow the sequence of operations:
- Cut wings from 3mm sheet of iron.
- Sharpen the edge at the lower edge.
- Bend in the middle.
- Hammer out the front edge.
- Separate the blades of the nozzle.
- Weld a crossbeam behind the wings, adjusting the distance between them.
- Punch the bottom of the piece and make it resemble a ploughshare.
- Fix the stand with holes by welding to the front of the perch.
- Screw the rod, which goes to the power tiller, to the rack with bolts.
- Adjust the head by attaching the wings to the boom on hinges.
Manual disc planter for potatoes
The mechanism consists of 2 discs with a hub, a cross bar, a handle, and uprights. Step-by-step manufacturing:
- Take 3 mm thick steel sheet. As an alternative, use 50-60 cm pot lids or discs from an old planter.
- Cut circles 45-50 cm in diameter.
- Grind the edges at a 45° angle with a machine or angle grinder.
- Weld the hubs in the center.
- Make the brackets of fasteners from pipes with the size 32×45 and 45×55 mm. In the middle of the pipe of greater length fasten the smaller one by welding. Drill a 12 mm hole in a 45 mm diameter pipe. Weld nut until the bolt is completely screwed in.
- Make a stand. Bend 2 crosspieces from the pipe 32×250 mm at an angle of 30°. Fit bushings 45×55 mm by welding butt welding on one edge, on the opposite side. perpendicular to the end. Drill the holes and weld the nuts to them.
- To assemble a handle from thin sockets and sleeve 45×120 mm, in which to make holes on 12 mm.
- Assemble the entire rack. Paint the metal surfaces. Insert the crossbar into the crank hub and fix in place with locking screws. Attach the disk hubs to the uprights. Screw in the crossbar so it fits in the holes of the hub. Slide the boom and discs onto the crossbar. Screw in.
- If desired, the fixing of the circles can be adjusted.
Practical setting of the tool on the power tiller
The theory of the work of the implement for plowing is described in the textbooks for gardeners in such detail. that even a person who is far from agriculture can understand the settings. But in practice, the saying “if it was smooth on paper, we forgot about the ravines” is true!”.
Features of the soil, the current weather, the quality of sharpening the ridges. this is not the whole list of factors affecting the quality of plowing. Not to mention the characteristics of a crawler tractor. Therefore, before driving into the garden bed. you need to pass the technique on the “virgin lands”.
It is desirable that the characteristic of the soil is the same as that of cultivated soil. Firstly, while “working” you will feel how an implement behaves and secondly, you will set correct angles and working depth.
It is equally important to choose the right speed for plowing (okuschivanie) The relationship between speed and power when using disc attachments has been described above. The same is applied to other implements. Sometimes a poorly designed homemade planter, with the right speed, can work wonders. And the expensive active loosener just scatters the soil around.
For a detailed story about setting up the potato planter and installing it on a KADVI single axle tractor, see this video material.
Unit: 3/3 | Number of characters: 1279
Homemade disc planter for power tiller
Any equipment is made according to the drawing, which you can build yourself.
Design and construction
It is necessary to consider the design features of the manufactured equipment, which depend on the type of power tiller, the type of planned work, as well as the personal desire of the owner of the equipment. The device can have different forms of curved planes. On its surface, which is immersed in the ground, a massive tip can be applied, which is relevant for planting work, as well as activities related to harvesting.
Lebes or flaps are made with a bend or with a slope. They can also have adjustable and non-adjustable profiles.
By providing sliding wings and adjustable distance between the elements, you can simplify the processing of land, as well as expand the functionality of the device.
Materials and tools required
Before making a device for a power tiller, it is necessary to prepare materials:
- A sheet of steel, at least 3 mm thick;
- struts;
- leash;
- turnbuckles;
- fastening bolts;
- washers;
- locking elements;
- disc wheels.
It is impossible to make a homemade rocker arm for a power tiller without tools:
Making and assembling
How to make? In order for the manufactured tool to perform its assigned functions, it should be assembled according to the algorithm:
- Make a template from paper, and then from steel with a minimum thickness of 3 mm.
- Cut out the halves of the equipment.
- Bend the workpieces until the outside of the workpiece is parallel with the radius line
- Carry out welding with an electrode according to the type and thickness of the metal.
- Finish the welding seams with an angle grinder to eliminate the roughness and irregularities that will later hinder the assembly and normal operation of the device.
- Check that they are securely fastened.
- Repeat the welding to check.
- Deburr the edges with an emery wheel mounted on an angle grinder.
- Bolt the uprights, the leash and the turnbuckles together in a “T” shape.
- Weld the elements.
- Connect disc wheels with wheel adapters.
- Adjust disc arrangement.
- Fasten the device to the power tiller bracket through the leash with bolts with washers and locking elements.
- If desired, the arm of the hinged discs can be made adjustable.
In order for the implement to be able to carry out its intended function, the discs must be perfectly smooth, free of burrs and irregularities.
A homemade planter has many advantages over home-built models, since it can be easily assembled, rebuilt, and repaired. Potato tiller is easier to make to power tillers Neva, Salyut and other well-known models because of the ease of attachment of the device to the equipment.
Block: 3/3 | Number of characters: 2809
Hiller for power tiller with my own hands
To make a homemade tiller for a power tiller is not so difficult. It will consist of such basic components as 2 disks, 2 stands, 2 screw-adjusting turnbuckles, a T-bar for mounting the structure.
Before you start, prepare the necessary blanks:
- Metal sheets for making discs (or already made discs);
- square metal profile for making the boom;
- Parts for making a tarplet.
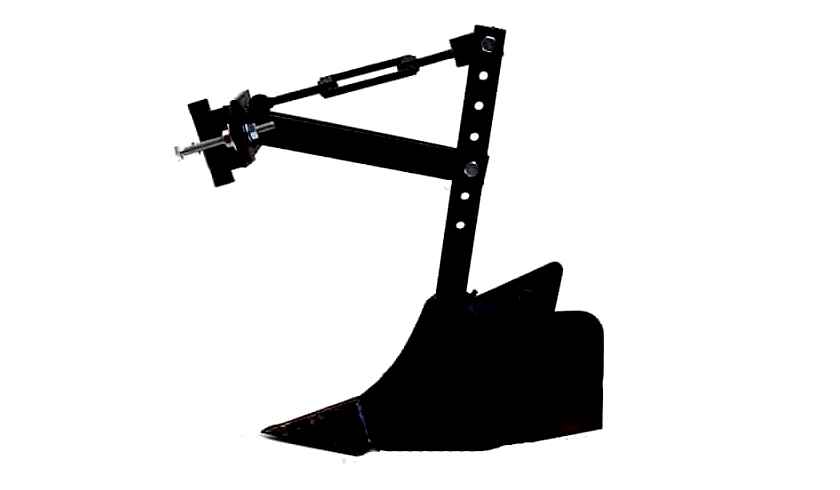
The photo below shows exactly how the adjustment of the vertical axes of the rocker arm will be done with the aid of the tarlep. Letter “B” indicates adjustment screws, letter “C”. struts:
If the necessary blanks are available, you should make the rocker arm according to the drawings below. Don’t forget to adhere to the specified dimensions to get a quality product.
The tool-holder will be attached to the tiller with a bracket, and the leash is attached to the bracket with screws with a stopper.
We also suggest you read the video, which describes the intricacies of making a homemade rocker for power tillers: This kind of rocker will be compatible with such models of power tillers as Neva MB-1, MB-2, Agro, MTZ, etc. д.
How to use
The equipment will allow you to enjoy your work
The disk disc planter for the tiller is easy to use. It is important to set it up properly before plowing. The distance between the lower and upper corner is doubled by repositioning the posts and bolts from the discs into the recesses of the leash. To maintain the balance of the machine, turn the single-row clamp at the same swivel angle.
- Adjusting the width between the discs. To make it easier to turn the clamps, a large washer is put between their ears and the leash bar. A bolt is threaded through it, and over the angle of attack is tightened with another washer. The second one is lowered by half a turn and covered with the third one.
- Mounting the clamp and stripes on the disc coulter. The tool is attached to the tiller via the hitch on the tractor frame without the string bar. The leash is held in place by a stopper and flat bolts that hold the leash to the outer tube of the attachment unit; the bolts hold the leash to the outer tube. The arm pivots in this way along the longitudinal axis to the desired level.
- Attaching the disc coupler to the tiller. The optimum operating gear is carried out at reduced speed. Traction is increased. To keep the wheels from spinning, they are paired beforehand.
The operation of the automatic disk hoe is based on the principle of the soil is grabbed by the discs as they move and the formation of a roll in the process of hoeing and fertilizing. The advantage is compactness, high operating comfort, less energy input when tilling and an even ridge formulation. The price of the device varies, depending on the size of the disc, material, adjustment mechanism, equipped with a hole form of Cascade, or roller bearings.
How to use
The equipment will allow you to enjoy your work
The disc coulter disc for the tiller is easy to use. It is important to set it correctly before ploughing. Double the distance between the lower and upper corners by moving the struts and bolts from the discs into the recesses of the lever. To keep the machine in balance, the single-row clamp is rotated to the same swivel angle.
- Adjusting the width between the discs. To make it easier to turn the clamps, a large washer is put between the clamp ears and the guide bar. A bolt is threaded through it, and another washer is tightened on top of the angle of attack. The second one is lowered by half a turn and covered with the third one.
- Mounting the clamp and bar to the disc coulter. The attachment is connected to the motoblock through the hitch fastener without a longitudinal bar. The leash is held on by a stopper and flat bolts, on which the tube of the attachment part is put, and the bolts press the leash to the outer tube. So the arm along the longitudinal line is rotated to the desired level.
- Attaching a disc trowel to a tiller. Optimal working gear is achieved at reduced speed. The traction increases. The wheels are paired beforehand to prevent the wheels from spinning.
The principle of the automatic disk hoe is that the discs grab the soil as they move and form a windrow as they hoe and raise the soil. The advantage is compact size, comfortable operation, less energy input when ploughing and an even finish on ridges. The price of the device varies depending on the size of discs, material, adjustment mechanism, equipped with either a hole of the Cascade shape or roller bearings.
Operating procedure
How to plow with a power tiller for potatoes? To get a decent yield of potatoes you need to follow the rules of soil cultivation, plant care, including inter-row cultivation, timely harvesting.
Preparing the soil for potatoes
The first step to winning the battle for a crop of root crops is to prepare the soil for planting potatoes with a power tiller. To start the spring work on the vegetable garden, it is necessary to determine the area for potatoes.
For this purpose it is necessary to find a dry place with loam. Loosening the soil is recommended in dry weather. The soil layer should not be turned over during spring tillage.
The cultivation process depends entirely on the type of soil.
- Take a small amount of soil and soak it in water;
- Rolls out of this soil a ball, from sandy soil a ball will not work;
- A strip is pulled out of the ball, if it did not work out. the soil is loamy;
- The soil is loamy or clayey.
Determining the composition of the soil can be done by hand
Depth of embedding
For potatoes, the most suitable type of sandy, sandy loam type. The master decides for himself to what depth he will plant potatoes with his power tiller.
Light sandy and sandy loam soils soak up the air sufficiently, so you can not cut ridges, but plant in the furrows. The cultivation depth depends on the soil characteristics and the optimal value is 12 cm.
How to check readiness
Preparing the power tiller for work is as follows:
Before starting the power tiller, be sure to check the oil and fuel level
How to work
The planting process involves the whole complex of activities from the preparation of equipment and seeds to the completion of the planting pore. Technological methods develop differently even depending on weather conditions.
Under all circumstances, growers practice the moment of presowing selection, seedlinging and germination of tubers. For planting choose the tubers weighing 35-50 grams. Sprouts are put in the ground when they become thick and green.
Making furrows
After all the seed is ready to be sown and the equipment for tilling, the question of how to make furrows for potatoes with a power tiller arises. Medium-ripening and late potato varieties are planted in a row at a distance of up to 35 cm, and the row spacing is maintained at 60 cm. The cutting distance between the rows of early varieties is kept within 50 cm.
Cutting beds
People use technology according to their specific conditions. With the help of a power tiller cut furrows or ridges. On the request, how to cut ridges for potatoes with a power tiller, there is an answer.
The first bed should be made exactly along the ruler. In the next row, the wheel is lowered in line with the previous row. Everything turns out smoothly, if they put extensions on the rubber wheels, hitch a two-row oculator, set the knives correctly in the center.
The role of the plow
What is a potato planting plow for a power tiller is the speed. They cut the furrows, put the potatoes in, go back, and the single axle tractor closes the furrow. The next furrow is laid at a distance of about 70 cm.
Homemade plow
Experienced farmers without much difficulty make a homemade plow for planting potatoes with a power tiller. They understand the price preference of the product with their own hands.
In addition, intelligently calculated parameters facilitate the work, the plow is not pulled out of the furrow. The plow is controlled during work and gives its advantages.
The homemade plow combines with other devices.
Motocultivator
The potatoes can also be planted with a power tiller. It is equipped with a gearbox and cultivating cutters, unlike a power tiller, which has wheels.
The cost of this unit is cheaper. Cultivation of potatoes involves the use of a plow.
How to make a tool with your own hands
To create an arrow for a power tiller with your own hands, you need to follow clear rules and it is desirable to develop or use existing drawings. This will allow you to correctly and quickly mount all the elements, so that you do not have to fix the work later. With your own hands you can make modifications of the lister (traditional) or disk type. To perform the work you may need the following tools and equipment:
- electric arc welding machine;
- Electric drill with a set of strong drills of various diameters;
- grinder and a number of disks and nozzles in the set;
- sanding machine;
- gas torch;
- workbench with a vice;
- a variety of files;
- fasteners (rivets, nuts, bolts).
Once the scheme has been drawn and the necessary parts have been prepared, proceed to the assembly of the homemade manual opener.
In the first place pay attention to the rack. It is made with a bend, the angle of which is 15 degrees. The distance must be 40 cm from the end of the pipe. Steel plates are welded to the finished stand, this will be the tip of the oucher.
The front and the rear fork are made of pipes. The forks of each must have the same width. On the front pull handle length forks make about 55-60 cm, this is the optimal size for the average person who will handle seedbeds.
Some gardeners equip the front pull with a belt, which they put on one shoulder to relieve their hands.
Read more: How to make a house for ferrets with your own hands blueprints
Duwuxotwal plough
For making a double tilting plough, you need 2mm thick slats each. The plates are shaped into a semi-circle. The prepared plates are welded to the post, making the seam as even as possible. Make sure to grind the plates with an angle grinder.
Trimmer
After the plates have been welded, a knife should be cut out of the sheet. The shape of the blade should resemble an arrowhead. The knife should be well sharpened at an angle of 45 degrees. The 45 degree sharpening guarantees a long life span.
The next step is to weld the tip to the lower part of the stand. The final step is grinding the seams.
Mudding devices made of improvised materials
It should be noted that it is possible to make a homemade perch without investing in the purchase of iron. This will reduce the cost of the tool to a minimum. As a starting material, it is acceptable to use a suitable size iron product. For example, an unnecessary lid from an old pot.
The main thing, using such an approach to the case, remember about the drawings and the required disc diameter. It can be no less than 400 millimeters. This is due to the nuances of the cultivation of the soil, taking into account the area of the roots of potatoes, planting depth and clearance. In general, the maximum depth of planting is equal to 60-80 millimeters, the length of the roots. up to 200 millimeters. The lid is sharpened on all sides, slightly transformed by bending and mounted on a single-axle tractor.