Trim on the door: The easiest way to cut it at 45°, even without experience
The architrave is an integral part of the door frame, which gives the aesthetics of the appearance. However, this element is very often scratched and wiped and therefore needs to be replaced. Here too, the main task is to cut it at a 45° angle. This kind of work is quite simple if you have a plane at hand, but what to do if you do not have it, and you need to do it urgently? In today’s article we are going to talk about the simplest ways of making a 45° weld, even without experience, using improvised means and materials. But to begin with. the simplest option with such a tool as a plier.
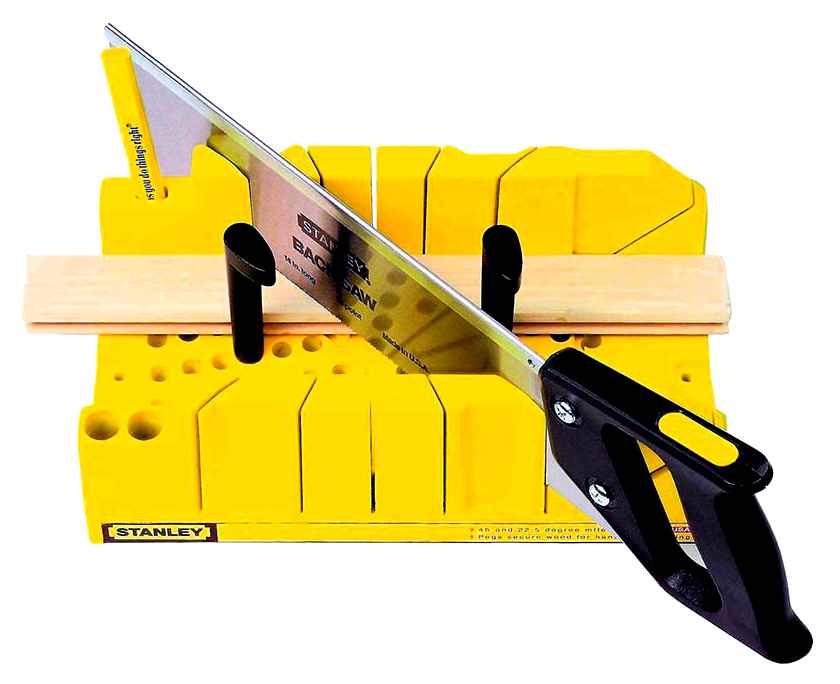
Such a device as a plier is very convenient to use, and also costs inexpensive. Therefore, if possible, it is better to buy it in advance, it will not take up much space in the closet. Most often the plane is sold together with a fine hacksaw, which is easier to cut casings. If you do not have it, you should not use an ordinary hacksaw with a broadset. The best tool for this purpose is a metal saw, the cut with it will be more accurate.
What to do if you do not have a suitable tool
In this case, you can use an ordinary school protractor. It can be used to easily measure angles. However, a protractor can also be unavailable if there are no schoolchildren in the house. In this case, will help an ordinary tile, with which to draw a strip at right angles, and then divided in half. The cut is best made from the front side, working with a hacksaw across the entire plane.
You can also use an ordinary ruler for marking. the marks will be much more accurate than with tiles.
Cutting a skirting board for ceiling decoration
Another type of ceiling plinths. from extruded polystyrene foam. They are much denser than conventional foam products (so they do not crumble), cost a little more, but to cut them a little harder. To work, you can use the same knife or hacksaw for metal.
The most expensive baseboards are made of polyurethane. These are elastic, strong and moisture-resistant products, which are very easy to cut with a construction knife. True, they can not be used in all rooms, since polyurethane is sensitive to high temperatures. it deforms, starts cracking or cracks.
To work with wooden baseboards, only a hacksaw with fine teeth is suitable, you can use a tool for metal.
However, many novice craftsmen are not so much interested in how to cut the ceiling plinth in the corners correctly. This process requires the performer to make careful calculations and accuracy. In some cases, if the interior of the room allows, you can not think about how to saw a corner on the ceiling plinth, and use ready-made corner elements. They are available in building stores. In that case, the baseboard is simply cut straight and inserted into the corner piece. All irregularities and flaws will be hidden.
Using a plinth cutter for cutting baseboards
In the carpentry business, a special device made of wood, metal or plastic is often used. the plough. In it, special slots are made that allow for an even cut under 90º, 45º, and in more complex devices. even under 60º. There are also professional plinths equipped with a pivoting mechanism. In these, the cutting tool can be set and fixed at any angle to the workpiece. Before making a ceiling plinth in the corners, it is necessary to understand the details.
To cut the inside corner of the ceiling plinth with the help of a plinth joiner, it is necessary:
- First, the baseboard blank must be applied to the surface of the ceiling and the length must be marked.
- Now place the piece of skirting board in the jig as it should be placed on the ceiling.
- Press the skirting board firmly against the back wall of the wood skating rink.
- Hold the workpiece with one hand to prevent it from shifting during cutting.
- Place the hacksaw at a 45º angle to the workpiece.
- Cut the skirting board, controlling the degree of pressure of the hacksaw so as not to damage the product.
- Then proceed to cut the counter piece of the skirting board. It is also placed against the far side of the jigsaw.
- The workpiece is pressed and held by hand to prevent it from shifting.
- Set the hacksaw at a 45º angle to the workpiece so that the direction of the cut was the opposite of the first baseboard element.
- Cut off the corner of the baseboard.
After trimming the ceiling skirting boards in the corners proceed to docking the resulting elements. If the cutting was done accurately, they will fit snugly together.
Note that it is recommended to start cutting the inner corner of the skirting board from the front side. Then the trimmer line will be cut more accurately and evenly. As for the wooden elements, all the flaws on them will need to be deburred with a file. “How to properly trim a ceiling plinth in the corners. options and methods for plinths of different materials”.
Consider how to cut the outer corner of the ceiling skirting board using a wire cutter:
- Start marking and measuring the ceiling plinth is best with the inside corner, and only after it is done, proceed to cut the outer corner. Otherwise the plank may be short, it will not be enough to fill the entire length of the ceiling.
- Place the skirting board on the ceiling, and mark its length.
- The workpiece is then placed in the jig and pressed against the front wall.
- Place the hacksaw at a 45º angle, hold the workpiece with your hand and saw off the corner.
- The opposite side of the outer corner must be cut in the same manner.
- Press the workpiece to the front of the jig.
- The hacksaw is placed at a 45º angle to the baseboard and saw off the workpiece.
Upon completion of the work, the pieces of the skirting board are docked together, checking whether everything is done correctly and evenly.
It is worth noting that the plough can help cut the corner of the ceiling plinth as evenly as possible only if the walls are strictly perpendicular. If they are uneven, and the corners are not exact, this device is unlikely to be useful. “How to properly cut the corner of the ceiling plinth. rules and methods”.
Using a container of water
Marking in water What to do if we are dealing with a pipe of small diameter, and we need to cut the pipe at an angle somewhere near the edge? A deep container full of water will help us. Before you begin, you need to calculate the angle of inclination and make a mark on the vessel. Then we just need to gently lower the edge of the pipe in the water and tilt it to the mark on the tank. We pull out the pipe, mark the line for the trimmer of contact with water, and safely cut according to the markings. This method is good for marking a large number of pipes. A ready template from a container of water will speed up the process of our work.
Selecting welding parameters
The quality of the expected weld largely depends on the correct setting of the parameters of the mode. His choice involves specifying the following parameters:
- what electrodes are planned to use for the work (their characteristics and diameter);
- the values of the parameters of the applied current (including its type: direct or alternating);
- welding arc voltage;
- The speed of the process;
- The number of passes required to fill the seam.
Much of the quality of the connection depends on what these parameters will be selected. Depending on the brand of metal from which the pipe is made and the thickness of its walls, choose what electrodes to make the connection. With the right choice of welding conditions the weld will be good and reliable.
The choice of welding modes
The quality of the expected weld largely depends on the correct setting of parameters of the mode. Its choice involves clarification of the following parameters:
- What electrodes are planned to use for work (their characteristics and diameter);
- values of the parameters of the supplied current (including its type: direct or alternating);
- welding arc voltage;
- the speed of the process;
- the number of passes required to fill the weld.
The quality of the connection greatly depends on the choice of these parameters. Depending on the brand of metal from which the tube is made and the thickness of its walls, choose what electrodes to make the connection. With the right welding mode, the weld will be good and reliable.
Computer software to assist
Computer program
I would also like to consider the method of marking with a computer program. This is quite a complicated method for those who are not used to working with a computer. It requires knowledge of PC, availability of programs for reamers and drawings. We begin with a drawing, indicating the size of the circle and the slope. We make a so-called virtual template.
Virtual cutting
Then use a printer to print the image on a sheet of paper. The larger the diameter of the pipe, the more sheets of paper you can use to mark it out. Cut out all parts of the drawing with scissors and use adhesive tape to glue them together. The ready template is attached to the pipe and we mark it along the edge of the paper. This method of marking is considered one of the most accurate. If you do not have such programs on your computer, you can use the Internet. On the net you can download a template for marking. It must also be printed on the printer and cut out. Ready molding wrap around the pipe and perform the marking.
Other trimming methods
As a rule, in ordinary rooms, the walls and ceilings are rarely even. If there are minor deviations, they can be trimmed in the process of fitting. If the deviation of the angle from the standard 90 degrees is large, you need to know how to cut the ceiling plinth without a plough.
Exit in such a situation only one. to make the procedure, how to cut corners on the skirting boards on the ceiling on the spot:
- To carry out the procedure, how to properly cut the skirting board on the ceiling, you need to arm yourself with a finely sharpened pencil (with its help you can apply clear marks, not visible from afar), a piece of baguette, a ruler and a good office knife (if a plastic or wooden skirting board is mounted. then a saw).
- Having attached the frieze to the corner, make a pencil mark on the outer edge. Do the same with the back side of the angle. As a result, the lines should form a cross on the ceiling. The intersection point of the marks will be the point of convergence of the edges of the ceiling frieze. To transfer the scheme, how to properly cut the ceiling plinth on the corners, the frieze is applied and rests the end part in the corner.
- Then using a ruler it is necessary to connect the edges of the frieze and the marking. A simple operation, how to cut a skirting board for the ceiling on a hard surface will not give a positive result: the complete connection on the cut corner of the two separate baguettes will still not be. In this case you have to make an additional trimming on the spot. This option is suitable for not very wide friezes (up to 5 cm).
- To trim the corner more precisely, it is necessary to put the skirting on the end. When cutting, the knife should move obliquely at a 45 degree angle (so that the edge is sharpened). After that, fitting in place, if at all, will be needed, but on a very small scale.
- A similar procedure, how to cut a skirting board on the ceiling, is also carried out for the second plank. It is necessary to attach it to the place of future installation, having set the end of the adjoining side of a corner. Then mark the point with a cross, draw a marking and cut at the bottom. If you need a trim, it is done before the glue is put on.
Similar actions are carried out on the outer corner. It is most convenient to first trim one corner, and the second fit already on it.
Using decorative corners
This refers to special corner adapters, which are usually supplied with polyurethane and polystyrene friezes. Decorative corners are glued in the corner, and baguettes adjoin to them on both sides. Fitting in this case, or is not required at all, or is carried out with a simple office knife.
How to cut a skirting board in inner corners: a plan of action by steps
Begin installation of plinths in one of corners. If this is your first experience, choose the part of the room where you want something to stand. Not always, of course, the first pancake, but still better to be on the safe side. To make the corner on the baseboard neatly, work without haste. Saw one off, check it, fit it. Moving on to the next one. Fasten it is better after the two adjacent corners are assembled. But it’s not worth putting off the assembly too much either.
Trimming the baseboard in the corners requires some skill. But by making a few joints yourself, you can beautifully decorate complex corners
How to use a jigsaw to cut baseboards? Position the device in front of you, preferably on a table, but it is possible and on the floor. What side to turn it does not matter, it is symmetrical. Insert the plank into the profile, rotate it as it will stand against the wall. When sawing a skirting board in the jig, the “wall” is the wall that is further away from you. Once again: you press the baseboard tightly against the back wall in the position in which it will be installed. Insert a hacksaw into the necessary slots. You can start cutting.
The first joint in the room
Cut the first skirting board trim as close to the edge as possible. Carpenters have their own lingo and they say “cut” a corner. It doesn’t matter what you call it, what’s important is that we position the skirting board in the jigsaw so that we get the first cut. Pull out the skirting board by a short distance with the use of a cutting line, we can start with 1-2 cm. It is harder to cut a smaller piece, so save it for later, when you have some skill.
In the jig, place the skirting board on the far wall, facing in your direction. It’s easier to see if you’re cutting/sawing it right
Then you have to make a corner on the skirting board like this:
- Place the skirting board in the joiner, pressing it against the wall opposite to us. Expose it in the mounting position. as it will stand against the wall.
- Insert the hacksaw into the desired slots (see picture below).
- Move the plank so that it extends slightly beyond the cutting trimmer line.
- Cutting.
- We take the second piece of a skirting board and repeat the same operations, but the position of the saw on the jigsaw is reversed. Insert the skirting board from the other side. Be careful here, otherwise you’ll have to redo it several times, as the joint won’t work.
How to cut a skirting board in a joiner: for an inside and outside joint
We got two pieces sawed to join in the inner corner. To make the joint perfect, we try on the parts in place. There are likely to be some flaws. We take sandpaper with medium grit, remove everything that prevents the docking. Then using a fine grit we achieve a tight joint without gaps and clearances.
At connection of plinths in a corner, use a transparent silicone sealant. Before you install the fasteners, a layer of silicone is applied to the cut. Immediately after the skirting board is fixed, remove the surpluses that appeared on the outside. Clean up until the surface is absolutely clean. This method of connecting baseboards in the corners looks neater, it does not clog with dirt and dust.
How to file down the corner of the skirting boards at the right distance
The second and all other corners of the skirting boards should be made at a certain distance. If the next corner is again internal and the distance to it is less than the length of the bar, we use the same fragment, which already has a notch. We measure the distance with a tape measure. strictly from corner to corner. Then this distance will be marked off on a plank by means of a tape measure. The beginning of a measuring tape coincide with a ledge, we measure required distance, we do a mark with a pencil. It will be a starting point for the cut.
It is necessary to know at what distance to cut
The skirting board with a mark is laid in a jig, select the desired direction of the sawing. The line can be aligned with the blade of a hacksaw or with the slot in the jigsaw. Whichever is convenient. Cut off. This section should be “tried on” in place. If both slats are against opposite walls or the gap is only 1 mm, everything is fine. It is possible from a new piece to cut the second slat for design of the joint. And again we remove the imperfections with sandpaper.
If the length of the wall is greater than the length of the baseboard plank, take a new plank. The second corner we will cut on it. It is important not to make a mistake, in what direction to saw. Having set both slats along the wall, on one of them to mark the joint, make a straight cut. For a straight cut, there are also slots in the jigsaw. So there will be no problems.
How to join two baseboards in a straight cut
But the joint in a straight line does not always look perfect, and in the process of operation it often diverges, forming a visible gap. If you want, you can cut at an angle (any) the two strips.
For this purpose at first we cut an edge of one plank under a slope, we mark on the second place of connection. The mark is placed on the side of the plinth, which pressed against the wall. At that point we saw off the other part without changing the position of the saw relative to the jig saw, but with the bar inserted from the other side. The joint is made with a slant. It is more accurate. The difference is especially noticeable on wooden baseboards and fiberboard. The cut, again, bring “to mind” with sandpaper.
We make the external joint
In apartments or houses there are not only internal corners, but also external corners. In this case, first trim the nearest inside corner and finish it off. When it’s ready, you can make the outside corner on the baseboard. Putting the plank in the corner, as it should be. At the place of the outer corner with a pencil make a mark exactly at the place of the turn.
How to make the outer corner of the baseboard
Next, the bar is transferred to the jig, we choose the appropriate position. To avoid mistakes, all the time imagine how the baseboard stands at the wall and what you should get.
How to make the corner on the baseboard more or less than 90°
Not all corners are exactly 90 degrees. If the deviation is small, the gaps can be removed with sandpaper. In other cases, you will have to mark and cut, taking into account the real degree. The main task in this case is to find the point on the floor where the two skirting boards will join.
Let’s start by explaining how to correctly cut the outside corner, if it is not 90 degrees. We take a plank, we put it to a corner from one of the sides, we press tightly to a wall. as it should stand. Along the bottom edge of the baseboard with a pencil we draw a trimmer line on the floor. We put a plank to the other side of the corner, do the same. The intersection of the two lines and will be the junction point of the two baseboards.
How to dock a baseboard if the angle is less or more than 90 degrees
Now we are going to fix the skirting board again, we are going to expose it the way it will be fastened. We do two marks: at the top at the turn, at the bottom where the straight lines we have drawn intersect. Now the important task: we have to make a bevel along these marks. If there is a crosscut saw or a jig saw with an adjustable slope of the saw. expose it and cut. If not, we carefully cut with a hacksaw. In order not to confuse, you can pencil out a line for the trimmer, on which to saw. Similarly mark and cut the second part. Finish the connection of baseboards with sandpaper.
Few professionals process joints with sandpaper. it’s time and extra work. But if you dock the baseboards in the corners of your own home, with your own hands, you definitely want everything to be beautiful. This is what this manual finishing is for.
Everything is exactly the same with the internal corner of a non-standard size. Applying the baseboard in the corner, draw a straight line on the floor. We do it on the other side. The intersection point is transferred to the strips.
The way of marking with a container of water instead of a template
This method of marking is suitable for pipes of small diameter, which are planned to cut at a certain angle close to the edge. First you need to prepare a deep container of water. The planned angle of slope is marked on it. Now you need to carefully immerse the end of the product in the liquid, bend it to the mark, and then pull out.
As a result of such actions, a clear line for the water contact trimmer will appear on it, it must be highlighted. Using this template the pipe is cut at an angle. This method is best for jobs that require multiple markings.
Using a computer program
To realize this method of marking pipes for cutting you will need a computer with special programs. First you need to make a drawing, which shows the transverse dimensions of the product, as well as the planned angle of the cut. It is necessary to get a virtual template.
Print it out on the printer. And here it is worth understanding that the larger the diameter of the pipe, the more sheets will be needed to print it. Then you need to carefully cut out the details of the drawing from all pages and glue, it is best to use office tape for this. It remains to attach the template to the pipe and make a marking.
This way of solving the problem is characterized by high precision. All required programs are available online and are free to download and use. There you can also find a template for cutting pipes at an angle. You just have to print it out and cut it. To mark the pipe, the template is simply wrapped around the pipe.
A set of tools for cutting ceiling plinths
Working tools when solving the problem of how to properly trim a ceiling plinth in the corners, selected depending on the material from which the plinth is made, because each of them has its own processing features:
- Polyvinyl chloride skirting has a complete lack of mechanical resistance. Even light pressure causes irreparable damage. Consequently, no great effort is needed in the cutting process. The question of how to cut a PVC skirting board is solved with a blade, a sharpened construction knife or a hacksaw for metal.
- Skirting boards made of expanded polystyrene are also not particularly durable, but compared to PVC, they are of higher quality, and also crumble easily. Trimming the ceiling baseboard made of foam is performed with sharp tools, as well as PVC.
- Wooden skirting boards have higher strength characteristics and an aesthetically pleasing appearance. However, the cost of such products is quite high. To cut baseboards made of wood, we recommend using a wood hacksaw with frequent teeth, as the teeth of a hacksaw for metal are easily clogged with sawdust.
Factory corners. an alternative option
Avoid problems when deciding how to properly cut corners on the ceiling plinths, you can use ready-made corners, which are in construction stores a large range. In this case, measure the required length of the main baseboard, cut it at right angles and join it with the corner element. However, such elements have one significant disadvantage: they look larger than the baseboard. This makes the corner more noticeable and spoils the appearance of the room. In addition, in rooms where the angles differ from 90 degrees, it is quite difficult and inconvenient to install corner elements. But most often skirting boards jointed with a corner element look attractive.
Cutting the ceiling skirting at the right angle is quite difficult, this procedure requires accuracy and precision. Using a special device. a plier. The baseboard can easily be trimmed to a 45 degree angle. When lining the baseboard in corners other than 90 degrees, you can use hand marking. To make the ceiling look decent after the repair, you need to know how to cut the ceiling plinth, and select tools according to the material of manufacture.