How to cut porcelain tiles with an end saw?
Use a hammer and chisel to hammer or cut a notch in the block or bridger on all sides. Hit the chisel on the cut line until the material splits. For a larger project or a more precise cut, a circular saw with a blade for concrete. good option. Mark the cut and clamp the stone or bridger to a stable work surface.
With this in mind, how to cut a paver with a circular saw?
- Mark the notch. Mark the cut trimmer line on the top surface of the paver, using a pencil and an angle or ruler.
- Install saw blade. Put the paver on a non-slip mat over the work surface.
- Cut on the top side.
- Cut on the underside.
- Tear along the cut.
What kind of saw is used to cut paving stones?
Bridger stones are often cut with large concrete saws or end saws, but they can be cut successfully with a simple circular saw seen. Instead of a circular saw a standard blade is used to cut lumber, however, circular saws need to have a diamond blade for masonry to cut through bridger stones.
The motor is completely vibration isolated from the motor frame. seen. There are 8 pieces left in stock (more coming soon). Used for very hard cutting concrete and rebar. Available.
Molding is still in fashion?
If they have a crown in their house =Crown molding never goes out of style. The only reason you don’t see it anymore. Is that people can’t afford it. If they do not have a crown molding=Crown molding is out of style.
Why Cut crown molding upside down and backwards? Chris Marshall: Crown molding is usually cut upside down on a coping saw so that the narrow edge that will rest against the wall rests against the saw stop and the top edge molding that will match the ceiling rests against the saw table.
How to cut a cove profile at a 45 degree angle?
Crown molding with a 38 degree spring angle is actually so common that many trim saws are equipped with pre-set clamps or marks at 31.6 degree angles and 33.9 degree. settings are used for 90 degree angles.
Choosing a cutting tool
Before making corners on the ceiling skirting boards, you need to find out what construction material is used to make the fillets:
- Styrofoam. This material is extremely brittle, it crumbles easily. It has the advantage of being affordable to many consumers. When working with expanded polystyrene because of its brittleness should be used a knife or hacksaw. Do not press too hard, the work must be done very carefully and slowly, otherwise the baseboard will break.
- PVC. Products made of it are inexpensive, but they also need to be handled with care. PVC skirting boards are highly electrostatic and therefore strongly attract dust. Use a hacksaw or knife to cut these boards.
- Extruded polystyrene foam. Tacks made of this material are durable and reliable, but their cost is higher than previous samples. They are not easy to break, and they do not crumble when cut. When choosing what tool to use and how to cut corners on the ceiling skirting boards made of this material, it is best to use a construction knife or hacksaw, which are designed to work with products made of metal.
- Wood. Wood is used to make the strongest type of these products. This robust product is the hardest to work with, due to the high resistance of the material to physical impact. Wooden skirting boards are cut with a hacksaw, and with fine teeth.
- Polyurethane. It is used to produce durable skirting boards for ceiling surfaces. They have a big disadvantage. polyurethane products do not react well to temperature differences and are sensitive to heat or cold. These nuances must be considered before trimming the ceiling plinth in the corners.
Special fittings are available, which facilitate the process of installing the skirting boards. These are corners for ceiling plinth. They help to hide all kinds of errors that occur during installation. These corners should simply be inserted into the skirting boards. All you need to do is trim the fillet at right angles. Corner will cover existing errors.
Inner joint
The workpiece is placed in a special device. a plane. This unpretentious tool is inexpensive and must be purchased. Consider the maximum width of the cut slat that can fit in the jigsaw. it must not be less than the width of your parts. Firmly having pressed a plank to a wall of a chair you through a slit under which there is a designation “45 degrees” saw off a plinth. One workpiece is obtained. The second piece is heated exactly the same way, but, the cut is made in the other direction and the bar must be applied to the opposite side of the jigsaw.
After these operations you will have two elements, perfectly adjacent to each other. As a result of the connection you get the internal joint of ninety degrees. Before installation, it is recommended to carefully grind the cut with sandpaper. If wooden workpieces were sawed off, then wood putty is needed to obtain perfect joints. it is not uncommon for small chips to appear when sawing.
Inner junction
The workpiece is placed in a special attachment. the jig. This uncomplicated tool is inexpensive and must be purchased. Consider the maximum width of the cut slat that can fit in the jigsaw. it must not be less than the width of your parts. Firmly press the slat against the wall of the wall joiner you saw through the slit, under which there is a sign “45 degrees” sawing the skirting boards. One workpiece is obtained. The second is heated in the same way, but the cut is made in the other side and the plank must be applied to the opposite side of the jigsaw.
After these operations two elements are obtained, perfectly adjoining by the slices to each other. As a result of the connection you get the inner joint of ninety degrees. Before fitting, it is advisable to sand the cut edges very carefully. If you sawed off wooden workpieces, then to get perfect joints you need a wood filler. it’s not uncommon when sawing small chips.
Trimming technology
With the use of a chisel
Instructions for corner fitting baseboards and fillets depends on what configuration the joint will have. As a rule, when performing repairs parts are connected perpendicularly, so in this section we will consider in more detail just such a variant.
As mentioned above, it is easiest to cut corners using the compound mitre saw.
Cutting directions for shaping an inside corner
- Place the piece against the place where it will be installed, and then measure the required length of the piece.
- Set the chisel on a flat, stable surface. The best way for this purpose will be the workbench, because it will not be so convenient to saw on the floor.
- Insert the strip into the jig where it will be placed on the wall. Press the piece against the wall of the frame, so that the flat parts touch the inner surfaces of the chair.
- Hold the piece with your left hand to prevent it from shifting.
- We set the saw blade in the slot at the desired angle (the correct orientation for internal and external corners is shown in the diagrams and photos). Carefully sawing off the piece, avoiding unnecessary pressure on the tool.
Cut to form an outside corner
Tip! Skirting boards with thin walls can crack under pressure. To avoid this, we put under it a wooden staple or any other bar of the appropriate size and saw them together.
- Now we proceed to cutting of the second corner. Put the other part of the skirting board symmetrically to the first one in the jig and press it to the tray in the same way.
- Cut the piece by setting the hacksaw into the appropriate slit.
After that, it is advisable to check how tightly the trimmed corners adhere to each other, and only then proceed to gluing them.
Connect the fragments only after their preliminary adjustment
Without the use of a jig
The price of such a device as a plinth and moldings is relatively low, but at the right time it just may not be at hand. Certainly, in this situation labor intensity of a task will increase, but nevertheless it is possible to cope and so.
Marking scheme
The first method is suitable for ceiling fillets and involves the use of a marking on the ceiling:
- Trim both docked parts at 90.
- Place one panel at the attachment point, press it firmly, level it and set the end against a perpendicular wall.
- Using a pencil, draw a trimmer line outlining the contour of the panel.
- Remove the panel, lay a symmetrical part and repeat the operation.
- Now we have the intersection point of the two lines on the ceiling. One by one we put details to a basis and we do marks opposite to this point.
- Laying the baseboard on the workbench, connect the mark to the corner and on this line perform trimming.
- As in the previous case, check the quality of the skirting board joint.
Sequence of operations
You can use templates for floor plinths:
- We take two strips of heavy paper or cardboard, whose width corresponds to the width of the baseboard.
- Apply them to the place of installation of the product, noting how the connecting line for the trimmer should pass.
- Using the marks, cut out templates which we then lay on the skirting board and use as a sample for trimming.
Tip! Only use one pair of templates to join several corners if you are sure that they are perfectly perpendicular. Otherwise the gaps will be quite large, and laborious fitting is required.
Using markings on cardboard
Complex configurations
Sometimes it is necessary to join not perpendicular skirting boards, but parts located at a different angle.
In this case, the task is seriously complicated:
- Cut two blanks with a good margin in length.
- We put one workpiece to the place of installation and mark the lines corresponding to the location of its edges at the top and bottom.
- Repeat the operations for the second part.
- At the intersection of the lines determine the location where the joint will be located.
- Before cutting a corner on the baseboard, we put it to the wall and transfer the marks directly to the material.
- Connect the marks with a line, along which we make a neat kerf.
- Try it on to see if we have a good fit, first by weighing it down, and then on the base. If necessary, either remove some of the material from one edge, or (if the discrepancy is too great) repeat the trim, more carefully completing all measurements.
Corners over 90
Exactly the same when it is necessary to collect a curvilinear surface from several segments, only the lines of junction of details here will, naturally, be more.
How to cut a skirting board in the inner corners: a step-by-step plan of action
Begin installing baseboards in one of the corners. If this is your first experience, choose the part of the room where something will stand. Not always the first pancake, of course, but still, it’s better to be on the safe side. To make the corner on the skirting board neatly, work without rushing. One sawed off, checked, matched. Move on to the next. Fix it better after the two adjacent corners are assembled. But it’s also not worth putting off the assembly too much.
Trimming the baseboard in the corners requires some skill. But having made a few joints yourself, you can beautifully design complex corners
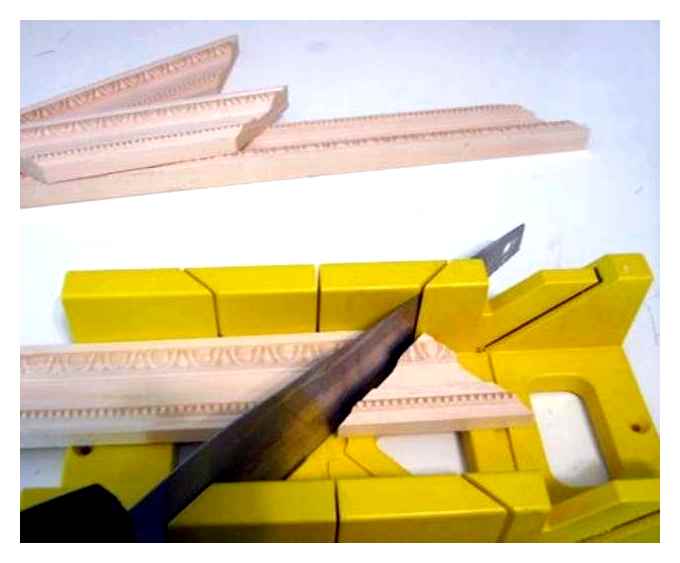
How to use the plinth cutter to cut baseboards? Position the device in front of you, preferably on a table, but you can also do it on the floor. Which way you turn it does not matter, it is symmetrical. Insert the plank into the profile, rotate it as it will stand against the wall. When sawing a baseboard in a jig saw, the “wall” is the wall that is farthest away from you. Once again: you press the baseboard tightly against the back wall in the position in which it will be installed. Insert a hacksaw into the required slots. You can start sawing.
The first joint in the room
The first piece of the skirting board must be cut as close to the edge as possible. Carpenters have their own lingo and they say “cut” the corner. It doesn’t matter what you call it, what’s important is that you position the skirting board in the direction you want to make the cut at the beginning. For the line for the trimmer of the cut move the bar to a small distance, for the beginning it is possible on 1-2 cm. It is more difficult to cut a smaller piece, so the savings are left for “later” when you have at least some skill.
Position the skirting board in the jigsaw on the far wall, so that it faces away from you. This makes it easier to check if you are cutting/sawing properly
Further to do a corner on a skirting board is necessary so:
- We place the baseboard in the mortise, press it against the opposite wall from us. Expose it in the mounting position. as it will stand against the wall.
- Insert the hacksaw into the desired slots (see picture below).
- Move the bar so that it extends slightly beyond the line for the cut trimmer.
- Cut off.
- We take the second piece of baseboard, repeat the same operations, but the position of the saw on the jigsaw is reversed. Insert the skirting board from the other side. Here be careful, otherwise you will have to redo several times, as the connection will not work.
How to cut a skirting board correctly in a jig: for the outer and inner joint We have two pieces of wood cut for the junction in the inner corner. To make the joint perfect, we try on the details in place. Most likely, there are some flaws. We take an abrasive paper with a medium grain, remove everything that prevents the docking. Then a fine grit to achieve a tight joint without gaps and gaps.
When connecting baseboards in the corner, use a transparent silicone sealant. Before installing the fasteners, a layer of silicone is applied to the cut. Immediately after the skirting board is fixed, remove the excess that has appeared on the outside. Clean up to a completely clean surface. This way of connecting baseboards in the corners looks more neat, no dirt and dust gets clogged in it.
How to file the corner of the skirting at the required distance
The second and all other corners of the skirting boards should be made at a certain distance. If the following corner again internal and distance to it is less, than length of a plank, we use the same fragment on which already is a bar. We measure the distance with a tape measure. strictly from corner to corner. Then this distance is marked off on the strip using the same tape measure. The beginning of a tape measure coincides with a ledge, we measure the demanded distance, we do a mark with a pencil. It will be the starting point for the cut.
It is necessary to know, on what distance to cut
The skirting board with a mark is laid in a chair, choose the necessary direction of sawing. The line can be aligned with the hacksaw blade or with the slot in the jigsaw. Who needs it? They cut off. This section must be “tried on” in place. If both corners are against opposite walls or the gap is only 1mm, that’s ok. A second skirting board can be cut from the new piece to make a joint. And again we remove the imperfections with sandpaper.
If the length of a wall is more, than length of a plinth plank, we take a new plank. The second corner we will cut on it. It is important not to make a mistake which way to saw. Having established both planks along the wall, on one of them to mark the place of connection, to make a straight cut. There are also slots in the wood chisel for a straight cut. So there will be no problem.
How to connect the two skirting boards in a straight line
But the joint in a straight line does not always look ideal, and in operation it often diverges, forming a visible gap. If there is a desire, it is possible to cut at an angle (any) two slats.
To do this, first cut the edge of one slanted plank, mark on the second place of the connection. The mark is placed on the side of the skirting board that is pressed against the wall. On this mark we saw off other site without changing position of the saw relative to the jigsaw, but having inserted a slat from the other side. The joint is oblique. It is more accurate. Especially the difference is visible on wooden skirting boards and fiberboard. The cut, again, bring “to mind” with sandpaper.
Options for splicing plinths made of wood or wood-fiber board
Making an outer joint
In apartments or houses there are not only internal corners, but also external. In this case, first trim the nearest inside corner, finish it. When it is ready, you can make the outside corner on the baseboard. Putting the plank in the corner, as it should be. At the outside corner with a pencil, make a mark exactly at the pivot point.
How to make the outside corner of the baseboard
Next, the plank is transferred to the jig, we choose the appropriate position. In order not to make a mistake, all the time imagine how the skirting board stands at the wall and what you should get.
Trim to the outside corner
How to trim a baseboard to an outside corner.
If the room has external corners, it is much easier to formalize them than internal ones.
Manual step by step with a wire cutter.
- Place the skirting boards against the wall and mark the point of intersection.
- For the left-hand side cut, position the strip in the device so that its top is pressed against the upper wall and the bottom is against the lower wall, and the long edge is on the right.
- Cut the blade along the line of the cut in 45 degrees.
- Cut from the right side can follow the same principle, with the edge of the blade on the left.
Tip: Check the cuts on the floor and do not glue the baseboard until you are sure the job is done correctly.
How to cut a profile with a mitre saw
Those in the carpentry business know that when making baseboards and mouldings, you need to cut the workpiece at an angle and at a slant. This work must be carried out with particular precision, because we are talking about making a joint on the bevel. The trimmer saw does a good job with the task at hand. With it you can easily handle profiles, including wide parts.
The same work can be done with a stationary circular saw, but it requires special skill. With crosscut saw. everything is much easier and more convenient. But the tool has to be precise. That is why it is better to buy a crosscut saw from a reputable manufacturer. By the way you can save money when buying if you choose a model without a variable saw blade tilt. When cutting profiles in the mounting angle position it is quite possible to do without this function.
Now let’s pay attention to the disk, the roughness and quality of cuts depends on it. For cutting wooden profiles it is necessary to use discs with tungsten carbide inserts, the front angle of teeth should be from 5 to.5 degrees. If the disk is not of the highest quality, even an excellent tool will not save the case. Believe me, an expensive disk is worth its money. In addition to wood, we also cut plastic and aluminum. You can find discs in stores with special tooth configurations designed to work with these materials.
Further it is up to the master. Saw cutter is fastened on the workbench with clamps. For long profiles you can make two supports and put them on either side of the tool. For frequent work of this kind it is advisable to equip the workshop with a special table, the tabletop of which would be at the same level as the working table of the mitre saw. Both special workbenches and a variety of profile cutting devices are available on the market. But good results can be obtained by using self-constructed supports and table extensions.
The cutting tool needs to be positioned vertically. The circular saw blade is secured by the spindle nut that must not be clamped by tightening it. After you have checked that the saw is securely mounted on the workbench, fasten the workpiece. Parts for bevel joints are obtained with bevel cuts in different directions. Saw blade of sliding compound saw is turned by 45˚D. After sawing to the right, saw the workpiece and then do the same, but with a 45 degree turn to the left. In this case, the inner and outer parts of the connection are obtained. Now cut the parts to the right length, and you will make a great skirting board or cornice.
How to use?
In order to properly cut the skirting board using a wire cutter, the following accessories will be needed:
- A metal hacksaw, the tooth pitch of which must correspond to the material used for the skirting board;
- Assembly or a stationery knife (for cutting ceiling foam products);
- a protractor and a simple pencil (preferably a very soft pencil);
- fine sandpaper.
Before trimming a skirting board, measure the necessary angle with a protractor on its front side and mark it with a soft pencil. Next, the workpiece is placed in the jigsaw so that the outlined line for the trimmer is positioned strictly on the axis connecting the two paired slots. Then the skirting board is pressed against one of the side walls, held firmly by hand and insert the hacksaw into the grooves. Sawing off the corner must be done accurately to the markings, otherwise the geometry of the connection will be broken and the work will have to be redone.
Arbitrary angles are cut using a rotary or electric model. The skirting board is placed on the work surface, fixed and laser marked using a built-in angle gauge. Then the sawing is performed, after which the parts are aligned as a control. Cutting corners with such tools is characterized by the perfect shape of the cut areas and high accuracy of measurements.
When forming inner and outer corners there are some rules, if you become acquainted with them, there will be no difficulties in cutting the skirting board. The inner corner is formed as follows:
- The wood skirting tool is placed on a table or workbench with its sidewall towards itself;
- The skirting board is placed according to its left or right affiliation, and close to the opposite wall of the tool;
- The left piece should be placed in the jigsaw from the left side and the corner cut from the right and vice versa: the right pieces should be placed on the right and the corner cut on the left;
- the sawing is performed without allowances, strictly along the outlined line;
- After the left and right corners will be sawed off, both preparations overlap and check for a tight fit of parts between them.
The outer corner is formed in a slightly different way, namely: the skirting board is not pressed to the opposite side, but to its side, after which the left side is set not to the left as it was in the previous case, but to the right, and the corner is sawed off. With the right piece proceed in the same way: set it on the left and cut off a corner. When working with a wire cutter, remember that the cutting of the skirting boards is done from the front side in both cases.
Before you begin, prepare all the necessary tools: a plane, a special hacksaw with fine teeth (sometimes sold as a set with a plane), a pencil, a tape measure, sandpaper.
The use of the planking mitre requires some skill.
Safety precautions when working with this tool require special attention. this applies to both fixed parts and the movable hacksaw.
The workpiece is placed in the device so that it is tight to the bottom and one of the side strips. It is necessary to monitor the correct position in accordance with the required angle of cut. You must cut all the way through with the hacksaw, otherwise the face of the workpiece may split in the process of breaking.
It is very convenient to cut the baguette with a chair for finishing frames or a special ceiling baguette, made of polymeric materials. Since the outer surface is often decorative dings, the requirements for the quality of the cut is always very high.
- Before cutting, you must carefully mark the workpiece so as not to mix up the corners.
- The workpiece should be placed in the jig so that the marked line for the trimmer coincides with the corresponding groove of the tool.
- Then it is necessary to press the workpiece and cut with a hacksaw strictly on the mark.
- When cutting the second blank must be clearly imagine how it must be docked to the first. it is important to put the baguette in relation to the grooves of the tool, otherwise the work will have to be redone. When you are sure that everything is installed correctly, you need to repeat the operations in the same order.
In order to saw off the corners of the baseboard, the baseboard saw is placed on a workbench or table. In the stud is placed at once both fitted skirting boards. it is important to make sure that they clearly adhere to the opposite walls of the device.
The wire guide also works well with cable ducting. This element of the interior is not easy to hide, and all the flaws of their laying and installation are visible. It is not difficult to use the cross cutter in this case, and the effect is stunning.
Varieties
The design of the crosscut was developed quite a long time ago. Its shape resembles a tray or box without end walls, which has a U-shaped cross-section. Slots are made in the side walls at a certain angle. In the beginning, the tool was made of wood.
Work with such a jigsaw should be very careful, as it is easy to saw together with the workpiece and the tool itself.
Step by step, the manufacture of the simplest wooden chisel can be presented as follows:
- First of all, you need to choose an even scrap of boards up to 50 cm long and 10 cm wide;
- Screw the side boards of the same size as the base to it with self-tapping screws;
- Using a protractor, mark the side walls for slots, make angles of 90 and 45 degrees;
- Carefully cut guide slots in both side walls.
Modern products have become cheaper, as they are made more mass-produced from plastic or polyurethane. They do not weigh much and are suitable for mobile repair crews.
The plastic diagonal cutter has a big disadvantage, however, because it wears out quickly. The slots gradually expand, and it becomes impossible to work with such a tool. However, because of their low price, it is always possible to replace a worn-out device with a new one.
Metal (aluminum) products are the most reliable and durable. Many professionals use exactly such tools. The only disadvantage of this type of product remains its price.
Structurally the tools can also be divided into several groups.
- Simple. This attachment fixes the workpiece for sawing at right angles and 45 degrees. It can be successfully used for sawing baseboard, laths, casings, baguettes, and other parts. Special hacksaw with slight toothed splitting is available for this type of tool.
- Rotary version gives the opportunity to rotate the hacksaw to almost any angle: from 15 to 135 degrees. This type of tool is of little use for small domestic work, but is very convenient in workshops as a stationary tool working in constant mode. Some inconvenience is quite time-consuming setting the required angle. But if the workpieces will be sawn in several pieces, then this factor will not be relevant.
- An electric plier is a circular saw mounted on a special machine that has a turntable.
The last two types of tools will be useful for large amounts of work. they can cut several products at once. A special clamp helps to cut, for example, several blanks of floor or ceiling plinths, products for frames.
Block: 3/3 | Number of characters: 131
Consider in more detail how to properly cut the corner on the ceiling plinth with the help of a plier using different materials.
Polyurethane
Polyurethane foam (colloquially called just polyurethane) is a very good material for ceiling skirting. Because of their good flexibility, they fit snugly into the base (wall and ceiling junctions), even if the walls and ceiling are not level due to construction errors. In addition, polyurethane is well washable, and therefore can last a long time. Low load resistance is not a problem here: there are almost no loads on the ceiling plinth. We also have a separate article where the question of how to make a ceiling of plasterboard and suspended ceilings of plasterboard with your own hands is discussed in more detail.
Material polyurethane for ceiling plinths
To cut the polyurethane skirting board with a wire cutter is as follows:
Styrofoam
Foam is also often found as an element of decorative design of rooms. Its characteristic feature. increased fragility, so it must be fitted in place extremely accurately, no deformations foam does not tolerate.
Cut it with the help of a wire cutter in the following way:
- Baseboard plates are laid in the jig.
- A cut is made. Unlike polyurethane, foam is a soft material, and it can be cut even with a knife or better. a clerical or construction cutter. Here it is better to use not big, but an even piece of wood, a metal strip or a ruler. As a last resort, you can make pencil marks corresponding to the slots of the jigsaw, connect them with a ruler. and lead the slots.
- If you wish you can use any type of saw, but you must take into account the fragility of Styrofoam. Therefore, it is better to moisten the blade with water in advance.
- Once cut, fitting is carried out in the same way as for polyurethane.
Asterisk IMPORTANT: Styrofoam is a fragile material, so the cutting tool should be sharpened as best as possible.
Polystyrene
Polystyrene has the same properties as Styrofoam. That’s why polystyrene skirting boards are cut in the same way as Styrofoam skirting boards. The main thing here is to sharpen the cutting edge of the tool as sharply as possible in order to avoid chipping. There is no need to machine the cut edges with emery cloth: the edges are usually fluted enough as it is to ensure good adhesion of the glue.
Wood
Wooden skirting boards are not very common and are expensive, so they must be treated responsibly. The cutting technology looks something like this:
Asterisk IMPORTANT: when fitting you must be extremely careful, it is better to cover an uneven cut with a decorative overlay or wood filler, than to scrape too much of the wood.
Widespread nowadays plinth from plastic (polyvinyl chloride, PVC). It is convenient because:
- Easy to cut with any tool.
- It is flexible, and can be used even in rough corners.
- Usually has internal cavities, which means it can be used as a conduit for electrical wiring or fiber optic lines for the Internet.
PVC skirting is well approved
PVC skirting boards are cut just like polyurethane. However, you must take into account: the best tool, a hacksaw for metal with fine teeth, is only suitable for thick skirting boards, in thin ones it can tear out pieces. So the best option for thin items is a stationery or construction cutter or a sharply honed knife. It requires a certain knack for use, therefore it is better to try beforehand on scraps or sheets of thin plastic.
Block: 3/8 | Number of characters: 3610
Instructions for using a planking plier
The chair is placed on the work table and fastened with screws or a screw clamp. The workpiece should be marked, then inserted into the chisel tray so that the mark is opposite to the required cut. Press the workpiece by hand or secure it. A hacksaw is inserted into the kerf and the workpiece is cut at a specific angle. You need to use a special hacksaw to make an accurate cut. accurately. Insert the other side of the second workpiece and make the cut. Grind away any irregularities with fine sandpaper.
The chisel can be bought in a store, on the market, or made by yourself.
Advantages of a homemade wire saw
Creating a chisel with their own hands has a number of advantages:
- small consumption of materials left over after repairs. Making a tool with their own hands does not require an investment;
- You use a sturdy, reliable, environmentally friendly material;
- You can create a multi-tool that will serve you well for years to come;
- You will be able to make grooves at such angles as you need, but for this you need to correctly calculate and mark the materials for work;
- The production method is very fast and does not require much effort.
How to make a crossbeam with your own hands
Before you start the work on the manufacture of the chisel with their own hands, it is necessary to prepare high-quality material. The wood must be well dried, with a smooth surface, without defects and dents. It is better not to use plastic for the mortiser, as it can get damaged during its making. The thickness of the boards should be about 2 cm. Prepare a ruler and pencil, fine sandpaper, a vice, a drill with a set of drills, euro screws and Allen wrench for tightening them. hacksaw for metal.
Make the side walls of the jigsaw. They can be made from 1 cm thick plywood or 2 cm thick boards. The height of each of the boards may vary from 30 to 50cm, length 25cm, but no more, too long boards will interfere with the work. On the surface of the boards, make marks to mark the holes for the screws, and then mark the kerfs.
To do this, join the two workpieces together precisely by pressing them together in a vise. In the middle of the line make a mark with a pencil or marker. Mark 45 and 90 degree angles on opposing edges. Make cuts with a metal hacksaw. The depth of cut must be deep, but not as deep as the bottom of the jigsaw. Make a cut that is perpendicular to the given. Clean the kerf with fine sandpaper. Now you need to connect the sides to the base. Connect the sides of the bottom of the future jigsaw with the side boards.
Drill holes in the marks on the sides of the jigsaw for screws. Tighten the boards together with screws. It is best to make a hole in the middle of the base to connect it to the work table. Do not use glue in the process of making the jigsaw yourself, because a collapsible tool is more convenient than a glued one. It is important to fix a piece of rubber on the back side of the work surface, which will help the tool to be stationary. Base width of the jigsaw depends on the size of the material to be cut.
Attention: the right side of the baseboard must be placed in the tool on the right side, and the corner to be cut off on the left side. And vice versa: the left side of the baseboard is on the left side of the jigsaw, and the corner to be sawed off is on the right side.