How to properly cut glass at home with and without the glass cutter
Experienced craftsmen recommend using the three main types of glass cutters, with which you can easily cut glass to the required dimensions, even at home.
Roller
Pretty popular model, notable for its ease of use. The roller glass cutter is often chosen by beginners, because it is very convenient to work with. In addition, such a tool is cheap, because there are no diamond stones in its construction.
Structurally, the glass cutter consists of a roller part and a handle. Special hard alloys are used for the production of the roller, the diameter of the element is 5 mm.
But the working life of such a tool is limited. it lasts for three and a half to four hundred meters of glass material. But since it costs very reasonably, it is possible to buy a new tool at any time. In addition, the kit comes with several replacement roller elements, so that you do not have to change the purchased tool for quite a long time.
Diamond
Another common, effective and popular glass cutter is the diamond. This variant is perfect for both professionals and inexperienced glass cutters.
Let’s find out how to cut glass with a diamond glass cutter. it is necessary to note at once that you will spoil dozens of glasses, but all your expectations will be justified once you have mastered the technique of diamond glass cutters.
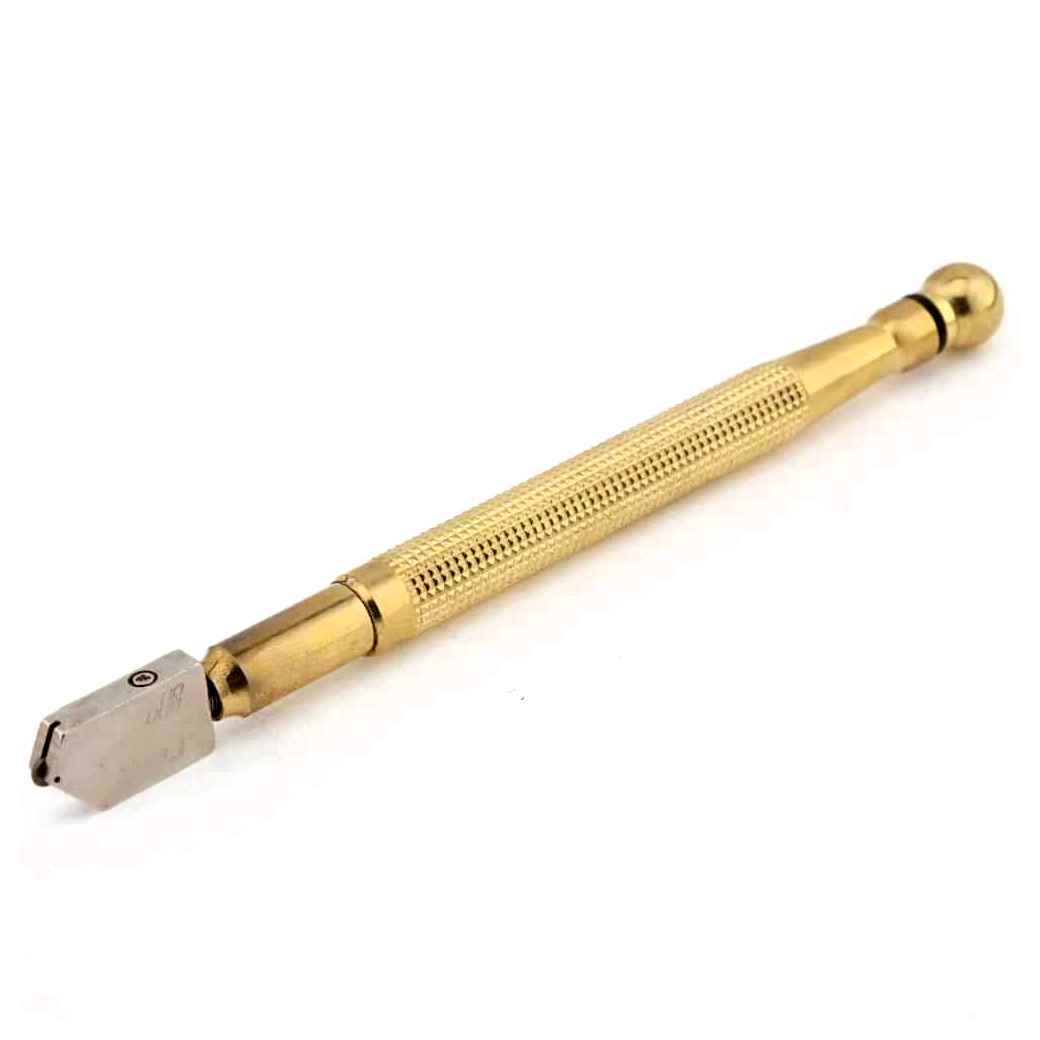
Diamond glass cutter
The tool consists of a handle and a working head with a diamond element, which can be either pyramidal or beveled. All should be aware of this peculiarity, because the shape differences of the heads influence the working principle. For example, it is much more difficult to cut glass with a pyramid head. it requires a developed, almost “musical” ear. See how to cut glass with a diamond glass cutter. During work, the diamond moves on the glass surface and makes a sound of a certain frequency. When the sound is “wrong”, it confirms that the movement of the diamond element is not correct, and the chipped glass is very likely to be defective. To cut the desired shape correctly, beginners use a glass cutter that has a beveled head.
The stone in this tool is either artificial or real, and this distinction influences the cost. But there is one more peculiarity: with a real diamond you can cut a centimeter-thick glass, while an artificial diamond is enough only for 5 mm. And the operation period of such samples is different. a real diamond will cut ten to fifteen kilometers of glass, while an artificial diamond will finish its operation after the fifth kilometer.
Oiled
Such a variant of glass cutter is a refinement of the tool with a roller head. There is a small reservoir in the handle, in which lubricating liquid is poured. It is continuously fed to the roller and glass surface during cutting, greatly reducing friction and improving the quality of the scratched lines, ensuring long tool life. As a result, the service life of an oil glass cutter, as compared to a simple roller, increases fifteen times.
oil glass cutter
Besides the above models, there are also circular glass cutters which can be used to easily cut circular holes in the glass. The construction of such a tool is somewhat different, resembling a compasses wheel rather than a handle with a cutting element. besides circles the oil cutter can also cut ellipses.
getting ready for work and working procedure
Before you can use the glass cutter, you must prepare it for operation. For the glass cutter, the cutting wheel must be correctly adjusted. To do this, loosen the fixing screw, center the roller and tighten the screw back. The roller must not be loose, but firmly and easily turned. That’s why you have to pay a lot of attention to the setting of the tool.
Now prepare the work surface. It should be wide and flat; a dining table is fine. The table should be covered with a cloth and sheets of newspaper to avoid scratching the glass. But do not make too big a cushion under the glass. it should be completely lying on the surface, not suspended. The glass must be clean and dry. Then take a ruler or other straight and long object and expose it so that its edge goes over the place of the necessary cut. It is acceptable for the cut edge of the glass to hang down over the floor, but its area must not exceed 10% of the total area of the canvas, otherwise cracks might form.
It is necessary to take the glass cutter in your hand like an ordinary ball-point pen. Using the ruler attached, make the cut. At the first cut, do not force the glass cutter, it must move smoothly to form a thin and shallow cut. Do not cut all the way through. just a few millimeters before the edge of the pane, release the pressure otherwise the cutter will break and damage itself on the edge of the pane. Then it is necessary to move the glass so that the cut segment is in a hung position, on a hanging segment it is necessary to knock with the palm of the hand from below. It is necessary to knock not from an edge, and from the middle, that the cut went from the center to the edges. To prevent the cut piece from falling and breaking, it must be supported from below with your free hand. When the entire length of the cut has been punched, the cut piece is broken off.
What tool to choose?
Glass is a molten quartz sand with the addition of elements such as calcium oxides and alkali metals.
In essence, glass is a fluid substance that flows at high temperatures and has no clear crystalline lattice. This is why glass is transparent.
To cut a glass sheet, it is sufficient to make a groove on it with a cutter that exceeds the hardness of the material itself. After that, a network of deep cracks is formed, which allows you to separate the two pieces along the cut line. The following types of manual mechanical glass cutters are used for this operation:
The first tool uses a diamond as a cutter, soldered into the metal head with a special solder. Handle is made of wood or plastic. There are glass cutters with natural diamonds. These were made in the former USSR, and cost a lot even at that time. Nowadays glass cutters are equipped exclusively with artificial diamonds. On easier devices there are minerals with a curved cutting edge. expensive glass cutters are equipped with four-sided diamonds, inclined by 20 grades to the cutting axis. The cut is more precise and deeper, but requires a good level of skill.
Roller glass cutters. the simplest and most widespread. Their trump card is low price that makes it possible to buy them for single work. The working cutter is a roller made of hard metal alloy. Most of these devices for cutting sheet glass are equipped with several rollers, three or six. When one roller becomes blunt, the circle on which they are fixed turns around its axis, and the next cutter extends into the end of the device. The rollers are made of tungsten carbide, bobedite, carborundum and other alloys harder than quartz on the Mohs scale.
oil glass cutter is structurally similar to the roller glass cutter. The difference is that the end roller is lubricated with a special kind of oil during operation. It makes the cut easier, greatly reduces cutter wear and improves the breaking of glass along the marked line. Modern oil devices consist of a roller and a special reservoir filled with oil. It lubricates the roller by capillary lubrication while it is rotating and does not leak out when it is not running. Oil glass cutters are quite advanced and can be used for cutting curves in combination with a rotating head.
Everyone chooses for himself, which tool is better for him. a roller, diamond or oil.
Safety precautions
Glass is a very fragile material and therefore especially dangerous.
When cracking glass, glass shards have several sharp edges.
Large pieces of glass can easily cut through skin and muscle mass.
Fine chips are invisible to the eye because they are transparent, but they can get lodged in the soft tissues and cause suppuration. Here are the basic rules that must be followed when cutting glass with a glass cutter:
- Wear safety glasses only. While working, small particles can get into the cornea, causing pain and even vision loss. If a piece of glass does get into your eyes, do not try to remove it yourself.
- Wear gloves when cutting glass. Many craftsmen neglect these requirements, and in vain. After all, the sharp edge of the glass easily cuts through soft materials. It is better if it cuts through your glove than through your skin. If you feel that your cloth gloves slip on the glass or that they become less sensitive, use products that have rubber coated fingers.
After the workpiece is cut, carefully clean the place of work. It is best to combine vacuuming with wet mopping. Rag or rags, which washed the floors and the table or workbench, it is better to dispose of.
Rules of Glass Cutting
Many inexperienced people who have never had a hand in cutting glass often rush to the cutting itself. This is not right.
Before starting the process, it is necessary to study a few recommendations from professionals:
- Wet the glass to be cut. That is, a dry cutter is highly discouraged. Oil or kerosene must be applied to the affected area. This will allow the glass to slide more easily, and the risk of cracking the glass itself is greatly reduced. Also, for best results, the tool itself (cutter) should also be moistened in these liquids.
- Very often there is a moment when a person cannot decide how hard to press. It is important to know that it is different for each glass because it differs in thickness. To be bolder and not to damage the material, you need to try to practice. For example, on an old and unwanted piece of glass. If such an opportunity is not given then it is necessary to rely on the sound of the cutter. The point is that with the right distribution of force, the sound should be monotonous, without sharp sonic spikes. In this case, the actions are performed correctly.
- It is not necessary to conduct the process on a hard surface. It should be covered with a soft material. Any cloth can be used, but thick enough, or a piece of an old rug. That’s what’s perfect for this process.
The process itself is quite simple. Use a ruler to make marks, which will help to navigate to the right size. Then you need to draw an even line so that the force does not expose the glass to the formation of cracks.
After the manipulation, you must carefully place the cutter handle under the cut and apply light pressure from above. If all the guidelines have been followed, the glass will break smoothly into even pieces. If that doesn’t work then use the cutter again and try again.
How to Cut Glass
wikiHow is run as a wiki, which means that many of our articles are written by more than one author. When this article was created, 42 people worked on this editing and improvement of this article, including anonymously.
Number of views on this article: 7443.
Whether you need to put glass in a window, create a stained glass window, or do another project, cutting glass is a useful skill that is not difficult to master. With the right tools and the right hands, anyone can cut standard glass at home.
Set up your workspace. You will need a large flat surface on which to cut the glass, preferably it should be slightly soft so that your glass will not be scratched. Work in an area that is easy to clean up later. Because of the risk of glass breakage, if something breaks, avoid cutting glass on the carpet. For safety’s sake, keep pets and children away from the work area and materials.
Clean the glass where you are going to cut it. Any dirt or sand can make your efforts go awry. Wipe off stains with a cloth or just run your finger over the area where you plan to cut.
Get a glass cutter and some lightweight oil. Glass cutters are about the size of a pencil and have a diamond or hardened wheel to mark the cut on the glass so that it can be easily broken along the intended line. You can buy a special oil for glass cutting or use a small amount of kerosene.
- The cut cannot be very long. Cuts longer than 60 cm have a greater chance of breaking the glass when you try to separate the halves.
- Make sure to leave at least 15 cm on each side of the cut to be able to grab on to break it. If you need to cut smaller pieces you may need special tools such as pliers or a small hammer to break glass that you can’t hold with your hands.
Dip the glass cutter in oil and grip it like a pencil. An oiled glass cutter creates a smoother line for the trimmer. Don’t forget to look at the wheel afterwards as you cut and make sure that it goes exactly along the intended line where you want to make the cut.
Put a ruler along the cut line. The ruler must be thick enough so that the glass cutter cannot damage it during cutting.
- If you apply too much pressure (this is a common mistake), chipping and gouging will appear at the point of the cut.
- You need to get a smooth cut. If you press too hard in one place and perfect in another, the glass will never break the way you intended. Microscopic imperfections in your line will prevent the glass from breaking evenly.
Move the glass cutter evenly from one edge of the glass to the other. Don’t move the glass cutter back and forth if you miss something.
Check the trimmer line. You need to achieve a line that is barely visible if you wipe off the oil. It should look like a light scratch, no more. Make sure it extends from one edge of the glass to the other.
Gently grasp both edges of the glass with your hands. Hold the glass as if you were going to break a piece of potato chip in half with both hands.
- When the glass breaks, it may start to break in the direction from one edge to the other. If this process stops somewhere, just apply a little more pressure with your wrists to break the glass all the way.
Use fine sandpaper or an emery stone to grind away the sharp edges. Not only will this protect you from cuts, but it also adds strength to the glass as a ground glass is less likely to crack along the cut.
Use a template to trim the edge. If it’s a hand-drawn curve, make sure you outline this trimmer line with the glass cutter completely from edge to edge. Use a marker pen to trace the outline beforehand, or place the glass on a paper template.
To cut in a steep arc, draw short straight lines with the glass cutter. With a steady hand you can easily draw light curves with the glass cutter. For steeper curves, draw a series of short straight lines along the direction of the curve, so that their points of contact are on the outside of the shape you cut.
Turn the glass over and apply light pressure on the back side. That way the glass will begin to break. Finish the process by applying light pressure in the right places. If your marking of the cut is made too close to the edge, the glass may break toward the edge rather than further down the line, because this is the easiest way to break.
Make a few relief cuts to break off small pieces of glass, instead of one whole piece. The smaller these cuts are, the smoother your cut will be. Wrap a small piece around the pliers and break it off.
Smooth out the edges of the curved cuts with the glass cutter. This grinder uses a rotating diamond wheel to grind. Turn the machine on and press the cut firmly against the sanding wheel to smooth it out. Then, sandpaper it like a normal cut.
- Apply the trimmer line with the glass cutter along the reflective side of the mirror, not where the coating is applied. You won’t be able to break the mirror if you put trimmer fishing line on the back of it. The technology for cutting mirrors is otherwise exactly the same as for regular glass.
- This method is for regular glass and cannot be used to cut tempered glass, which will crack if you try to break it.
- Practice on unnecessary pieces of glass to get a feel for it before you cut the required glass.
- Wear safety glasses. If the glass starts to break unevenly, a piece of glass can fly right off in your face.
- If you have not been able to apply the trimmer line properly with the glass cutter, you should not reapply it. This is more likely to damage the wheel of the glass cutter but will not solve the problem.
- Wear gloves. Edges and corners will be very sharp, so wear thick cloth or leather gloves of a comfortable size so as not to lose dexterity.
- A bad cut with nicks and jagged edges is hard to fix, you have probably already ruined the glass.
- If light pressure is not enough to break the glass, stop. If the trimmer line for the glass cutter is not well drawn, the glass may break elsewhere, including right in your hands.
- Never eat or leave food or drinks where you are working with the glass.
- Be sure to thoroughly clean the work area to remove any splinters of glass that have appeared. Even if you do not see them, they can stick to your hand or leg, which is very unpleasant.
Glass cutters and their types
First of all it is necessary to define with what glass cutter is necessary to work in your concrete case. The great confidence among professionals have diamond tools. They use diamond heads that come in two shapes: square and beveled.
The first one is used by experienced craftsmen. Its cutting part is located at optimal angles to the axes of glass cutters. Using such a tool requires a certain amount of skill. If the tool is not tilted correctly, there is a chance of getting a defective cut. You can tell if the tool is properly positioned during the cutting process by hearing and feeling, but you need some experience to do this. The beveled diamond head is most often used by beginners, because its location is on the same axis as the tool itself, which makes it much easier to use.
Diamond heads can be natural or synthetic. When using natural stones, it is possible to cut glass from 5 to 10 mm thick. Synthetic tops allow a material thickness of less than 5 mm to be cut. They also differ in their level of wear resistance. So natural stones are designed for a “run” of up to 10 km, and artificial stones are designed for a shorter run.
For glass cutting at home, the use of a roller glass cutter is recommended. It has a cheaper cost than diamond, but it is easier to use and effectively meet domestic needs. It cannot be used for glass that is too thick, but these types of glass are rarely used in the home, so using this glass cutter may be fine for home use. Its “run” can be about 350 m, after which it is necessary to sharpen it or change a roller.
Most modern glass cutters come on sale already with a removable nozzle, it allows to solve the operating problem.
It is also worth mentioning the use of oil glass cutters. They work on the same principle as roller tools, but are more advanced. There is a vessel in the tool holder, which contains an oily liquid. It is necessary for giving it to the glass and to the cutting element while cutting material. This reduces friction and also improves the quality of the cut. The tool can be used to cut glass with a thickness of about 20 mm.
It is worth taking into account that when working with glass, which thickness does not exceed 10 mm, it is necessary to use cutters with sharpening angle of 135 degrees. For thick glass with thickness from 10 to 20 mm cutters with cutting angles from 150 degrees are used.
It is especially worth noting another type of glass cutters. circular. It is a kind of suction cup and boom, on which the scale and oil glass cutter are located. Using such a device is quite easy. It is necessary to fix the suction cup in the center of the circle to be cut, then to set the value of the rod to a certain radius, and then to use the cutting element. Thanks to this design you can not only get properly cut circles on the glass, but also easily get pieces of glass out of the thickness of the sheet.
The flat surface to be cut should be level and without tilting. In addition to the glass cutter prepare a marker and a thick ruler for marking the cut line.
No special force is needed when using a diamond glass cutter. The tool should be pressed with approximately the same force as a pencil. Setting the correct direction to the cutter and finding the proper angle can be difficult for beginners. To understand the principle of operation it is possible to train on a sheet of rough material beforehand. After you have made a thin line cut you need to remember in what position the glass cutter was in, and by the same principle do it on a normal sheet. To make the cut easier, you should move the tool evenly along the length of the ruler without changing the pressure on the tool or the angle of inclination.
Glass cutters must be kept perpendicular to the plane of the sheet. A small line marking is made along the edges of the sheet so that the pressure in these fragile parts can be reduced. Otherwise it will lead to a chipping. Then the ruler should be set back from the markings by the width of the cutting element and make the cut. Work must be carried out from the far edges, and the cutter must be guided towards yourself, pressing it firmly with its side against the ruler.
The cut should be made quickly. So that it takes about 2 seconds for 1 meter. When working with the glass cutter more force is needed than with the diamond tools and the pressure should not be varied over the whole length except for the edges.
How well the tool is being used can be judged by listening. A straight hiss or crackling noise indicates proper operation, but a squeaking or creaking noise can indicate something is wrong. This indicates that the tool has become dull or that it has been pressed too lightly. The presence of small white splinters on the line may be an indication that the pressure is too much, so it should be a little weaker.
Faulty lines or too thick glass should be tapped on the other side of the sheet. To do this, move the glass to the edge of the work surface so the linear cut is 5 mm from the edge. Then it is necessary to tap with the tool through the head along the line from the upper edge of the sheet to the lower one. This will create micro-cracks that can easily break off the material being cut. To break small strips of glass you can use the sidewall of a glass cutter or a pair of pliers.
Choice of tool
Initially it is necessary to choose the right tool. As a rule diamond cutters are used for cutting materials.
The tool consists of a handle and a head where the cutter itself is installed.
IMPORTANT. Be careful with the tool. The diamond cutter is very fragile and if it is damaged it will not cut the material properly. There may be scratches in the material and if not, the material will just crumble.
It is not necessary to buy a professional tool for a single use, the middle price category will do. It is in this price range that diamond cutters, not roller cutters, begin.
Preparation steps
Fix the glass securely so it does not move in the process. After the cut is made, you need to shift the material so that the part that is not needed hangs in the air and push it.
IMPORTANT. Do not use a hammer to separate the unwanted part of the material. Thus, the part may crack or break altogether.
When cutting, hold the tool at an angle relative to the glass. Try to make the cut in one continuous line.
How to cut tempered glass
wikiHow is a wiki, which means that many of our articles are written by more than one author. Volunteer authors worked on editing and improving this article.
Number of views on this article: 21 916.
The process of cutting tempered glass is actually impossible. Tempered glass is essentially safety glass, and if you try to cut it, you will break the tempered glass into many small shards. Although you cannot learn how to cut tempered glass, you can learn how to anneal tempered glass so that you can cut it and then re-harden it.
Learn what the annealing process is. This is the process of heating the tempered glass evenly to remove stresses built up in it during the tempering process. These stress concentrator points are the reason why tempered glass cannot be cut.
- Effetre (tti), Bullseye, and Lauscha glass should be soaked at 504 degrees Celsius. Borosilicate glass should be soaked at 566 degrees Celsius and tempered Satake glass should be soaked at 477 degrees Celsius. Small beads require soaking for as little as 20 minutes, large beads require one hour soaking, and large paperweights may require soaking for 12 hours. Very large glass weighing 45 pounds or more may require months of tempering.
Slowly cool the glass to below the temperature of deformation ( = 1014.5 Poise). Be sure to do this slowly enough so that you do not introduce any additional stress. A cooling temperature of 399 degrees Celsius is appropriate for Satake glass and 427 degrees Celsius for other glass. Let it cool in the oven until it comes to room temperature.
Wearing safety glasses, prepare and cut the annealed glass. Using an angle, draw a line for the trimmer of the cut, and hold the angle along this line. Use a glass cutter to cut along these lines, pressing with moderate force to make a scratch along it. Do not run the cutter down the line more than once.
Place a 0.6 mm wood rod directly underneath the cut line and apply a sharp and quick pressure on both sides of the rod. Break the glass into two evenly cut pieces.
Grind the edges of the newly cut glass with a sanding stone. This makes it stronger and safer to use and handle.
If you wish, re-temper the glass. Re-hardening is best left to professionals, as it is a complex chemical process.
How to cut tempered glass
wikiHow is run as a wiki, which means that many of our articles are written by more than one author. Volunteer authors worked to edit and improve this article.
Number of views of this article: 21 916.
The process of cutting tempered glass is actually impossible. Tempered glass is essentially safety glass, and if you try to cut it, you will break tempered glass into many small shards. Although learning how to cut tempered glass is impossible, you can learn how to anneal tempered glass so you can cut it and then re-temper it.
Learn about the annealing process. This is the process of uniformly heating the tempered glass in order to remove the stresses created in it during the tempering process. These stress concentrator points are the reason why tempered glass should not be cut.
- Effetre (tti), Bullseye, and Lauscha glass should be soaked at 504 degrees Celsius. Borosilicate glass at 566 degrees Celsius, Satake tempered glass is best soaked at 477 degrees Celsius. Small beads require soaking for only 20 minutes, large beads require an hour soaking, and large paperweights may require soaking for 12 hours. Very large glass beads weighing 45 kg or more may require months of soaking.
Slowly cool the glass to below the temperature of deformation ( = 1014.5 Poise). This should be done slowly enough so as not to introduce additional stresses. A cooling temperature of 399 degrees Celsius is appropriate for Satake glass and 427 degrees Celsius for other glass. Cool the glass in the oven until it comes to room temperature.
Wearing safety glasses, prepare and cut the annealed glass. Use a square to draw a fishing line for the trimmer cut, and hold the square along this line. Use the glass cutter to cut along this line, pressing with moderate force to make a scratch along the line. Do not run the glass cutter along the line more than once.
Place a 0.6 mm diameter wooden rod directly underneath the cut line and apply a sharp and rapid pressure on both sides of the rod. The glass will break into two evenly severed pieces.
Grind the edges of the newly cut glass with a sanding stone. This will harden it and make it safer to work and handle.
If desired, re-temper the glass. Re-hardening is best left to professionals, as it is a complicated chemical process.