How to choose a circular and mitre saw blade
When making furniture I have to saw laminated chipboard. Laminated chipboard does not like it very much. Chipping. Chips form around the edge. How to saw Laminated chipboard
Please advise how to cut laminated chipboard, Laminated chipboard
When we are making furniture we need to cut laminated chipboard
Laminated chipboard doesn’t like it very much. Chipping. Chips form around the edge. How to saw Laminated particle board without chipping or caulking?
Unfortunately, I have never been able to beautifully fill in chips after sawing along the edge of Laminated chipboard. Of course, if the laminated chipboard is planned to be painted, the edge can be puttied, sanded, the board itself covered with alkyd primer, the edge glued with construction bandage with overlap on the laminated surface on the edge, puttied with construction bandage, sanded and painted. That will give you a perfect edge. Read more about edging Painted chipboard
But this method is not suitable if you intend to use the laminated chipboard in a painted finish. I have to saw
without chipping. Sawing so that there are no chips, without special equipment is quite difficult. The circular saw not only crumbles the edge, but can split the laminate coating half a meter along the board. And any other tool gives an even worse edge.
Rumor has it that laminated chipboard can be sawed without chipping with a metal saw with a very fine tooth, or even a jigsaw with a metal saw with a very fine tooth. But it doesn’t work for me.
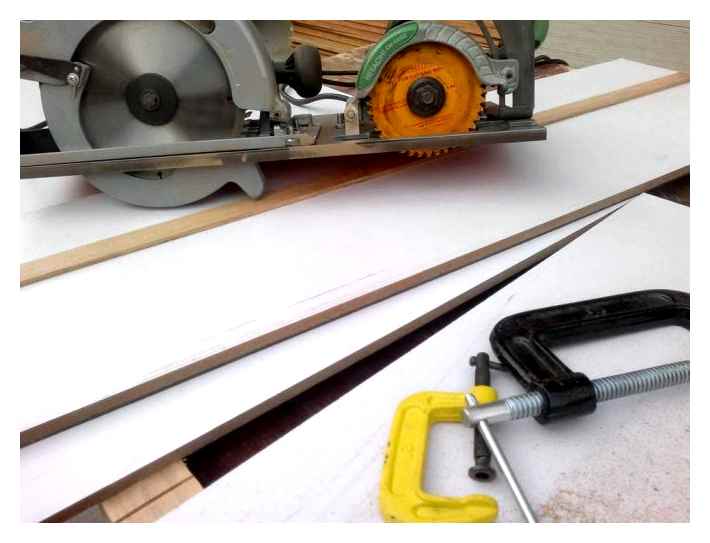
I cut Laminated Hardboard if I want a good edge, like this: Marking. I will run a miter saw on which to saw. I put a metal ruler along the mowing line. I fix it with clamps. Use the cutter to cut through the laminate along the lines of the proposed sawing. The cut is quite deep and wide (a little wider than a hacksaw or circular saw blade). Slide the cutter along the metal ruler a few times until the coating is completely cut through. I do this on both sides. It is very important to mark correctly so that the marking at the top and the marking at the bottom coincide. After that I usually already cut with a hand held wood hacksaw. But I have already mastered getting into the kerf with a circular saw.
Unfortunately, the articles periodically encounter errors, they are corrected, the articles are complemented, developed, prepared new. Sign up for news to stay informed.
If something is not clear, be sure to ask! Ask a question. Discussion.
Why the creaking of the wooden floor. My practical experience in dealing with the creaking of the floor. And also old people’s tips. How to cut off.
Why is concrete crumbling, cracking, deteriorating in foundation, driveway. Poured a path and the foundation in the summer. After the winter we can see serious damage, observed.
A chest of drawers, a drawer with their own hands. We make, we make ourselves. Self-made. Let’s make a chest of drawers, a chest of drawers of the right size from chipboard. The chest of drawers will be n.
Installing the linings with their own hands. How to decorate with linings that look beautiful and professional. Practical experience.
How to pour the foundation? Let’s make a foundation ourselves, with our own hands. Tips for pouring a foundation in short. Planning. Marking. Casting. Insulation.
Charcoal heating, experience. Experience of heating with coal. Warm, comfortable, but troublesome. Comfort and safety charcoal.
Attaching wood, metal, chipboard, fiberboard, plastic, brick with self-tapping screws. How to fix with self-tapping screws. Screwing a self-tapping screw into various materials, wood, m.
What tools to use?
If the question of how to saw a tabletop has arisen, the first thing to do is to decide on a tool for cutting, and most often several tools are used.
For example, using a circular saw, you can get a perfect result, but it is quite an expensive pleasure, because a quality tool costs a lot of money. Therefore, this unit can be found mainly only in special factories.
Angle grinder. is similar to the previous tool, but the result will be far from ideal. In the course of work with an angle grinder is possible the formation of many chips.
Usually, to saw a countertop, the two main professional and interchangeable tools are a jigsaw and an electric jigsaw.
Specialists in the field of construction divide the blades or, as they are also called, saws into two main categories:
In the case of work with worktops you need the variant that rips on one side.
Before proceeding to the main work, it is necessary to sharpen the tool blade well, so that chipping is not formed in the course of work. With the sharpened blade, before you start to saw the material directly, it is required to make a groove, the depth of which will be about 2-3 mm. This will allow you to get the job done without injury or splintering.
Sawing with a scratched marking line
It is possible to cut Laminated chipboard neatly without cracking or chipping its surface. To do this take the ruler and use a nail or awl to scratch the necessary line on the laminate.
Then Laminated chipboard must be sawed strictly along the scratched line. In doing so the teeth edges of the saw that is used must exactly hit the scratched line. Using this method it is possible to saw laminate with a jigsaw or a hand saw without any problems.
Using an electric jigsaw
For accurately sawing laminated particle board, you can use an electric jigsaw. Note, however, that it is preferable to use this tool for cutting small lengths of wood. Also when using a jigsaw, a saw blade with a small tooth size should be selected.
When sawing the laminate coating, the power tool should be moved smoothly, without heavy pressure. When sawing laminated chipboard with the jigsaw, it is advisable to dress the jigsaw slowly.
How to saw Chipboard without splintering
In order to saw evenly and splinter-free chipboard at home, you need to know some tricks. Without any doubt, it is better if you will be sawing with the jigsaw. Of course, you can also saw with a hacksaw, but the result is unlikely to please you, although it is possible to saw chipboard for various purposes, where the quality of the cut does not play any role. And so we need a smooth and beautiful cut. For this we take a jigsaw, a ruler, a tape measure and an angle bar for right angles (if it is necessary), an awl or a sharp object with which to trace a fishing line for a laminate trimmer on chipboard. We measure a part that will be sawed off with a reserve of 1-2 mm for the subsequent adjustment and apply a ruler, on it spend an awl or a sharp object of a line for the saw trimmer, try to press harder to cut through the laminate, and we saw along the line not on the line itself, but exactly along, only catching it the edge of the saw.
Then with coarse sandpaper finish the edges of our saw cut to the right state and if you are not satisfied with the quality of the sawn end, we take a wax chalk of the desired color t.е. in the color Chipboard and grind up the chips. Let’s talk about jigsaws, I personally use BOSSNevsky.
If it is necessary to saw without chips on one side only, you can use a saw with a tooth upwards and downwards, I use small saws with a straight tooth they shear less and saw both sides quite a decent cut. It’s easier to sand a sawn end with sandpaper if you drape it over a flat bar. Furniture wax crayons and markers you can buy in furniture stores, where they sell fittings. If you can not find a chalk in the color you want. No problem, it can be made from several others, mixing like paint. Simply melt crayons with a candle and drop them on a plate, one color on it another, then roll them into one and rub the chipped edges, remove the excess with a ruler or knife and polish gently with a rag, do not press too hard.
How to saw Laminated Particle Board without splintering.
Before we speak about the absence of chips when sawing Laminated chipboard and decide what to saw with, let’s define what it means to saw without chips? Everyone has his own attitude to the number of them after sawing, to some it is enough, and for someone and a dozen just right. That’s why let’s consider not one, but three available types of home cutting Laminated chipboard, from which you can choose the most appropriate one. For obvious reasons we will not consider the use of expensive equipment designed for sawing laminated chipboard, this is the destiny of professionals. We are still fans of the furniture business and therefore we will use the appropriate tools.The picture shows three parts, the upper one is sawed with an electric jigsaw, the middle one with a hand circular saw (parquet saw), and the lower one is also sawed with a hand circular saw, but then machined with a hand router. Of course it is possible to achieve different results in each case, it all depends on the experience and skill. But in general, the capabilities of the equipment in question give roughly these results on chips on Laminated chipboard.
In this case, three things allow you to get more or less good sawing results.
- Guide. It is not worth widdling with the guide for an electric jigsaw. Will suit an ordinary building level and two screw clamps.
- Choice of saw jigsaw for laminated chipboard. The saw jabs the laminate and the particle board itself with its teeth and the finer the tooth, the finer the splintering. And the sawing speed is appropriate. The direction of the tooth upwards or downwards says only about which side of the workpiece the chips will be more, in the first one from the top, and in the second one from the bottom.
- Control over cutting speed. If you feed the jigsaw too much, the saw will bend and move aside the kerf and the kerf will not be perpendicular to the plane of the workpiece. After such sawing, you would not dream of gluing the edge.
Now let’s consider whether it is necessary to “scratch” the laminate layer. It may be able to help, but only if the following conditions are met. As the saw forms chips not only on these layers, but also on the edge layers of the chipboard, so it is necessary to “scratch” them too. The width of the scratched line must exactly match the thickness of the saw (if you make it narrower, it stabs, if you make it wider, it leaves a mark on the board). The lines must be exactly one above the other and the sawing must be exactly along the line. Think about how realistic it is to do it at home with your own hands, and the answer about “scratching” will be obvious.
Sawing laminated chipboard with parquet.
The cause of chipping in this case is the impact of the cutting teeth, but not only in the direction of the kerf, but also on the opposite side. (The vibration of the power tool does not allow you to run the parquet perfectly straight, so that there is a misalignment of the disk relative to the kerf). The guide not only enables the chipboard to be cut evenly, but also prevents splintering on the opposite side to the sawing direction. When choosing a disk for sawing laminated chipboard pay attention to the number of teeth, the more teeth the cleaner the kerf.
Before you start milling furniture components with the router, it is important to saw them out with a 3 to 5 mm allowance on each side to be milled. Unlike previous sawing methods, the hand-held milling machine leaves behind a perfect cut surface. Chipping after such processing is rare and at the same time it is possible to maintain perpendicularity of the cut. So far we have considered only straight sawing, but if we are talking about cutting out various kinds of circles and roundings, then there is no alternative to the jigsaw and router. The disadvantages of using a router include the need for skill in working with it. We will talk about them in other articles.
Why the chips appear
Before cutting Laminated chipboard or laminate with an electric jigsaw, it is advisable to understand why chips form when cutting sheet material. And the answer is simple: it all lies in the design of the jigsaw, or rather in the design of the file.
So, in the process of cutting the file receives reciprocal movements (up and down). And if the saw moves along the teeth (usually downward) and almost no splinters are formed, when moving the tool in the opposite direction, the teeth as if tear out the upper layer of the material, thus creating an unpleasant splinter. That is why you can observe an almost perfect cut on the underside of Laminated chipboard and a splinter cut on its upper edge.
Ways to minimize chips
An additional reason of splintering could be a tooth bending of the file. That’s why the first thing to do is to take care about getting a tool with straight cut (often it’s Bosh saws). However, it should be noted that with prolonged work, such saws overheat and can even bend in the process of cutting. Because of that you should take breaks in your work to allow the cutting tool to cool down.
However, one saw blade change is not enough and in order to cut laminated chipboard (laminate) with an electric jigsaw without chipping it is necessary to make some modifications to the electric tool. Namely it is necessary to make it so that the material is not torn out when the saw goes against the tooth inclination. Why it is sufficient to make a shimmering pad. This conclusion can be drawn by trying to cut two sheets of Laminated Particleboard at the same time. So on the lower element chips will practically not be.
In order to make a landing pad for the jigsaw, it is enough to saw a rectangle of any solid material (for example, laminate) with dimensions identical to those of the electric tool’s soleplate.
Then a notch should be made along the larger centerline and the resulting tooling should be secured to the sole of the jigsaw with insulation tape or double-sided adhesive tape. All the finishing work is ready and you can perform finishing work in compliance with certain recommendations.
Cutting the chipboard
If the right tool is chosen and the marking is correctly made, there will be no problems with cutting the chipboard. The most important thing is that the movements should be very slow. Even if a fine-toothed saw is used, chipping can occur if you make a sharp cut. Cut through chipboard, not attempting to partially cut through it. To break the material so that it does not have cracks, then it will be impossible.
How to Saw Particle Board Without Chips at Home
How do I cut chipboard without chipping?
board. is a well-known chipboard, finely milled and coated with a paper-polymer film. Laminating is carried out at a pressure of 25-28 MPa at a temperature of 140-210 ° C. The coating is strong, beautiful, resistant to mechanical damage and thermal shock, making Particleboard very attractive for furniture production and interior decoration ,
Many home builders prefer to make their own furniture and buy high quality particleboard from building supply stores or manufacturers. Fortunately, the shorter color range of laminate coatings makes it easy to choose the most suitable material. The surface texture also varies: it can be smooth, imitating wood or natural stone, embossed under a shagreen or wooden pore.
But to make your own hands a unique piece of furniture or an exclusive interior, it’s not enough to just buy particleboard and cut it according to patterns. Thin laminate has a fragile structure. Rough illiterate actions tear the cut, and deep sinks appear on the edges of the coating. To cut particleboard without chips and cracks, you need to know some tricks for working with it.
Rules for sawing laminated particleboard
Cutting chipboard at home can be a hand saw with small teeth, circular saw, electric jigsaw. To work smoothly, you need:
Through the sawing trimmer fishing line, fasten the adhesive tape tightly, which prevents teeth from damaging the front of the pavement. Using a sharp knife, cut the fishing line for the trimmer sawing laminated coating and the layer of wood underneath it. The saw thus cuts through the inner layers of the chipboard, acting on the coating only tangentially. The hand saw should be at a very sharp angle to the board surface. Cutting with power tools for minimal power work. On the resulting piece, with a sharp knife, cut a thin layer of the coating edge at an angle of 45.6. Chop the saw cut with a small file, working the cut in the direction from the edges to the center.
To ensure that the edge of the chipboard saw does not form chips and cracks during further work, it must be protected with special spacers. This can be self-adhesive melamine tape, C-patch, T-edge.
Cutting panels of particle board and other materials
Any home handyman sooner or later faces the need to cut Chipboard. It can be making furniture by hand or paneling walls with fiberboard or particle board. As you know, cutting particle board is very simple to make the sawing smooth and chip-free. is not an easy task.
With your own hands or by order?
Custom sawing will be smoother
Quality sawing Particle board is difficult to produce by hand because of the large size of the plates. Standard board size is 2440 × 1200, and this is not the limit. However, if you often work with particleboard or fiberboard, it makes sense to buy an expensive tool and work for your pleasure. If you need to cut multiple sheets, you can go two ways:
- Cut the boards yourself using the hand tools you have
- Book a custom cut Particle Board in a specialized sawmill.
- Tools and materials
- How to cut chipboard without chips?
- Cutting shapes
- What You Can’t See Particleboard
?? We cut chipboard without chips
In this video I offer the option of sawing without a chip
, Without resorting to molding machines, immersed.
How to saw an electric saw without trimming
Sawing without chips on one and two sides, as well as what files to nail What. If you have at least once tried to make a chipboard at home, you know for sure that this work is not easy at all and requires not only skill, but also a good tool. Laminated particle board is particularly difficult to work with, cutting often results in a lot of chip. That’s why many craftsmen, faced with this problem, have come to the conclusion that it is better to buy chipboard when buying, especially since many trade organizations provide similar services, and the price for them is quite acceptable. Sawing particleboard is done using precision molding machines, which will help produce blanks of a given size and shape.
READ Why the Saw Gets Hot When Sawing
Modern models allow you to cut flat materials not only horizontally and vertically, but also at an angle.
In addition to cutting sheets, you can calculate and provide as a video file several options for cutting sheet material competently and economically (using special computer programs) and, if necessary, perform the cutting. However, if for some reason you prefer to do the job yourself, before you see the EAF you will have to do some preparatory work.
Tools and materials
If possible, it is best to cut the particle board with a hand router, using homemade guides. This method is not very convenient when cutting large sheets, because a table is required when working with this tool. In addition, this method often needs to change the cutter. But you will end up with cleanly machined “jammed” edges.
Electrical Puzzle. The most popular tool for sawing Chipboard
Some craftsmen use a jigsaw in their work, but in the absence of skill, it is difficult to cut accurately and chips may be formed.
You can try jigsawing a bimetallic canvas with sharpened teeth inward, designed for laminate. To make the saw cut with an electric jigsaw, increase the speed with a small amount of feed so that no breaks form.
If these methods don’t work for you, we’ll get you ready for the sawing at home:
How to Saw Particleboard Without Chips at Home
How can I cut Chipboard without chipping?
board. is the well-known chipboard, finely chopped and coated with a paper-polymer film. Laminating is carried out at a pressure of 25-28 MPa at 140-210 ° C. The coating is durable, beautiful, resistant to mechanical damage and thermal shock, which makes Woodchipboard very attractive for the production of furniture and interior decoration ,
Many home craftsmen prefer to make their own furniture and buy high-quality particleboard from building supply stores or manufacturers. Fortunately, the shorter color range of laminate coatings makes it easy to choose the most suitable material. The surface texture also varies: it can be smooth, imitating wood or natural stone, embossed under a shagreen or wooden pore.
But to make your own hands a unique furniture or exclusive interior decoration, it is not enough just to buy particleboard and cut it according to the patterns. Thin laminated coating has a fragile structure. Rough illiterate actions tear the cut and cause deep sinks in the edges of the coating. To cut chipboard without chips and cracks, you need to know some tricks for working with it.
Rules for cutting laminated chipboard
Cutting particle board at home can be a hand saw with small teeth, a circular saw, an electric jigsaw. To work smoothly, you need:
Tape tightly through the sawing trimmer’s fishing line to prevent the teeth from damaging the front of the pavement. Using a sharp knife, cut through the laminate lumber trimmer line and the layer of wood beneath it. The saw thus cuts through the inner layers of the chipboard, acting only tangentially on the coating. The hand saw should be at a very sharp angle to the surface of the board. Cutting with electric tools to work with minimal power. On the resulting piece, with a sharp knife, cut a thin layer of coating edge at an angle of 45.6. Shred the saw cut with a small file, machining the cut in the direction from the edges to the center.
To ensure that the saw edge of the chipboard does not chip and crack during further work, it must be protected with special spacers. This can be self-adhesive melamine tape, C-patch, T-edge.
Cutting of chipboard panels and other materials
Any home handyman sooner or later faces the need to cut chipboard. It can be making furniture by hand or paneling walls with fiberboard or particle board. As you know, sawing particleboard is very simple, to make the sawing smooth and chip-free. is not an easy task.
With your own hands or by ordering?
Individual sawing will be smoother
Quality sawing Particle board is difficult to produce by hand because of the large size of the sheets. Standard board dimensions are 2,440 × 1,200, and this is not the limit. However, if you often work with Particleboard or Fiberboard, it makes sense to purchase an expensive tool and work for your pleasure. If you need to cut multiple sheets, you can go two ways:
- Cut the boards yourself using the hand tools available
- Order sawing Fibreboard from a specialty shop.
- Tools and materials
- How to cut chipboard without chips?
- Cutting shapes
- What you can’t see Chipboard
?? We cut chipless chipboard
In this video I offer the option of sawing without the chip
, Without resorting to molding machines, immersed.
How to cut an electric saw without cutting
Sawing without chip on one side and on both sides, as well as what files to nail What. If you have at least once tried to make a chipboard at home, you know for sure that this work is not easy at all and requires not only skill, but also a good tool. Laminated particleboard is particularly difficult to work with, and often produces many chips when cut. That’s why many craftsmen, faced with this problem, came to the conclusion that it is better to buy chipboard when buying, especially since many trade organizations provide similar services, and the price for them is quite acceptable. The sawing of chipboard is done with the help of precise molding machines that help to obtain blanks of desired size and shape.
READ Why the saw heats up if you saw with it
Modern models allow you to cut flat materials not only horizontally and vertically, but also at an angle.
In addition to cutting sheets you can calculate and provide as a video file a few options for competent and economical cutting of sheet material (using special computer programs) and, if necessary, perform the cutting. However, if for some reason you prefer to do the job yourself, before you see the EAF, you will have to do some preparatory work.
Tools and Materials
If possible, it is best to cut the particle board with a hand router, using homemade guides. This method is not very convenient when cutting large sheets, because a table is required when working with this tool. In addition, this method often has to change the cutter. But you will end up with a cleanly trimmed “jammed” edge.
Electric Jigsaw. The most popular tool for sawing Chipboard
Some craftsmen use a jigsaw in their work, but in the absence of skill, it is difficult to cut accurately and chips can be formed.
You can try to install a bimetal canvas with sharpened teeth inward, designed for laminate, on the jigsaw. To make the saw cut with an electric jigsaw, increase the speed with a small amount of feed so that no rips form.
If such methods do not suit you, then to prepare the sawing at home, we will prepare for work:
Aligning the sheet Wood chipboard
After sawing it is necessary to eliminate the excess left over from the board. that was left when the marking was done. This is best done with a router. But it is also possible to remove the surplus material with emery paper. It is punched on a wooden block, which is easier to work with than loose sandpaper. Such machining allows not only to get rid of excess material, but also to smoothly deburr the edge.
This procedure ensures the best possible cut of the chipboard. But if the owner wants to increase his chances of getting a good result, he can make the cut on the slab using a guide bar. It is set along the intended line of the cut.
Correcting splintering that has occurred
To cut the material with the jigsaw and avoid chipping is almost impossible. You can cut the piece with the jigsaw with a small allowance (2 mm) and then mill or grind the allowance with the band grinder. Milling produces a cleaner edge than a grinder. Usually they mill the material on a self-made (based on the design of a circular saw guide) guide rail. Spiral cutters will improve the quality of milling. It is necessary to prepare them in a quantity of two pieces.
If you want to keep one side clean, it is necessary to use an ordinary two-feed milling cutter. If you want both sides clean, it is worth using a four-feed cutter with two left main branches and two right undercutting branches. Then it turns out that when cutting the material, the upper branches press the material down, while the lower ones pull it up. That prevents the formation of chips on the edges.
Material base
What do we saw the object out of??
If we want to create an object of high aesthetic quality (which is the case in most cases), we should start with the choice of material.
Plywood for sawing with a jigsaw must meet a number of requirements:
First, you should choose the optimal thickness of the sheet. If we cut out with our own hands a shaped piece of furniture from plywood, then we can use a panel 12-15 mm thick, and even thicker. If our goal is a thinner work, respectively, we need to buy material in 5 mm or even less.
Different thicknesses for different tasks
- The color of the veneer, from which the plywood is made, plays a role only if we are not planning to finish the finished product with a stain, varnish or paint. But most often they don’t pay attention to the color. it won’t be visible anyway!
- The humidity of the material is a critical parameter for sawing with the jigsaw. Plywood sheets must be dried thoroughly, otherwise our main activity will be replacing saws.
In terms of quality, only first or second grade plywood is suitable for artistic sawing:
- On the sheet should not be knots or stains.
- Inside the board should be no “s” with resin.
- You should choose only those panels, in which the veneer is glued sufficiently high quality.
Veneer splitting
To sum up
If you are faced with the question of sawing a tabletop, then you should not be afraid, because it is quite possible to do it yourself. If there is a possibility, it is better, of course, to use the services of professionals and take the material for processing to the workshop, where all work will be carried out on special equipment and with high quality.
In the case of sawing worktops at home, so that there are no chips, use a suitable tool. a jigsaw, adhering to the maximum accuracy and precision when working with the workpiece.
How and what is the right way to cut a hole in the countertop under the sink?
Admin1 13.10.2018 Renovation Комментарии и мнения владельцев to the entry How and what is the right way to cut a hole in the countertop under the sink? Disabled 6,518 Views From our article you will learn how to properly cut a hole for the sink in the countertop, what you need to consider and what is better to cut the countertop under the sink.
“Saving money is the best way to go,” the careful owner reasoned. And not only order a budget kitchen, but also plan to cut a hole in the countertop for the sink on their own. True, this operation only at first glance, it seems simple. For a successful result, you need:
- Know how to work with this or that material (for example, quartz countertop will not cause difficulties);
- have a set of necessary tools (or know where they can be rented);
- To understand the nuances, so as not to spoil the product (expert advice is important here).
Only then can maximum quality be achieved and once the entire work is completed, enjoy flawless kitchen function for years to come.