Polyolnik for power tiller: how to make a homemade cultivator and assemble a ripper with your own hands. step-by-step instructions and drawings
Cultivator is necessary if you want to get rid of hard mechanical work on your land. Ease of use, versatility, compactness and low price. these advantages have made the cultivator indispensable in a small private household or cottage.
With the help of the cultivator you can easily and quickly process a small area of land, conduct processing of hard-to-reach places (alpine hills, land near the fence and others). Cultivators are widely available in garden equipment stores.
You can make a cultivator yourself from simple materials.
Motor cultivator with their own hands: where to start and how to make
The gearbox and the engine are the main parts of the homemade cultivator. The first thing we do is to make the frame of the future cultivator, drill holes to install the main nodes, and make handles for driving the unit from two curved pipes of diameter 32 mm. Between the home-made handles you must put another pipe, which will be for us as a strut, increasing the strength of the construction. We later mount the starter button to one of the handles.
For the manufacture of the shaft I used unnecessary scrap, welded to it a sprocket from the camshaft of an engine VAZ, and the chain and both sprockets welded to the metal to make a cover.
I connected the three-phase motor on a standard “delta” circuit, the capacitor button-starter placed on the handle to be more convenient.
Grit hooks for a homemade power tiller
Our cultivator must somehow drive. Choose the right wheels. Remember that small wheels will get stuck in the ground and interfere with the work. Too big wheels will be hard for a homemade motocultivator to spin. Fix the chosen wheels to the steel brackets and place them on the gearcase. Attach the wheels to your homemade machine. that’s not all. Use tire pads on wheels. They make the rotary cultivator dig into the ground better.
Take automobile springs or simply angles and cut from them the hooks of the required diameter. To get the best effect, set the hitch angle to 120°.
When you’re done with connecting all the parts, you’ll be able to use your homemade motocultivator for several years. If you want the machine to just break up solid earth into big chunks, you’ll need to go with it fast. A lower speed will grind the ground into the smallest particles. it all depends on the speed of the cultivator. Before using it, lubricate the shaft of the mechanism with oil so that the homemade machine will last longer without failure.
On the same principle, you can also take a motor from a washing machine for a homemade power tiller. Disassemble the child’s bike and adapt the sprockets and bike chain to your machine. The result will be such a homemade electric cultivator. However, if you decide to make this unit with their own hands, keep in mind that the wire will constantly get tangled under your feet and interfere. Due to the fact that the power of the mechanism depends on the network and cable. you can not go farther than its length will allow.
Homemade options
Neva single-axle tractor is compatible with any attachment. All that is needed is to make its coupling to the body of the equipment.
Hiller is a relatively simple design, which many people can assemble at home.
The easiest type of planter to assemble at home is a disc. All you need for them is:
Any steel that is 2 mm or thicker will do. But they will need to be convexly shaped.
On the frame, holes are made, which will be necessary to change the distance between the racks of discs. They are attached to the frame with special bolts.
Here is a detailed video instruction that will help to understand how to make an arrow for a Neva power tiller with your own hands:
Types of attachments for power tillers
Hiller shows effectiveness for planting potatoes. This attachment is used on tillers, which reduces labor intensity and time of planting potatoes. Soil cultivation tools come in various designs and will fit any planting conditions. Potato weeders for power tillers are not included in the standard equipment of a machine, but it is possible to make them yourself.
Lister rocker
This kind is widely spread among farmers. Wide mouldboards give it an external resemblance to a butterfly. The latter are made of steel sheet. They are located on both sides of the axle. As they work, the equipment lifts the ground with a cutter, and the moldboards spread the earth from the center to the edges, forming a ridge. The tip of the implement is lowered below the soil level at a pre-set depth. The latter is set by the telescopic spike on the rear of the machine.
The machine’s factory set working width is a fixed value (25-30 cm on average). Limiting the working distance makes it difficult to tilt crops with a row spacing of 40 cm or more. For size change a sliding design is used. Variable width attachments have an adjustment mechanism that spreads or squeezes the moldboard. This allows the tool to be set to the desired row spacing. However, the larger the work area, the greater the power requirement.
Increasing the working width does not allow a weak machine to form a ridge in just one pass. Several passes per bed are necessary.
Disc coulter
Universal disk breaker for tillage. The cutting unit is made of concave steel plate discs. They enter the ground at a set distance, loosen it and form a ridge. For effective use it is necessary to angle the discs vertically and in relation to the direction of travel. Positives:
- Adjusting the working width. The distance between the two discs attached to the frame is set depending on the size of the row.
- Combination with all types of power tillers. Even low-powered implements can handle the soil, and the mounting design makes it possible to mount the implement on any implement.
Loosening row spacing on a power tiller
To use a single axle tractor for loosening the soil, the potatoes are initially planted according to appropriate parameters:
Loosening is combined with the first dip, 15 days after planting. For this purpose, they use a plow-tiller or disk attachments. For the single-axle tractor to get a better grip on the ground, it is recommended to replace the ordinary wheels with metal wheels with grousers.
If tilling is done with an arrow, a universal coupler is attached to the single-axle tractor, mounting one or more plow-heads on it.
When using disc attachments, the turning angle and spacing must be adjusted. The distance can vary between 40 and 70cm, depending on the type of potatoes and the height of the plants. The steering angle depends on the soil density.
Description of the potato variety Bellarosa, its cultivation and careRead
How to make your own perch for potatoes
First of all, let’s determine which tool is right for you. Forking attachments come in several varieties:
Lister with fixed and adjustable angle
Fixed is the easiest to use and make. To make it is simple, using the attached drawings:
The base is welded from a sheet of steel at least 3 mm thick. This node is the first to meet the resistance of the soil.
For the bracket we use 4 mm steel strip, it is desirable to harden the part after molding. The floorboard can be bent from 5 mm steel, for example, from a leaf spring. Only metal should be “tempered” first, and then harden again.
Advice! No crucible is needed for tempering and hardening. At this size of workpieces, a gas torch is quite sufficient.
The strut is the element that bears all the load. So for it choose a strip not less than 8 mm thick.
Welding should be performed in two passes, on each side of the joint.
The wings can be made of thinner sheet. 2 mm is sufficient. It is important to keep the dimensions, otherwise it will not be possible to correctly dock the wings to the base.
The wings can be bent on any pattern. a steel tube of suitable diameter will do.
Due to the concave geometry and welds, the construction is rigid.
Adjustable licker-type perch is just as easy to make yourself. The difference is that the wings are hinged to the base, and the tail end has bars for adjusting the angle.
Technology and workpiece thicknesses are the same as in the previous model. The versatility of the headstock increases considerably.
Double the working speed by making a two-row rocker arm for the power tiller.
The traction device only needs to be modified to the existing design. It makes sense to make the mounts movable, so that it is possible to adjust the width of the rows.
Disc coulters
The advantage of this type of attachment is synchronization with the capabilities of the power tiller. Speed and power can be adjusted and mutually exclusive. Since there is little resistance in the soil, there is no need for a more powerful single-axle tractor.
Another advantage. by correctly selecting the size of the discs, it is possible to dip potatoes at different phases of growth.
It is possible to make such a canopy yourself. The only difficulty is in molding the discs. Most often used cutters from the collective farm seeders are used. After a trip to the countryside, it’s easy to find good cheap copies. The best way is to mount it on bearings with oil seals fitted. Sleeve bushes will be jammed.
If one disk jams, the single-axle tractor can turn sideways. The disc coulter is adjusted by selecting the angle and depth of the plunge. To do this, the bracket is fitted with movable elements with bolt fixation.
Worn out circular saws are an interesting donor option for the disc coulters.
They do not lift the soil as effectively from between the rows, but the tines loosen the soil and the angle between the discs can be set less sharp.
This compensates for the lack of a bowl profile. The axles must, of course, be fitted with bearings. Otherwise there will be no rotation. you will just be raking the earth along the rows. If you couldn’t get disk bowls, this is your option.
Propeller weed guards
It uses two forces. progressive motion and rotary motion. Active rocker for power tiller requires the unit to have two gears and PTO. Tilling efficiency increases many times over, so does the cost of the machine. So just like the previous models. propeller-type planters can and should be made by yourself.
Again, nothing but quality iron, an angle grinder and a welder is required. The axles are fitted to the crawler, and the other parts are simply welded together by arc welding. The advantage of this attachment is that it performs two tasks in one pass on the power tiller.
Potato peels as fertilizer and nutrient
Row spacing is loosened and part of the soil is simultaneously moved into the rows. So you are tilling with loosened soil.
No need to adjust the propeller-type scarifier, only the distance between the blades needs to be adjusted. Different degrees of loosening and different heights of hilling are given by the shape of the tines and the angles of the set in relation to the axis of rotation.
You can make a pair of sleeves with brackets, and a set of blades for different types of hoeing. It will be enough to quickly change the hooks, and you will have a new tool every time, almost without additional costs.
Preparing the soil before planting the tubers
Prepare the soil before planting potatoes with the cultivator. It should be soft and loose. Otherwise the tubers will not be able to penetrate the hard earth crust.
Previously, soil was turned over with a shovel, which made preparing the ground difficult and time-consuming. This procedure can now be simplified using the cultivator tines. This helps to quickly loosen soil before planting potatoes.
Before cultivating the soil, you need to fuel the equipment, start it up and let it idle for a few minutes. After that switch the cultivator to the first speed, and start ploughing. Start the work from the edge of the plot. Having almost reached its end, it is necessary to turn the equipment and process the remaining 2 meters perpendicularly to the already made furrow. Do the same on the other side of the plot. This gives the farmer enough room to turn the cultivator.
After that it is necessary to work the area along the beds. When ploughing, small holes are left in the ground. In order to process the vegetable garden properly, when ploughing in the opposite direction, position one tiller against the trace left by the previous one. In this case the soil will be ploughed to the depth of a whole bayonet of spade, and the plot will be fully prepared for potato planting.
Sometimes farmers cultivate their plots in a circle before planting. In this way, the cultivator starts moving from the edge, after which the machine moves in a spiral. The main disadvantage of this method is that afterwards the soil needs to be smoothed with a rake. If, on the other hand, one ploughens the plot along the seedbed before planting, it becomes more even. When using this method, only the areas in which the cultivator was turned have to be levelled.
Reviews
Kirill
Every year we cultivate a small piece of land with the cultivator, as our health does not allow us to do it manually. This year our “machine” failed us, but we had no money to buy a new one. My neighbor and I found a video manual and made a machine out of corners and sheet iron for two. We have a good machine for loosening the soil.
Vladislav
I have a large family, so I thoroughly plant my crops every year. Of course, I can’t process the plantation by hand, so I do the main work with the cultivator. I recommend not only hoeing and loosening the soil with it, but also the digging of tubers, because it makes the task easier.
The main purpose of a power tiller is to plow the ground. It is recommended to use for inter-row cultivation, to facilitate the task and improve the quality of the harvest. If there is no possibility to buy the device, then make it yourself, following the instructions.
CULTIVATING THE GROUND WITH A POWER TILLER
Before planting potatoes with a tiller the soil needs to be worked to make it loose and soft. Previously, it had to be turned over with a shovel, which was time-consuming and labor-intensive. Now, by attaching milling machines instead of wheels, we can cultivate it quickly and qualitatively. We use the Neva-MB2 power tiller, it is reliable and unpretentious, and has served us well for several years.
Now let’s cultivate the area along the beds. The mills leave small hollows in the soil. To cultivate the garden well, it is necessary, when driving in the opposite direction, to follow the trail left by the other tiller. Then the soil will be cultivated to the depth of the spade bayonet, which is optimal for planting potatoes.
Auxiliary equipment for the power tiller
Among the necessary improvements to the motoblock in the form of attachments, it is recommended to make, in addition to all of the above, the following elements:
For designs of wheels used as propulsion for a motor-block in the arable field use wheels with rubber tires. How to make wheels for a motor block with grousers prompt experience and ability to work with ready-made structures, such as steel wheels from tires.
Angle is cut into sections of 35-40 cm. The rims of the disk are marked into equal segments. It is best if there are 8 or 10 of them. The marks are made and the corners are welded at the marks.
The elevator with his own hands for a motor-block is better to make from a piece of pipe with a diameter of 100 mm. The elevator itself is made in the form of a roller on a bracket. If necessary, it changes its position and allows you to lift the single-axle tractor on the support. In the normal position, the lifting shaft is in front of the machine and is used as a supporting roller when overcoming ditches and potholes.
Bucket for a tiller with your own hands is recommended to assemble in the case if you plan to use it as a snowplow.
Homemade tillers for power tillers
Manufacturers offer different versions of tillers for power tillers. It is possible to use one set of cutters or buy two different types of devices, changing them depending on the soil cultivation conditions.
Some craftsmen prefer to use homemade products, which, if properly assembled, will be no worse than the factory ones.
The main advantage of making a tiller yourself is that it can be adjusted to the specifics of the site.
How to correctly sharpen a self-made power tiller?
Manufacturers of power tillers sell equipment with regular milling cutters already sharpened. But what can a person, who has already made the cutters for his or her cultivator, do?? In this case, you will need to perform self-sharpening of the cutting blades of the device.
For sharpening equipment you will need an angle grinder, equipped with a diamond wheel with a diameter of 12.5 cm. Otherwise, you can use a sharpening machine, but it will be difficult to use due to the size and direction of the blades bend. If the manufactured cutters are equipped with small-sized knives, fine-grained sandpaper can be used for their quick sharpening.
To sharpen the blades of self-made cutter for a cultivator it is necessary strictly at an angle of 45 °. It is necessary to independently determine the side that deepens into the soil. To remove too much metal from the knife is not required, it is enough to 1-2 sharpenings in one season. In some cases, the sharpening intervals for the tiller blades can vary. depending on the intensity of use and the type of soil being cultivated.
If the cultivator is operated intensively in wet weather, the condition of the cutters must be monitored. To prevent corrosion, they should be treated with a special anti-corrosion composition, which can be found at almost any auto parts store. It is also very important to try to avoid contact with stones and other hard objects. this will help extend service life and reduce the need to sharpen the cutting blades of the device.
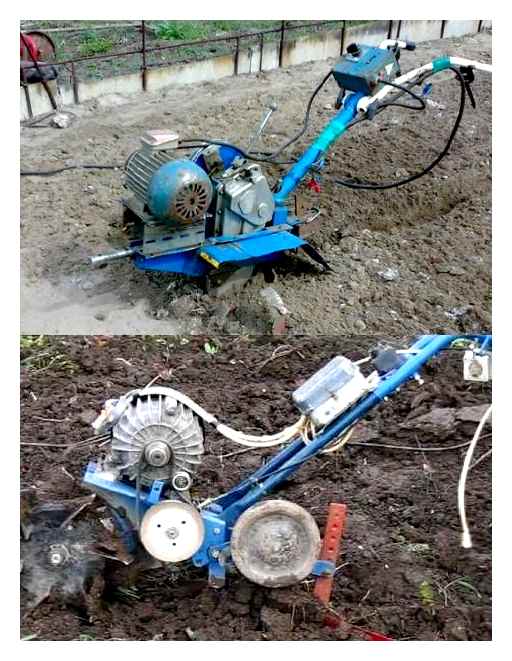
Cultivator with its own hands with an electric drive
As a power unit, two electric motors with 1500 watts each are used. They are combined into one system by means of a belt and pulleys of the same diameter. One of the motors has a double pulley and the torque is transmitted by the tension pulley to the driven pulley connected to the transmission intake shaft.
Rear wheels are not driving, but when attached to the front axle of the rotary head, they become a supporting structure. If you put the wheels on the drive axle, the rear axle adds stability to the construction. This configuration allows hitching various attachments, from a cultivator to a spear-shaped ripper.
The gearbox used in this design is a ready-made one, from the broken out piece of motor-block “Neva”. After replacing worn out gears. operability restored.
The advantage of such a gearbox is the strength of its housing. That’s why it is used as a building block for the cultivator. The front drive axle is an extension of the secondary shaft.
The frame is assembled from improvised materials, from a powerful ventilation system from decommissioned military vehicles. Aluminum tubes for the tiller arm stand were taken from the same place. The bracket for the attachment is made from a plow holder from a discarded farming machine. Wheels were taken from it.
The only purchased element is a power cable. 20 m long. Enough to cultivate a 4-acre plot, with a socket set in a corner of the field. Moto-cultivator with a moped engine.
The drawing of the device is shown in the illustration:
Moped motor D8 is used as the power plant. Air cooling system does not work on the cultivator, because of the low speed. Therefore, a tin canister is brazed around the cylinder to which water is poured. Periodically adding liquid to prevent the cylinder block from getting warmer than 100 ° C.
Two-stage chain reducer. Sprockets from bicycles and mopeds were used. The housings are welded from 3 mm thick sheet steel. The lower gear stage has a power function, so the output shaft is reinforced by steel bushes mounted on the gearbox housing.
Conclusion: The construction is robust and reliable, tried out by dozens of gardeners. You can always make modifications to any of them, based on the materials you have.
Moto-cultivator with a moped engine. video. Self-made frame is welded from 40x40x5 angle and 20×20 profile pipe. Gearbox from VAZ 2101 is installed, the transmission from the engine to the gearbox is carried out through the chain. Simple and tasteful. details in the video.
Block: 4/4 | Number of characters: 2627
Toothed hand cultivator
To make a toothed cultivator will require more strength and skills, but if you want to make it is also quite simple, had steel pancakes and trunnion, as well as teeth and axle.
The steel pancakes are put on the axle with a certain diameter (calculations must be made in advance as to the severity and weight compatibility of both. The pancakes should already have holes, into which steel bars or spring steel tines are inserted. They are fastened by rivets, which are later de-brazed.
Although this is not the only option of all that has been invented by clever dacha owners.
Making the crawler
Using all the above tips you can assemble a single axle tractor yourself in quite a short time, using only available materials and spending a small amount of money.
Block: 5/6 | Number of characters: 2500
Disc rotary cultivator
Unlike other self-made items, the rotary cultivator is not so easy to construct. Although its advantages are undoubted, because it is a multifunctional device that can carry out harrowing, leveling the land, breaking up large clods and a dozen other functions.
Disc cultivator requires convex discs mounted on two axles. To understand the principle of assembly and operation you need to watch the video.
A lot of people, telling how to make a cultivator for a power tiller with their own hands, say that it is quite a complicated process to take on this for those who are not able to work with machines, tools and welding. But there are plenty of tips on how to choose it in the store.