How to cut the corners of a skirting board
As for the question of how to cut a corner in floor skirting boards, the methods of measuring, cutting and joining corner elements on the floor are no different from the installation of ceiling profiles. The only difference is that when cutting on a miter box, the side that will rest on the flooring should adjoin the side, and the leg that will be adjacent to the wall should lie on the base of the device.
Another difference in the installation and cutting of floor and ceiling skirting boards is the shape of the fillets. So the ceiling molding often has an almost isosceles right triangle in the base cut, sometimes one of the legs is slightly smaller, but this difference is not significant. But the floor profiles, especially wide ones, on the contrary, have a small base leg resting on the floor and an elongated leg resting on the wall. The floor plinth on the lower leg, as a rule, is no more than 23 mm, and they differ greatly in height, from 25 to 300 mm, sometimes higher.
Cutting and sealing of the outer corner of the floor plinth is identical to the fitting of the ceiling fillets
Some stylish interiors require the installation of high profiles, and in such cases, cutting the inner corner in the traditional way is not relevant. To cut and join a high and narrow profile, saw the first plank at a right angle and fix it in place. Next, you need to cut a piece of the baseboard at a right angle. The second plinth, which will dock perpendicular to the first, should be laid flat, then a prepared piece should be placed on the edge with its end, and carefully outline it along the contour. The resulting drawing must be cut out exactly along the mowing line, and then cleaned the butt end with sandpaper. The skirting board cut in this way will exactly follow the contours of the already fixed profile, and will fit tightly into place.
The way how to properly saw and join a high, but narrow plinth
How to saw down skirting boards without a miter box?
It would seem that it could be easier. cut each plank at an angle of 45 °, and the trick is in the bag. In reality, everything is not as simple as it seems at first glance. there are practically no absolutely even corners. Maybe in new buildings this is taken into account, and there the walls are located almost at an ideal right angle. However, when the house is more than 30 years old, then one can only dream of such an idyll. In addition, not everyone has a miter box, and as we now understand, this device does not help in all cases.
How to be in this case? Nothing is impossible. for a start it is worth preparing a cutting tool (a saw for metal, a sharp knife). The very step-by-step instructions on how to cut down the ceiling plinth are given below:
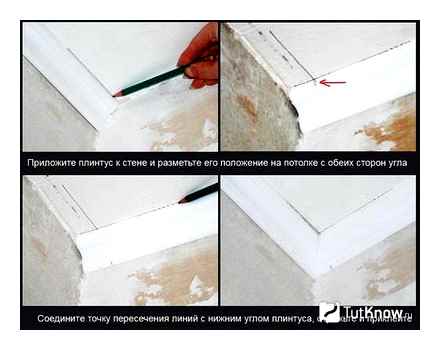
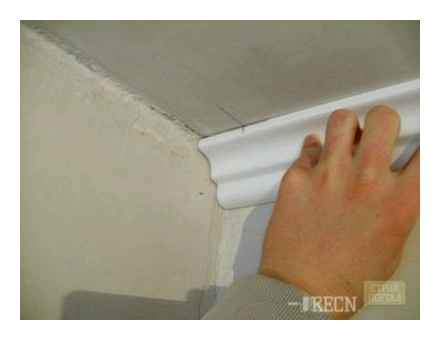
- The stage is to attach the plinth to the corner in the way it should be located. After that, with a pencil, draw a small line on the ceiling along the plank and remove it.
- Stage. the second plinth is applied from the other side of the corner to the place of abutment with the first product. Also draw the line, and the result will be a markup.
- Stage. again lean the plinth, as described in the first stage of work, and mark on its upper edge the point of intersection of two straight lines on the ceiling. Now, from this mark on the bar, a straight line should be drawn to its opposite corner. this will be the cutting line.
- Stage. do similar manipulations with the second plinth.
- Stage. armed with a sharp tool, cut the edges along the intended mowing line.
- Stage. attach both planks to the corner and assess if there are cracks at the junction. If they are not there, you can start gluing the products. Otherwise, additional processing should be carried out.
To solve the question of how to properly saw down the ceiling plinth, sensible observation will help.
When creating an inner corner, the bottom of the plank (the edge that is adjacent to the wall) must be longer than the top (the edge that is adjacent to the ceiling). The opposite is true for the outer corner.
Decorative corners
In this case, you do not have to think about how to cut the planks at the desired angle. After all, even if the joint turns out to be uneven, then such a defect will be reliably hidden from the eyes by a ready-made corner element.
How to trim without a miter box?
- We take the right and left plinths alternately, put each of them tightly into the corner, and put points on the wall as shown in the figure.
- We take the right side, apply it to the wall, and from point “2” we draw the line perpendicular to the wall, put point “3” on the molding.
- We apply the left part, and on it we also set the point “3”.
- On the floor we draw curbs along their lower edge, mark the place where the mowing lines intersect. We mark the point on both moldings.
Now you need to trace along the plinths of the mowing line from mark “4” to “3”. We do the trimming so that on one side the hacksaw blade goes along the “3-4” mowing line, and on the other side. along the opposite edge of the board. In the photo, this edge is marked with a green dot.
How to connect an inner corner and fit elements
And now about how to cut the plinth in the outer corners. Apply the mowing line with the edge of the corner on the inside of the baguettes. Next, we draw the lower side of the baseboards along the floor. We transfer the intersection point to the plinth, and then, using the right angle of the ruler, to the opposite edge of the board. So we got a mowing line trimming.
How to connect an inner corner and fit elements
Method “Oh! Lucky! ” We cut the plinth with a miter box
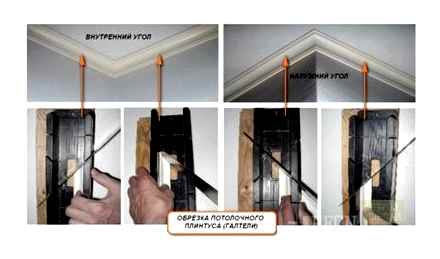
Before cutting the corner of the ceiling plinth, measure the corners of the room with a building corner, if they are straight, then you can cut the corners so that they fit tightly, without a gap, in the corner using a miter box.
A miter box for cutting a ceiling plinth is a simple carpentry device for cutting, consisting of a tray with a rim to hold the plank in one position, and with grooves that guide the blade of the cutting tool at the desired angle: 45, 60 and 90º.
In order not to get confused in the sides of the plank and there is no question of how to cut the corner of the ceiling plinth, attach the plank at the installation site. Mentally fix the position of the plinth, and without turning it over, install it on the miter box. The part that will be glued to the wall should rest against the side. If you applied the plinth on the left, then you need to cut from the left end, and, accordingly, vice versa.
Photo instruction on how to cut the corner of the ceiling plinth, internal pairing
Important: To cut off the inner corner, the bar is applied to the far wall of the miter box. In order to cut off the outer corner, the plinth rests against the near side.
If the skirting board is made of polystyrene or loose polystyrene, then it is better to cut it off with a sharp knife, you can use a clerical one, more rigid materials: polyurethane, dense polystyrene, PVC, it is recommended to cut it with a hacksaw for metal with small teeth.
External corner, photo how to properly cut the ceiling plinth
The cut ends, for a snug fit to each other, must be processed with a file or sandpaper, after which the profile can be installed in place. To catch all the nuances of installation, be sure to watch the video on how to cut the ceiling plinth, the video instruction demonstrates how and where to apply the profile in order to make the right cut.
Buying a miter box for cutting at one time is completely impractical, so you can make the device yourself. To do this, you will need a rectangular base part, made of plywood or chipboard, for the sides. bars, all elements are aligned, the bars are installed at the edges, their parallelism is checked, the parts are fixed on self-tapping screws. Next, the angles are marked along the protractor, an angle of 45º can be measured using a square sheet folded diagonally.
The 60º angle is also very easy to make. It is known from the school course that the angles in an equilateral triangle are 60 degrees, draw a triangle with the same sides on paper, cut it out, this will be the template along which the cuts are made.
Before sawing down the ceiling plinth, check the corners, if they are 90g, use a miter box
Undercutting skirting boards with and without a miter box
We prepare the set of tools the same as for working with the ceiling plinth, but with minor changes: we add a small ruler, and the cardboard knife is not useful to us. As for the type of miter box, the selection criteria remain the same.
Making a cut without a miter box
If you do not have the opportunity to get a miter box, or the angle of the wall is much greater or less than 90 degrees, then you will have to do a little drawing. This business will require maximum concentration from you, but be sure you can handle it.
Trim ceiling plinth
Cutting the skirting board in the miter box
When trimming, remember that when decorating the inner corner, the edge of the skirting board adjacent to the wall should be longer than the edge adjacent to the ceiling. When decorating the outside. on the contrary.
- A second ceiling strip is inserted into the tray from right to left and cut off;
- The finished planks are attached to the corner and the joint is adjusted with a knife;
Planks are attached to the corner and an adjustment is made
- How to join the corners of the skirting board? You can do this from a stepladder right on the wall. But it is not very convenient, therefore, experts advise to combine and glue polyurethane and foam elements with each other on the floor with special glue for joints.
How To Cut & Install Crown Moulding
The corner is best glued before installing the skirting board on the walls How to cut the skirting board:
How to finish finishing the corners
Only the inner corner can be sealed with putty or sealant. The outer should be fitted as closely as possible. It will be simply impossible to remove even a small gap in the future imperceptibly here. Especially when the skirting board is wide.
What to do if there is no miter box?
You can cut the polystyrene strips with a knife. However, sharpen it properly. Otherwise, the material at the ends will simply crumble.
Cutting features
Let’s take a closer look at how to properly cut a corner on the ceiling plinth using a miter box using different materials.
Polyurethane
Polyurethane foam (in common parlance. just polyurethane) is a very good material for ceiling skirting boards. Due to their good flexibility, they adhere exactly to the base (the junction of the wall and ceiling), even if the walls and ceiling are uneven due to construction errors. In addition, polyurethane is easy to clean and therefore can serve for a long time. Low load resistance is not a problem here: there are almost no loads on the ceiling plinth. We also have a separate article, where the question of how to make a plasterboard ceiling and suspended plasterboard ceilings is discussed in more detail.
Polyurethane material for ceiling skirting boards
Cut the polyurethane plinth with a miter box as follows:
-
Measure the wall and ceiling in the junction area.
Choose a suitable template on the cutting table.
Place the end of the plinth in the miter box and make a saw. It is recommended to use a miter saw, but in the absence of it, you can take a regular hacksaw or, better, a metal file. it has a smaller step, and therefore the cut will be more accurate.
The ends of the cuts are applied in place and compared. If necessary, revision is made with a hand tool (in extreme cases, just with a knife).
The finished skirting boards are glued in place. If gaps are formed, they are sealed with silicone sealant or a special putty.
How to cut coving corners perfectly
Factory ready corners
Note that every master has the opportunity not to pore over precise cutting and fitting corners.
perfect inside miter joint hack. baseboard molding install
It is enough to measure the required length of the workpiece and cut it at right angles.
All defects and flaws will be hidden by this special element. But it is not always possible to use such a convenient method, since the standard dimensions of such factory corners can differ markedly from the size of the plinth itself.
Such angles will stand out for their disproportion, and it will not look very neat. But if the design of the room and the size of the blanks allow you to use this method, then you should not neglect it.
For those who have to use one of the methods of trimming the ceiling plinth, the following tips will come in handy.
How to make a miter box with your own hands
Let’s consider a few simple options.

How to cut an inner corner
You need to start fitting and installing skirting boards from the outermost inner corner. The distance to the second corner is measured with a tape measure. The second piece of the plinth is measured with the same tape measure. At the abutting ends of the skirting board, the 45 ° chamfer must point outward.

Cut the corner of the ceiling plinth with a miter box
As described above, corner trimming can be done with or without a special tool. a miter box. The set of other items that you will need is the same in both cases: a hacksaw, a cardboard knife, an inclinometer and a pencil, a stepladder.
How to cut the corners of the skirting board correctly
So that when joining two strips of the plinth there are no gaps and overlaps, you need to make the correct markings, carefully cut off the desired piece and make a chamfer.
Styrofoam
Polyfoam is also often found as an element of the decoration of rooms. Its characteristic feature is increased fragility, therefore it must be adjusted in place very accurately, the foam does not tolerate any deformations.
You need to cut it with a miter box as follows:
-
Plinth plates are stacked in the miter box.
An incision is made. Unlike polyurethane, foam is a soft material, and you can even cut it with a knife or, better, with a stationery or construction cutter. Here it is better to use a small, but even piece of wood, a metal plate or a ruler. As a last resort, you can make pencil marks corresponding to the slots of the miter box, connect them with a ruler. and lead the slot.

Asterisk IMPORTANT: Styrofoam is a brittle material, so the cutting tool should be sharpened as best as possible