How to saw a tabletop so that it does not have splinters
Making kitchen furniture requires certain knowledge and skills. One of the difficult points in this area is the intricacies with Laminated chipboard. And if a simple board or particle board can be easily sanded and covered with any material if necessary, laminated chipboard already has a coating, and to replace it is unlikely.
How and what to saw a tabletop without chips in the home, and what points you should pay attention to?
What tools to use?
If the question of how to saw a tabletop arises, the first thing to do is to decide on the cutting tool, and most often several tools are used.
For example, using a circular saw, you can get a perfect result, but it is quite an expensive pleasure, because high-quality tools cost a lot of money. That’s why this unit can be found mainly only in special factories.
Angle grinder. has similarities with the previous tool, but the result will be far from ideal. In the course of work with an angle grinder is possible the formation of many chips.
Usually, to saw a tabletop, the two main professional and interchangeable tools are a jigsaw and an electric jigsaw.
Specialists in the field of construction divide blades or, as they are also called, saws into two main categories:
In the case of working with a tabletop, you will need the option that tears on one side.
Before you start the main work, you need to sharpen the tool blade well, so that no chips are formed in the process of work. With a sharpened blade, before you begin to directly saw the material, you need to make a groove, the depth of which will be about 2-3 mm. This will give you the opportunity to work without injuries and chips.
What tools to use?
If there is a question of how to saw the countertop, you must first decide on the tool for cutting, and most often several tools are used.
For example, using a circular saw, you can get a perfect result, but it is quite an expensive pleasure, because a quality tool costs a lot of money. Therefore, this unit can be found mainly only in special factories.
Angle grinder. is similar to the previous tool, but the result will be far from ideal. In the course of work with an angle grinder many chips are possible.
Usually, to saw a tabletop, two basic professional and interchangeable tools are used. a jigsaw and an electric jigsaw.
Specialists in the field of construction divide blades or, as they are also called, saws into two main categories:
In the case of working with a countertop, you will need the option that rips on one side.
Before you start the main work, you need to sharpen the blade of the tool well, so that chips do not form in the process of work. Sharpened blade, before you start directly sawing the material, you need to make a groove, the depth of which will be about 2-3 mm. This will allow you to perform the work without injuries and splinters.
Sawing methods Laminated chipboard without splitting
Saw the laminated board should be a special machine (format-cutting machine). But its ) if it is a question of using it at home. An alternative is budget options (hacksaw, jigsaw, etc.).д.), which will take longer to cut, but will require less money.
Using a hacksaw
with a hacksaw at home is difficult enough. First, you need to cut through the line with a knife for trimmer measuring and glue the scotch tape over it. This protects the top layer from damage. The tool is directed at an angle of 30 degrees. Move the hacksaw back and forth carefully without exerting excessive pressure. To saw chipboard without splitting with a hacksaw at home, choose products with the smallest of teeth. In case of damage it is necessary to pass the place of sawing with a file, directing it from the edge to the center. To finish, rub with emery paper (fine grit) and hide the defects under a flexible profile.
READ Checking a chainsaw ignition coil with a multimeter
Sawing methods Laminated chipboard without chipping
Sawing laminated board should be a special machine (format-cutting machine). But its ), if we are talking about using it at home. As an alternative, you can find budget alternatives (hacksaw, jigsaw, etc.).д.), which will take more time when sawing, but will require less monetary investment.
Using a hacksaw
hacksaw at home is difficult enough. First you need to cut the line with a knife for trimmer metering and scotch tape over it. This prevents damage to the top layer. Point the tool at a 30-degree angle. Move the hacksaw back and forth gently, without excessive pressure. To saw laminate chipboard without splitting with a hacksaw at home, use products with the smallest of teeth. In case of damage, the place of sawing should be passed with a file, directing it from the edge to the center. Finish by rubbing with sandpaper (fine grit) and hide the defects under the flexible profile.
READ Checking a chainsaw ignition coil with a multimeter
Sawing rules
Before sawing, choose a method as well as accessories and tools.
- tape;
- painter’s tape;
- pencil, ruler;
- sandpaper.
- hacksaw;
- router;
- circular saw;
- guide rail;
- jigsaw;
- sawing machine.
- On the face of the particle board, apply the points of the. You need to determine in advance what type of cutting will be done. straight or curved. Their cutting technique is different.
- Connect the dots in the trimmer fishing line and stick sticky tape on top. SawingDesigned chipboard with a laminated surface, preferably using adhesive tape. It will reduce cracks when cutting, as the wood board is subjected to a lot of pressure with the increase in temperature.
- To saw the board. Set the accessory at the right angle to achieve extremely straight edges. The process should be smooth, rhythmic and without much pressure.
- Work out any irregularities and edges with a file and rasp, if necessary. The edges can be glued with veneer, the appropriate color. This will protect them and look prettier.
Only after all the necessary tools are placed on the table, can you begin sawing.
Using a router
Router. power tool, for manual woodworking. Suitable for grooving, shaping, edging, and drilling. Before using it, saw a sheet of wood with a jigsaw, 3 mm from the marking. Sawing with a router should be carried out with a bearing, which forms the depth of cut to the required level. This is a labor-intensive process, which can only be performed by experienced professionals. There is a high probability of cutting a board crooked.
Jigsaw
To evenly saw off with a jigsaw Chipboard without splintering, you need to choose a device with the minimum size of teeth. It is used for small areas of tiles, with smooth movements without pressure at low speed. If you are using the jigsaw for the first time, there may be some cracks on the back side of the board. The quality of the cut will improve with further use.
Sawing with undercutting
A guide rail. a stop ruler. is needed for the process. It is secured to the board with clamps. Trimming is carried out according to the marks. The bar is set along the mowing line, and the cut is made 10 mm deeper. The second cut is made through. With this method, there will be no chips on both sides, as the bottom side of the laminate is already cut.
Some elements used in design projects are not cut in a straight line, but in a curved line. In this case a mixed type of cutting is used Particleboard.
Sawing with a format cutting machine
You place the workpiece on the table and fix it in a fixed position. Make the necessary markings on the sheet and turn on the saw unit. When the blade reaches sufficient speed, the table moves forward with the wood and hits the blade
Machines for cutting chipboard are divided into 3 types:
- The bed. the fixture that supports the entire mechanism. Heavy duty frame adds stability and eliminates vibration. This is important for a quality cut.
- Saw unit. consists of 2 flat metal discs. The first one pre-sawns the panel while the second one finally cuts through it.
- Working tables. There are three steps involved in the process. The first for positioning the assembly, the second for feeding the boards to be sawn (movable) and the third to hold the sawn-off parts.
- Carriage. allows the sliding table to move. The workpiece is secured in position with a stop and rulers.
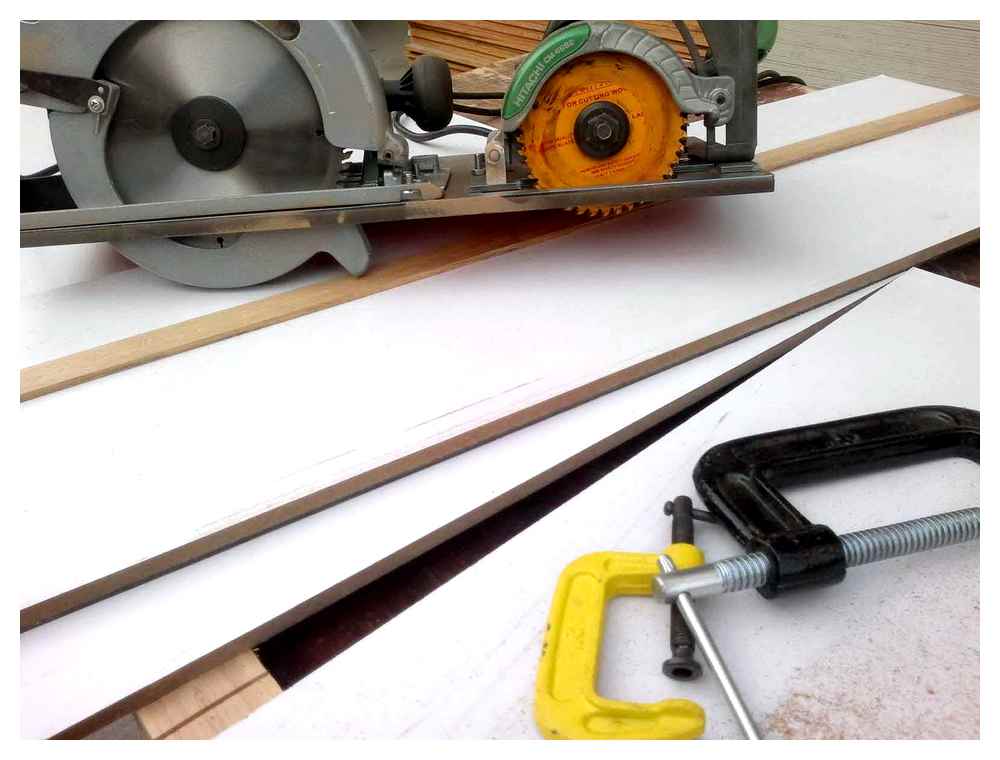
Reception 1. Sawing on guide rail
We set a guide (rail) on the workpiece, set the cutting depth and make the cut. As you can see for yourself, even on the outside of our chipboard workpiece there are no chips, no undermining. The kerf itself is even, with no signs of burrs or side waves. Why is there such a difference??
How to bend chipboard. a practical aspect
Sometimes it is necessary to make a bent piece of chipboard. the end face of a table, cabinet, shelf.
To do this you must first cut the required piece of material to size, and then make numerous parallel cuts on the inside surface of the piece (see Pic. Fig. 1 и 2)
Needed fragment Cutting kerf
To make the curved shape, the obtained part should be glued to the template with PVA glue and fixed with self-tapping screws. After soaking the time necessary for the adhesive to cure, the part can be removed and used as intended.
Before screwing self-tapping screws into the chipboard, it is advisable to pre-drill the material. To do this, use a drill with a 1-2 mm smaller diameter than the screw. Drills for chipboard are used the same as for drilling wood, and self-tapping screws are bought standard.
Due to the lower cost of chipboard than other installation and construction materials, a small number of defects when working with their own hands is not critical. Spoiled sheets can be used to make smaller items without the expense of professional equipment and specialists.
We bought a coffee table recently, the price is not expensive, but there is a “but”. The height of the table is too high for our interior. It would be good to reduce the height of 10 centimeters. As they say, we are not looking for easy ways, decided that
I remembered that on our site is a specialist asoleg, who made. Of course, I’m far from it, but some recommendations may help. I contacted him, explained the problem and he kindly shared his secret. With his permission I publish his technique for cutting furniture chipboard without chipping.
Sawing Laminated chipboard without chipping. The magic zero insert! Announcement
It’s pretty straightforward. Marking out the fishing line for the trimmer cut. Then use a straight edge knife to cut through the top layer of the chipboard. Simply run the knife a few times with a little force along the beveled line of the cut. (I recommend to practice on the unnecessary part of the chipboard) If you press too hard, the decorative layer will be swollen, and it will not be very pretty.
Then, stepping back 1-2 millimeters from the outlined mowing line toward the rough part, we cut with a jigsaw or a suitable saw with teeth pointing toward the handle of the saw. Making a notch on the opposite side of the cut so that there is no splintering when we finish the cut. And we cut through to the end. Sawing
How to saw chipboard without chipping
In order to saw evenly and without chips chipboard at home, you need to know some tricks. Without any doubt, it is better if you are sawing with an electric jigsaw. Of course, you can saw with a hacksaw, but the result is unlikely to please you, although it is possible to saw chipboard for various purposes, where the quality of the cut does not play any role. And so, we need a straight and beautiful cut. For this we take an electric jigsaw, a ruler, a tape measure and an angle bar for right angles (if it is necessary), an awl or a sharp object with which to trace a fishing line for a trimmer on the laminate on the chipboard. We measure a part that we will saw off with 1-2 mm reserve for the following adjustment and attach ruler, on it we guide with an awl or a sharp object the fishing line for saw trimmer, try to press harder to cut through the laminate, and we saw along the line not along the line itself, but exactly along, only catching it with the edge of the saw.
Then we use coarse sandpaper to bring the edges of our saw cut to the right condition, and if you are not satisfied with the quality of the sawn end, we use a wax chalk of the desired color t.е. in the color Chipboard and grind up the chips. Let’s talk about jigsaws, I personally use BOSSNevsky.
If you need to saw without chipping only one side, you can use saws as a tooth up and down, I use a small saw with a straight tooth they shear less and cut both sides pretty decent. It will be more convenient to work on the sawn end with sandpaper, if you stretch it on an even bar. Furniture wax crayons and markers you can buy in furniture stores, where they sell fittings. If you can’t find a crayon in the color you want. No problem, you can make it out of several others by mixing like paint. Simply melt candle crayons and drop on a plate, one color on it another, then roll into one and rub the edges with chips, remove the excess with a ruler or knife and polish rag gently, strongly to press not necessary.
What’s important to know
The most important rule is that the thinner your worktop, the easier it is to cut it at home. That’s why the ideal worktop is 28 mm thick. When ordering worktops, be sure to allow for extra space. After all, at least 5-10 cm can be “lost” during your test cut.
However, if you have never experienced how to cut a countertop before and you have absolutely no experience in this matter, you are better to resort to the services of specialized companies.
Sawing with a panel saw
For sawing with the machine, the workpiece is placed on the left stationary table up to the adjustable stop. The required length is measured. The saw unit starts up. When the saw blade has reached the required speed, the table is moved forward.
The workpiece, together with the table, is fed to the saw table to cut the required slice.
Design
The most popular models are Mj 45kb-2, JTS-315SP SM, Woodtec ps 45, Altendorf F 45. Despite their different features, they have a common design.
Mandatory components of a nesting machine:
- The frame is the base on which all the mechanisms are mounted. Heavy columns eliminate vibrations and oscillations, critical for accurate sawing.
- Sawing assembly, consisting of two discs. The first disc is at the front of the unit and is used for pre-sawing the workpiece. The second disc is for fully sawing the board.
- Three working tables. The first is stationary and carries the assembly. The second, formate. movable, on which the plate is fed to the disk. A third supports the parts you are sawing off.
- The carriage is the part that allows the format table to move.
- Stops and rulers that secure the workpiece in the desired position.
Depending on model, price and specifics of the cut, these machines have different design nuances.
- spigot, which diverts chips and sawdust, and connects the dust extraction system;
- clamps to securely clamp the workpiece to the table;
- A swivel ruler and angle stops that make the cut at the right angle without marking;
- a frame with a stop leg for sawing long workpieces;
- ball and roller slides.
The first format machine with moving board was assembled in 1906 by the German carpenter Wilhelm Altendohm.
How to saw laminated chipboard without splintering.
Before we start talking about the absence of chips when sawing Laminated chipboard and deciding what to saw with, let’s define what it means to saw without chips? Everyone has his own attitude to the number of them after sawing, for some people one is enough, and for others even a dozen is just fine. Therefore, let’s consider not one but three types of home cutting Laminated chipboard, from which you can choose the most suitable. For obvious reasons, we will not consider the use of expensive equipment designed for sawing laminated chipboard, this is the destiny of professionals. We are still amateur furniture makers, so we will use the appropriate tool.Here are three parts, the upper one is sawn with an electrical jigsaw, the middle one with a hand circular saw (parquet) and the lower one also sawn with a hand circular saw, but then processed with a hand router. Of course, in each case you can achieve different results, it’s all about experience and skill. But in general, the capabilities of the equipment in question produce roughly these results in terms of chips on laminated chipboard.
In this case three things make it possible to get more or less a good sawing result.
- The guide. Wise up with the guide for an electric jigsaw is not necessary. The usual building level and two clamps will do.
- Choice of jigsaw blade for laminate Chipboard. The saw scratches the laminate and the particleboard with its teeth, and the finer the tooth, the finer the chips. And the sawing speed will be correspondingly. The direction of the tooth up or down only tells you which side of the workpiece will chip more, the first from the top and the second from the bottom.
- Cutting speed control. If you feed the jigsaw too much the saw blade will bend and move aside the kerf, and the kerf will not be perpendicular to the plane of the workpiece. After such sawing you don’t have to dream about gluing an edgebanding.
Now let’s consider whether to “scratch” the laminate layer. This may help, but only if the following conditions are met. As the saw blade not only chipped those layers, but also the outermost layers of the chipboard, it is accordingly necessary to chip them as well. Width of “scratched” line has to correspond exactly to the thickness of the saw (if you make it narrower then it cuts, if you make it wider then it leaves a trace on the piece). Lines should be strictly on top of each other and it is necessary to saw strictly along the line. Think about how realistic it is to do it at home with your hands, and the answer about “scratching” will be obvious.
Sawing laminated chipboard with parquet.
Chipping in this case is caused by the cutting teeth, but not only in the direction of the kerf, but also on the opposite side. (The vibration of the power tool does not allow to conduct the parquet perfectly straight resulting in misalignment of the disk relative to the kerf). Not only does the guide rail keep the chipboard straight, it also prevents chips on the opposite side from the sawing direction. When choosing a saw blade for sawing laminated chipboard pay attention to the number of teeth, the more teeth the cleaner the cut.
Before processing furniture parts with a router it is necessary to saw them with a reserve of 3-5 millimeters from each side to be processed. Unlike previous methods of sawing, the manual board cutter leaves behind a perfect surface. Chipping after such work is rare, and it turns out to keep the cut perpendicular. So far we have considered only straight-line sawing, but when it comes to sawing various kinds of circles and roundings, there is no alternative to the jigsaw and router. The disadvantages of using a router include the need for skills to work with him. About them we will talk in other articles.
How to saw chipboard without chipping at home
How do I cut chipboard without chipping??
board. is a well-known chipboard, finely chopped and covered with a paper-polymer film. Laminating is carried out at a pressure of 25-28 MPa at 140-210 ° C. The coating is strong, beautiful, resistant to mechanical damage and thermal shock, which makes particleboard very attractive for the production of furniture and interior decoration ,
Many home craftsmen prefer to make their own furniture and buy high-quality chipboard in construction stores or from manufacturers. Fortunately, the shorter color range of laminate coatings makes it easy to choose the most suitable material. The surface texture also varies: it can be smooth, imitating wood or natural stone, embossed under a shagreen or wooden pore.
But to make your own hands a unique furniture or an exclusive interior, it is not enough just to buy chipboard and cut it according to the patterns. Thin laminate coating has a fragile structure. With rough illiterate actions, the cut is torn, and deep shells appear on the edges of the coating. To cut chipboard without chips and cracks, you need to know some tricks of the trade.
The rules for sawing laminated particleboard
Cutting particle board at home can be a hand saw with small teeth, a circular saw, an electric jigsaw. To work smoothly, you need to:
Through the sawing trimmer’s fishing line, fasten tightly with adhesive tape that prevents the teeth from damaging the front of the board. Using a sharp knife, cut through the sawing line for the trimmer sawing the laminate coating and the layer of wood beneath it. So the saw cuts through the inner layers of the chipboard, acting only tangentially on the coating. The hand saw should be at a very sharp angle to the surface of the board. Cutting with power tools for minimal power work. On the resulting part, with a sharp knife, cut a thin layer of coating edges at an angle of 45.6. Shred the saw cut with a small file, machining the cut in the direction from the edges to the center.
To ensure that the edge of the sawn chipboard does not form chips and cracks during further work, it must be protected with special spacers. This can be self-adhesive melamine tape, C-patch, T-edge.
Cutting panels of particle board and other materials
Sooner or later any handyman has to cut chipboard. It may be making furniture by hand or paneling walls with fiberboard or particle board. As you know, sawing particle board is very easy to make smooth and chip-free. Is not an easy task.
With your own hands or by order?
Custom sawing will be smoother
Quality sawing Particle board is difficult to produce by hand because of the large size of the sheets. The dimensions of a standard plate are 2440 × 1200, and that’s not the limit. However, if you often work with particleboard or fiberboard, it makes sense to buy an expensive tool and work for your own pleasure. If you need to cut multiple plates, you can go two ways:
- Cut the plates yourself using the hand tools available
- Have chipboard sawn by a professional sawmill.
- Tools and materials
- How to cut chipless chipboard?
- Cutting shapes
- What you can’t see Chipboard
?? We cut chipboard without chips
In this video I offer the option of sawing without a chip
, Without resorting to plunging molding machines.
How to cut an electric saw without trimming
Sawing on one side and on both sides, as well as with what files to nail What. If you have at least once tried to make a chipboard at home, you know for sure that this work is not at all simple and requires not only skill, but also the presence of good tools. Particularly difficult to handle laminated particle board, cutting often produces a lot of chips. This is why many craftsmen, faced with such a problem, have come to the conclusion that it is better to buy particleboard when buying, especially since many trade organizations provide similar services, and the price for them is quite acceptable. Sawing particleboard is done using precision molding machines, which will help you get the blanks of a given size and shape.
READ Why the Saw Gets Hot When Sawing
Modern models allow you to cut flat materials not only horizontally and vertically, but also at an angle.
In addition to cutting sheets you can calculate and provide as a video file several options for competent and economical cutting of sheet material (using special computer programs) and, if necessary, perform the cutting. However, if for some reason you prefer to do the job yourself, before you see the EAF, you will have to do some preparatory work.
Tools and materials
If possible, it is best to cut Chipboard with a hand router, using homemade guides. This method is not very convenient when cutting large sheets, because a table is required when working with this tool. In addition, this method often needs to change the cutter. But you will end up with cleanly machined “jammed” edges.
Electric Puzzle. The most popular tool for sawing Chipboard
Some craftsmen use a jigsaw in their work, but in the absence of skill, it is difficult to cut accurately and chips may be formed.
You can try to set on the jigsaw bimetallic canvas with sharpened teeth inside, designed for laminate. To make the saw cut with an electric jigsaw, increase the speed with a small amount of feed, so that no rips are formed.
If such methods do not suit you, then to prepare the sawing at home, we prepare the work:
Aligning the sheet Wood particle board
After sawing it is necessary to eliminate that stock. that was left behind when the marking was done. The best way to do this is with a router. But you can remove the excess material with emery paper. It is pounded on a wooden bar, which is easier to work with than loose sandpaper. This kind of machining not only gets rid of excess material, but also smoothly deburrs the edge.
Such actions allow the best way to saw the Woodchipboard. But, if the owner wants to increase his chances of getting a good result, he can make the cut on the slab using a guide bar. It is installed along the intended line of the cut.
The sawing method with undercutting
This method also involves the use of a circular saw, but a plunge saw is more suitable. A double ruler is needed: it is clamped to the workpiece. Working principle is the same as for the panel slicer: two cuts are made in one line.
This is what the ruler bar is used for. It is positioned along the line of the marking line and slightly notches the laminate without disturbing its texture. Then the material is sawn along the marked line.
By the way! Thanks to the notch on the laminate, there are no chips when a second deep cut is made.
The sawing area can be closed off with an edging strip.
It is possible to cut a tabletop into one or more pieces using this method. Minimal chips are possible, but they can easily be removed by sanding or by hiding with a decorative cover.
Round edges can also be masked.
Disadvantage: this method can only make a straight cut.
What is not suitable for sawing?
angle grinder or angle grinder. that’s what you shouldn’t use when sawing worktops. Some craftsmen recommend this method to save time. However, it has more disadvantages than advantages.
Use the level for precise sawing.
Firstly, the quality of parts is not good: because of the sharp movement of the disc appears a lot of chips. Secondly, if large sawblades are used, there is a high risk of injury.
Professionals make a better cut because they have special tools.
In addition, a lot of dust is left after the work, which is unacceptable in the home.