How to Mount a Rotary Mower on a Single Axle Tractor
Speaking of a rotary mower refers to a device that mows the vegetation that grows in fields and meadows. It can be crops or weeds, which must be gotten rid of if no herbicides are used.
It is the closest name to the quickest perception, giving the idea that its principle of operation lies in the functionality of the discs on it, with the help of which the mowing is carried out.
Rotary type mowers are connected to the power tiller in three main ways:
Similarly, this type of mowers is subdivided according to the way the cutting devices are located in relation to the machine on which they are fixed:
All about how to make an electric lawn mower with his hands.
Looking here you can view a video of a mini tractor from the power tiller Neva.
A single-axle tractor with a hay mower
So, after a long struggle of choice and searching for a compromise it was purchased:
There have already been reports on the power tiller, I will not repeat them. The engine is excellent, the build quality of everything else is Soviet. In particular, after 5 minutes of work, the bolt that fastens the pulley on the motor shaft came off with a whistle. It’s good that there was a shield. And through 10 minutes of work was lost knob from the switch of speeds, stupid unscrewed in spite of found traces of glue But found Then still got off a rubber band from the right handle well and so on. In general, it is necessary to glue and tighten. The most important claim. the bolt that attaches the handlebar to the tiller itself, according to the designers’ idea, should provide easy repositioning of it on the side to go sideways from the tiller. In fact, the whole rudder is attached to the base with a bolt that has a nut screwed to the middle, t.е. just pressed down. Tighten it all the time. I’m thinking of re-cutting the threads on the bolt to pull it through this assembly and tighten with the nut underneath. Of course it will be harder to reposition the steering wheel, but pulling it up all the time is not the way to do it.
Now for the mower. I have found out at once that the shaft on which the tensioner is installed is not parallel to the basic construction and as a result after the tensioner is installed, it turns out that the roller distorts the belt trajectory. I cured it by bending the tensioner part, where the roller is installed. Let’s go first belt was killed about 15 minutes The worst thing is that even little belt loosening as a result of its overheating leads to the fact that it is already impossible to use it, because its tension is performed by roller tensioner or by resetting the mower itself on one “hole” in the console. As a result, the belt is stretched and the tensioner is not enough, and shifting the mower leads to the fact that even with lowered lever tensioner belt is still stretched, and start the engine with the “connected” load I something I did not want to try, in my opinion it is wrong. Change the belt, try number 2 Mowing like a tank, cuts everything and everywhere, but if the grass is dense or dead, it’s better to mow in small squares, because the grass is too thick, and the area to be mown.к. on the frame of the mower gathers a whole pile of tangled grass, which firstly hinders the knives to rotate, and secondly it rolls and crushes the grass on the side of the swath. I’ve got the hang of it this way. I make cuts, like “glades”, 5-7 meters long, then I reverse and mow perpendicular to these cuts to dump the stuff on the frame. As a result, with this approach, with a very uneasy bumpy site, dense grass, and in some places already fallen in 2 hours I managed to mow about 6 hectares, with pauses on belt cooling (it was the last, and to the city 150 km) and scattering of mowed grass.
Summary: I am generally satisfied, despite the aforementioned faults. If I had mowed a couple of weeks sooner, it would have been much easier.
What kind of mowers for my power tiller?
You can find a mower for your power tiller in stores or make one yourself. No need to rush and start making the equipment yourself. To begin with, you need to compare for haymowers in stores, they are not as small as you would like, but also not exorbitant.
Masters who decide to make their own mowers are attracted by the fact that they can save on equipment.
In addition, the process is not very complicated, there are many different blueprints on the Internet for ready-made models of mowers, and the thing created by your own hands helps to experience delight and pride.
The type of mower depends on the type of terrain. The land differs in topography, the grass in volume, size, composition. It is based on these parameters that you need to choose equipment. There are only three types of mowers on a single-axle tractor:
Rotary
The model is suitable for a site with low vegetation and small bushes, grain crops. The mower is quite productive, it is used on a relatively flat place with a slight slope (10-20 degrees).
Side slope on these models does not exceed 8 degrees. Significant disadvantage of a mower to a power tiller is a high chance of injury. After mowing, the grass is stacked in rows, which allows you to not bother with it in the future. The rotary models have a very simple design, which reduces the risk of breakage.
In a separate article you can read about the attachments for the power tiller Neva.
Segmental
The blades of this model move in a forward-reverse direction thanks to the work of the motor system shaft. The design features of the segment mower for power tillers are more complex than similar models, making them hard to maintain. But the models have a number of advantages: the side-mounted equipment eliminates the possibility of working on already mowed grass, unlike rotary versions. Movable cutting parts move along the ground contours, following the ground contours. This design enables you to mow plants almost right up to the root.
The mower works with a 20-degree tilt of the cutting part, enabling you to mow even the most uneven parts of the ground. The mechanism for activating and deactivating the equipment is not coupled to the power train drive. This solution enables unhindered shutdown of the mower in dangerous situations.
The balance of the blades in the segmented versions is adjusted as much as possible to reduce vibrations in the construction to a minimum.
Mower-carrier (drum mower)
The design is similar to the rotary model, but the mechanism is a bit more complicated. The rotary mower is made of drums, which are attached by a frame and belt clamps.
Block: 2/5 | characters: 2602
Rotary mower for power tillers: principle of work and features
This modification is designed to work on uneven ground, too. It can be single-disc (with the cutting edge of the knives of a single rotary disc) and double-disc (respectively, with two rotors, the knives of which rotate, as a rule, towards each other).
Among the advantages of the rotary mower are the following:
- Increased maneuverability with compact and lighter weight for perfect maneuverability between bushes and trees;
- Suitable for both water- and air-cooled power tillers;
- Depending on the model, mowing width can range from 52-80 cm and the height of the sprouts from 5-14 cm. All of this, of course, is adjustable when the power tiller is working with the mower;
- Can change blade angle for improved efficiency in hard to reach areas. For the same purpose you can also equip the product with additional skis;
- The presence of special drums, whose task is to push the plants, so that the tool does not clog even with thick and tough their varieties.
Designed for: haymaking, roadside weed control, small brush cutting. After the mowing, the t.н. The rotary mower is an ideal tool for haymaking, swathing, which is ideal for harvesting or disposing of grass. The result is a shredded crop big enough to be used in soil fertilisation, crop cover or humus preparation without the use of an additional mulch mower.
Block: 3/7 | Number of characters: 1410
Rotary mower
This equipment can be used for mowing lawns, as well as for cutting fresh grass into hay. It should be taken into account, however, that this kind of mower cuts high vegetation, and low grass just finely crushes. You can see how the equipment works in this video.
The main working elements of the device are knives, which are mounted on the working discs by means of the bar. The mower is driven by the PTO and sliding is done by rotating the lower discs.
To make the frame of the rotary mower with your own hands, you can use old metal corners or scrap metal, which probably have at home every handyman. To save time for the blades, you can use the tractor rotor. However, in this case, in order to improve traction and efficiency, it is desirable to reduce the length of the rotor from two to four centimeters, depending on the power of the unit used.
To make the rotor you need to make 2 round plates with a diameter of 390 mm from a sheet of metal or use the bottom of an unnecessary tin barrel for machine oil for this purpose. In the middle of these circles, weld the legs with which the rotation will take place. The welded joints must be strong.
For the lower support you can take the disc from the husker, but its diameter should not exceed 450 mm. For the axial shaft you can use a tube with a diameter of no more than 30 mm, and you need bearings 80, 106. On it, make a hole to fix the lower bearing, and place the second bearing on the pulley. To put a device with blades on the axle, and then weld a pulley to the shaft. The rotation of the working discs will be by means of two bearings.
This version has a working width of 1100-1150 mm and a rotation speed of 1500 rpm./min. The entire mower design needs to be mounted on a chassis welded from a steel angle. For safe operation it is imperative to install a protective cover on the home-made device. To simplify construction, the lower discs of the rotary mower can be welded to the frame.
This self-made mower is able to cut vegetation at a speed of 8-12 km/h. At high speed the grass is shredded more, and at low speed. more whole. Such equipment of a rotary type can cut vegetation of 60-80mm and is used not only for mowing grass, but also for cleaning the garden plot from weeds.
Tools and materials
- welding machine;
- fasteners;
- metal angle
- the bottom of an old metal barrel;
- Eight cutting plates;
- wheel axle;
- two wheels.
Rotary model features
The rotary mowers are simple in design, making them easy to maintain and repair. The working elements are discs with blades mounted on them. They are attached to the discs with movable joints. There may be one or more discs. the more working discs, the wider is the surface area to be cultivated.
The price for spare parts and components is low. Spare parts for our rotary mower models are available at any specialised dealership. Imported models no older than 10 years old are just as well serviced. Mowers older than 10 years of imported mowers may not have replacement parts, as some models are no longer in production.
The rotary mower makes it easy to maintain the front lawn and park the grass for the winter in front of the house. The small model for a power tiller is convenient for clearing areas around fruit-trees and seedbeds.
Rotary mowers are produced in our country, as well as abroad. Among the largest and most popular models are mowers for power tillers “Neva”, “Zarya”, “Mole”, “Favorit”. Models differ in the number of working organs and the adjustment of the grass cutting height. To clean grass for feeding animals it is possible to use models with a height of up to 20 cm, lawn mowers with a cutting height of 5 cm are good for outdoors cleaning.
Aggregated with motoblocks “Favorit”, “Mole”, “Neva” rotary mower in several ways:
Reviews are better about the mounted models to power tillers “Neva” and “Cascade”, “Mole”, “Favorite”. Their power is higher and it is easier to work with a power tiller, because the whole worked area is visible.
According to the method of mowing grass, rotary mowers are divided into types:
- For mowing grass and laying in an even row. Suitable for cutting grass for hay.
- Mulching grass. Mulching grass quickly decomposes, suitable for lawns.
Choosing a model for your power tiller “Neva”, “Salut”, “Zorya”, “Favorit”, “Mole” it is recommended to take into account the following factors:
Landscape features. Purpose of purchase (for mowing grass for hay or for leveling lawns in front of the house). Weight of the mower (important for transportation, as a large model is difficult to transport). Capacity (the smallest mower with low power is enough for a small lawn). Type of grass mowing (models that mulch grass are not suitable for making hay to feed livestock).
Features
Mower for a mini-tractor is presented in the form of a mechanized unit connected to the tractor PTO. The device has a fairly simple design, so it rarely breaks down and serves for a very long time. All types of mowers are quite maintainable and do not have problems with the availability of spare parts. over, since there are no complicated components and units, some craftsmen make them by themselves. With their compact dimensions, these mowers don’t cause any transportation problems and take up little space in storage.
Modern models are often equipped with options that make working with the machine even easier and more comfortable. Some models are equipped with a grass catcher box, a special box for grass storage and a hydraulic unloading system which enables the container to be emptied if it is full. Such a unit is convenient when mowing large areas, such as golf courses and alpine meadows. The tedder is one of the optional extras. This tool allows you not only to mow the grass, but also to shake it, which prevents the risk of hay sticking and eliminates the need to buy a rake and tedder.
Modern market offers a huge range of mowers, including expensive multifunctional devices of the world’s brands, as well as budget models of little-known manufacturers. For example, the most inexpensive model can be purchased for 30 ths. rubles, while serious machines cost 350 thousand rubles. rubles and above. Buying used implements is much cheaper: from 15 thousand. RUB and above, depending on the type of machine and its condition.
Block: 3/6 | Number of characters: 1947
Rotary mower with their own hands
Rotary mowers come in several varieties and types, varying in price and characteristics. But many people think about how to make a rotary mower with their own hands, because whatever the price of a rotary mower in the store. it’s still a blow to the purse, which is small for a simple peasant or farmer. For example, you can assemble a homemade rotary mower from a rear axle and keep costs to a minimum, more info here.
The first thing to take care of is the accompanying material from which the rotary mower will be made. It is not necessary to look for something special, the normal scrap metal is quite suitable, which you can find at different dumps, abandoned complexes and other similar places.
Old bicycle frames, spare parts from old appliances, iron barrels, old batteries, all can be used for making a rotary mower.
The main criteria are your manual skills and a certain technical know-how of how to work with such material. And, of course, experience with a welder, without which you can not do without.
The whole process of making a rotary mower for a mini-tractor can be described step by step:
- From scrap metal you have gathered you need to make a frame, which consists of angles measuring around 40 cm. You also need to take care of the blades, which you will install on the rotary mower.
- Next, the discs. They can be made from the bottom of old unwanted barrels, it is only important to comply with the dimensions. Each disc should be 39 cm in diameter and 4 mm thick.
- Next, install the blades on the discs. In order to make the axle, on which the discs will rotate, we need an iron pipe with a diameter of 3 cm. You will also need bearings, which you install on the tube, and a second one for the pulley.
- Then we reinforce the knives on the shaft of the axle, weld pulleys to the tube and your homemade rotary mower for the mini-tractor is practically ready.
Finally, you need to install a cover on top of the entire structure, which will serve as a protective device. Such a mower allows you to mow a strip of grass, the width of which will be up to 115 cm.
The rotary mower with their own hands for the mini-tractor is a good solution for those who do not want to spend a lot of money on buying ready-made mowers, but want to make it themselves for their own needs. But if you do not want to bother yourself, you can always buy an inexpensive electric mower, which also will not greatly hit your
Block: 3/5 | Number of characters: 2584
Rotary mower with their own hands
Rotary mowers have several varieties and types, varying in price and characteristics. But many people think about making a mower with their own hands, no matter what the price for a rotary mower in the store. it’s still a blow to the purse, which is a simple peasant or farmer and so small in size. It is for example possible to assemble a home-made rotary mower from a rear axle and keep costs to a minimum.
The first thing to take care of is the accompanying material from which the rotary mower will be made. There is no need to be overly complicated and look for something special, quite suitable ordinary scrap metal, which you can find at various dumps, abandoned complexes and other similar places.
Old bicycle frames, spare parts from old machinery, iron barrels, used batteries. all can be safely used for making a mower.
The main criteria here will be your handiwork skills and a certain technical knowledge of working with such material. And, of course, experience with a welder, without which you can’t do without.
The entire process of making a rotary mower for a mini-tractor can be described in stages:
- From the scrap metal you collected, you need to make a frame composed of angles, which should be about 40 cm. It is also necessary to take care of the blades, which you will install on the rotary mower.
- Next. disks. They can be made from the bottoms of old unwanted barrels, it is only important to keep the dimensions. The diameter of each disc should be 39 cm, and the thickness. 4 mm.
- Next, install the blades on the disks. For making the axle, on which the discs will rotate, we need an iron pipe with a diameter of 3 cm. You will also need bearings, which you install on the tube, and a second one for the pulley.
- Then strengthen the blades on the shaft of the axle, weld pulleys to the tube and your homemade rotary mower for mini-tractor is practically ready.
Finally, you need to install the hood on top of the whole construction, which will serve as a protective device. This mower allows you to mow a strip of grass, which will be up to 115 cm wide.
The rotary mower with their own hands for a mini tractor is a good solution for those who do not want to spend a lot of money on buying ready-made mowers, but want to make it themselves for their own needs. But if you do not want to bother yourself, you can always buy an inexpensive electric lawn mower, which also will not greatly hit your
Block: 3/5 | Number of characters: 2584
Rotary mower KTM-2 for a mini-tractor
It is a mowing and mulching machine, popular with gardeners and utility companies. Manufactured by Smorogon factory and can be aggregated with all minitractors “Belarus”, known as MTZ. It works at high revolution without detriment to the engine, providing the clearing of a meter long area in one pass. Easy to maintain: All you need is to oil the gearbox and tension the chain.
Specifications:
Block: 4/8 | characters: 555
Homemade rotary mower on a tractor
We use a home-made rotary mower on a single axle tractor for cutting grass for hay and for mowing the lawn. If the grass is small, the mower will just shred it, and tall grass will mow it.
Let’s consider a model made for the “Neva” power tiller and similar models. From a grain planter we use two discs, and from a chainsaw we use a chain and gears. One disk requires four blades. They are made of hardened metal. To install them, holes 6 millimeters in diameter are drilled on each disc with a carbide drill. Using the tire, we attach the blades to the discs. also keep the clearance between the blade and the bar that is 1-2 mm thicker than the blade itself.
Thanks to this, the centrifugal force, when rotating, will spread the knives from the disc, and they will mow the grass. It must be able to rotate blades 360 degrees in order to protect them when they hit something hard.
Strong carbon steel is used as the axle on which the blades will be mounted. The diameter of the axis should be no less than eight millimeters. to let the blades move freely you need to tighten the blade axle up to the stop.
These two discs are mounted on a welded frame and establish a connection with the PTO drive. The discs must rotate in opposite directions to allow the grass cuttings to be stacked in rows.
Homemade segment mower on single axle tractor
This segment mower on a single-axle tractor is made of 15x50x120 metal bars. You need to drill 12 holes in them, so that their dimensions are suitable for M8 bolts. Later, a guide rail (89 cm) with teeth and blades will be attached to these bolts. Blades are mounted on both sides of the bar.
On both ends of the bar you attach the skids and the clamps. To the main frame is attached a wheel, which can be removed from an unwanted stroller. Under the influence of the PTO of the power tiller the cutting part of the mower begins to work. You can see it in the picture in more detail:
main welded frame (1), struts (2), gear wheel (3), brake lock and adjustment (4), brake lock dog (5), main arches (6 and 8), articulated body (7), foot (9), petrol line (10), regulator cock (11), petrol tank (12), handle (13), levers (14 and 17), latch mechanism (15) fixing bolt (16), throttle adjustment lever (18), clamp (19), engine muffler (20), engine (21), fixation fastener (22), cowl (23), cutting blades (24 and 25), cover (26), sled (27), fixation element (28), blade frame (29), rod (30), pin (31), plates for pressing down the lower and upper parts (32 and 33).
This mower, assembled according to this drawing, easily cuts the grass. In action this homemade mower can be seen in the video.
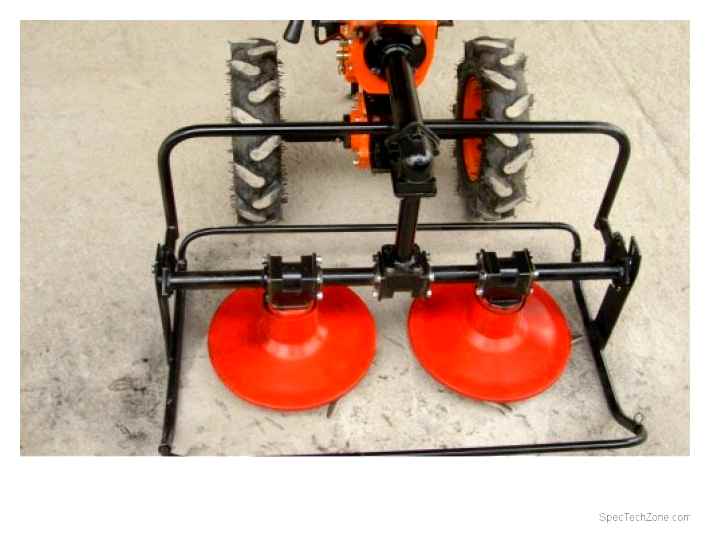
Proper installation of the mower on the single axle tractor
The newly purchased product must be properly installed on the technique to provide the desired performance and quality. Let’s consider the approximate order of assembly and installation by the example of the rotor version:
- We check the delivery set (the set may differ from model to model, but as a rule, it is a drive belt, frame, pipe fitting, fasteners, rotary cover, hydraulic hose, support skids, hydraulic cylinder, drive belt tensioning system, rotors with blades, spares);
Let’s mount the frame to the mounts of the power tiller so that it makes 45 degrees with the vertical plane and so that the slotted parts look up;
we install the rotors on the frame so that their blades are positioned at the bottom. It is important that they are fully seated on the slot;
Attach rotor cover to the same slot;
Secure with cotter pins and nuts attached;
Mount the tensioning system by removing the cotter pin and unscrewing the lock nut on the pulley. The next step is to carefully knock out the pulley so that the key is not lost. If the system is correctly installed, its handle will be directed upwards and fixed with bolts from the spare parts inventory;
Next, fix the skids on the frame with bolts from the spare parts kit so that their concave part is facing inside;
Unfold the frame rings. they should be positioned outside the frame of the power harvester. After that, finally connect to the second mower;
Put the drive belt on the pulley as you drive. It is important that the single axle tractor and the mower remain in alignment;
Assemble hydraulic cylinder. hydraulic hose system (if it is supposed to be connected to your power tiller).
After finishing assembling it is necessary to prepare the product for work:
- Reverse drive belt on the machine;
- Remove weights from the wheels (if there were any);
- put the motor at low revolutions;
- make a test run on a flat area without interference, checking the quality of the result and, if necessary, adjusting the blades and speed.
Assembly
One assembly is not enough for the desired result, it is also important to properly install homemade mowers for the power tiller. When installing the structure, you must strictly adhere to the following rules:
Switch the single axle tractor into Reverse; 2. Place the assembly in the hitch socket, making the connection to the PTO; 3. It is important to set the connection by means of a pin with a spring, otherwise this will lead to the destruction of the device; 4. The blades of the tool must be secured with a guard when installed; 5. Get rid of the auxiliary weights on the wheels of the power harvester, you won’t need them to harvest the grass; 6. Mow grass gradually starting from a small speed by engaging the coupling mechanism; 7. The turns are made smoothly and slowly.
It often happens that for some reason the manufacturer does not have a special mower on sale, specifically for this model, or that it does not suit by its characteristics. In this case it is not difficult to work on a homemade version. Full production on the basis of his farm will be demonstrated on the example of a segmented variation.
First of all, you must take a rectangular 5×1,5 tube with a length of 120 cm. An ordinary piece of an old lawn mower is also a good idea. On the tube, drill about 12 centimeter holes at equal distances, as the drawings show.
It is necessary to prepare the frame from welded angles and pipes, the frame can be covered with plywood and attach wheels to it. The tape is made of rubber ring-shaped. It is convenient to fix it with dural plates. Clamps are also welded on the frame to mount the cutting strip. For the latter, a strip with metal blades is attached to the pipe with holes prepared in advance, with M8-bolts.
Assembling
One assembly is not enough for the desired result, it is also important to properly install homemade mowers for the power tiller. When installing the design, you must strictly adhere to the following rules:
Switch the single axle tractor to Reverse mode; 2. Place the assembly in the hitch socket, making the connection to the PTO; 3. It is important to establish the connection by means of a pin with a spring, otherwise this will lead to the destruction of the device; 4. Protect the blades of the tool with the blade guard during installation; 5. Get rid of auxiliary weights on the wheels of the motoblock, you will not need them for harvesting the grass; 6. Mow grass gradually, starting from small revolutions, engaging the coupling mechanism; 7. To reduce risk of injury, do not turn the machine in reverse; 6.
It often happens that, for whatever reason, the manufacturer does not have a special mower on sale, specifically for this model, or that it is not satisfied with its characteristics. In that case, it is not difficult to work on a homemade version. Full production on your farm will be demonstrated on the example of a segmented variation.
From the spare parts, first of all, we need to take a rectangular tube 5×1,5 with a length of 120 cm. A normal piece of an old grasshopper will do just as well. On the tube is drilled about 12 holes of a centimeter at equal distances, as the drawings show.
Prepare a frame of welded angles and pipes, cover it with plywood and attach the wheels. The belt is made of rubber. It is convenient to fix it with duralumin plates. Clamps are also welded onto the frame to mount the cutting bar. For the latter, a strip with metal blades is attached to a pipe with holes prepared beforehand with M8-bolts.
Mower-carrier for power tiller
This implement can be used as a mower in summer and as a snow blower in winter. To do this in the winter version, put sprockets on the mower, and in the summer, when it is time to mow the grass, the blades from the mower. This model can also be referred to as a rotary, but it is more complex.
The grass that can be mowed with this model can have a rigid structure, and the snow in winter with ice.
The design of this model is made of two drums, which are connected to the frame and conveyor belt with hooks.
The cart is made by welding together pipes, metal angles, basically any metal you can find. Plywood and wheels are attached to the frame. The wheels can be taken from a children’s bicycle or stroller. The whole frame from the baby carriage will also fit. The plywood is thick, better use metal sheet. The size of the frame of the mower can be different, but the suggested 80×40 cm.
The main working body of this mower is made of drums (5), conveyor belt (3), frame (10, 16, 17, 18,20), brackets (19), angle brackets (4).
For the drums you can use large-diameter cans. In them the covers and bottoms are cut out. In their place mount two wooden circles. If you cannot afford to take the cans, you can use a thin sheet of metal and cut 8 discs out of it. Four of them will be 20 cm in diameter on the outside and four on the inside, 17 cm in diameter. Connect them in pairs, small and large with bolts. To these discs we attach the knives, 4 on each. The knives have to be able to turn freely, that’s why we leave 1 mm gap during the fixing. But at the same time it is necessary to make sure that the knives are not going to fall off when hitting a rock. Fix the drums on the frame by inserting the bushing.
The drums are fixed on a frame, that is made of an upper cross-beam (10) and a strip with sleeves and angles (16). Use a 35×35 mm steel angle for the beam. You need to cut off the side 35mm of the angle to leave some slots for the M5 bolts. The drums will be connected by a conveyor belt. For its installation in the corners make slots with a diameter of 13 mm. For the same task, the lower hub of the driven drum is mounted movably on the bar (15), and tensioning angles (20) are attached to the upper ends of the drum axles. To the end plates of the cross-beam corners 20 are stretched with screws M5x65 mm.
The transport belt is easiest to make from a rubber strip, which is connected in a ring by means of a 2 mm thick drew plate.
How such a model works, you can see on the video below.
Correct connection of the mower
If all the recommendations are followed, it is possible to create a technique that will not be inferior to any purchased model, neither in its service life, nor in the quality of performance of the work required of it.
Mower-carriage with your own hands
In order to assemble a mower of this type, the following materials will be required:
- metal corners to assemble the frame;
- four wheels (the larger diameter they will be, the less damage to the lawn);
- sheet (metal or plywood) 80×40;
- two tins (tin cans)
- 8 metal disks;
- 4 blades;
- bushing;
- drum;
- conveyor belt;
- fasteners.
The set of tools you will need is the same as for assembling the other types of mowers. Next you need to perform the following steps: