Front (rear) adapter for a motor-block with steering: how to make your own hands, video, drawings and dimensions
With this method, the power unit will be located behind the driver and rigidly attached to the front adapter. Consequently, the grip of the drive wheels on the ground is increased. This, in turn, will increase traction, which will make it possible to work with any attachments. For such experiments, the lightweight Salyut single-axle tractor with a weight of about 75 kg and a power of 6.5 hp is the best choice. с.
In this case, you need a steering column with a gearbox. But this is for this case, if you dare to make a single-axle tractor with front steering. This procedure is much more complicated and laborious than a simple articulation, but the result will be nice. you’ll get a single-axle tractor with a steering wheel and a seat, and all the necessary levers will be at your fingertips.
You will need not only a steering wheel and gearbox, but also steering rods with coulters. You will need to have gas, clutch, and brake pedals under your feet. They are connected to the standard controls with self-made rods or steel cables.
On the right side of the seat is installed a lever to raise or lower the attachment, as well as the handle of the parking brake. They put fenders with headlights on the front wheels. And minimachine finally gets the finished look of a power tiller with a front adapter.
It should be noted that in this case, the adapter has good technical characteristics that allow you to fully appreciate the advantages of working on your minitool.
The single-axle tractor is a mechanized helper for the gardener, which reduces labor costs and the user’s health. If such a device is supplemented with a steering adapter, it increases the comfort of steering and further reduces the physical burden.
In fact, the adapter allows you to turn a single-axle tractor into a kind of mini-tractor. From the material of this article you will learn the structure of the adapter, its purpose, types, nuances of installation and subtleties of operation.
Design Features
The design of this device is very simple. In essence, the adapter is a dolly that attaches to the power tiller. It includes a frame on which the driver’s seat or body is attached. The frame is mounted on the two-wheeled chassis. Another indispensable element of this equipment is a drawbar, with which the cart is attached to the main unit. It pulls the trailer, and this force is transmitted to the wheels of the adapter. Many different attachments can be attached to this unit: milling cutter, ploughshare, harrow, potato harrow, and more.
This ensures the reliability of the machine
When making such equipment for yourself it is necessary to pay much attention to the durability of the adapter and power tiller hitch, because it is the weakest point of the device. The hitch must be made of steel or cast iron. As a rule, it is made by welding, and you should pay special attention to the welds
As a rule, it is made by welding, and special attention should be paid to the welds. Modern models of this equipment also include a control panel, conveniently located near the driver’s seat
From this panel you can control the vertical movement of various equipment that is attached to the adapter. Angular movement of the attached implements can also be changed
Modern models of this equipment also include a control panel conveniently located near the driver’s seat. This plate can be used to control the vertical movement of the various equipments fixed to the adapter. The angular displacement of the attached implements can be changed.
For this purpose, the device is equipped with a system of levers or hydraulic nodes.
In addition to the set of equipment that is sold with the adapter, you can use a variety of additional devices to facilitate gardening work. Some of them are purchased in the store, others can be made independently with the appropriate devices, materials and skills.
Buying a new one-axle tractor adapter is not a big deal. There are many different types of this equipment on sale. The more functions this equipment has and the more convenient it is to use, the higher its price is. Even the cheapest adapters have a significant cost, so many owners of power tillers decide to make this trailer with their own hands.
In this case it is necessary to perform a preliminary calculation of the strength and mechanical characteristics of the machine.
What is the purpose of the adapter
The adapter for a power tiller in a classic form is a trailer with a seat on two wheels, fixed behind the power tiller, and to which the attached equipment is mounted. It is the adapter that allows you to install additional equipment as easily as possible. The adapter turns a single-axle tractor into a minitractor, thereby making it not only versatile, but also as comfortable as possible.
The cab adapter lets you sit while you work, which makes it easier to work. An adapter also gives more stability to the tractor, which also makes the work easier and simpler. It is also convenient that the immediately adjusted attachment will not go too deep or rise too high. Attachment is adjusted on the adapter with a manual device. Even with lightweight tillers, such as the Neva and Kaskad, it is safe to use the adapter.
Maximum comfort when using a steering adapter or front adaptor for power tillers. You don’t have to use the tiller arm to control the tiller, which is much more comfortable. Thanks to such a device you can get the perfect mini-tractor. multifunctional, easy to operate and with a working speed of about five kilometers per hour.
The dimensions of such an adapter for power tiller is usually about two meters long, eighty centimeters wide and one and a half meters high. The adapter with a handlebar is not small in size, as it is practically the front part of the minitractor. This adapter is also suitable for the Neva power tiller, the lightest one on the market today.
With this in mind it is possible to say that an adapter is essential for a power tiller.
How do you upgrade a homemade single axle tractor??
The Arkhipov is multifunctional. It can be used as a plow, or a cultivator. In order to do that it is enough to exchange removable parts for plough with parts with discs for cultivator. The single axle tractor will dig furrows into the ground as it goes along, and place the potatoes in them. To plow the tubers, you only need to set the moldboards in place and pass the machine between the planted rows.
The machine is also comfortable during harvesting. Working width can be changed using different mouldboards. The machine is not bad either because it’s able to pick up skipped potatoes and leftover crop tops after harvesting. For this purpose, it is equipped with a rake or harrow.
Universal design can be used not only for agricultural work. In the winter it is used with great success for snow removal. A faithful assistant will also be needed for cleaning the paths of the lawn. By installing a single-axle tractor roller with a round brush and an additional sprocket, the owner will facilitate his work on clearing the sidewalk.
Tools and materials needed
You can make a manually operated adapter or a dumper adapter with your own hands and even without help. That’s why it’s important to determine the type of accessory first. The next step is the drawings. You can use ready-made, based on the instructions to the same brand motorblocks, but implemented already with adapters, or you can create it yourself. Making drawings with your own hands, careful attention should be paid to the main elements:
When the scheme is ready, it is necessary to take care to have the following tools on hand:
- welding machine;
- drill;
- grinder;
- two wheels with an axle;
- lathe;
- finished chair of suitable size;
- metal profile for the frame;
- steel angle and beams;
- fasteners;
- screws, self-tapping screws;
- an electric screwdriver;
- control levers;
- a circle of steel with special holes. the basis for the coupling;
- bearings;
- means for lubricating and priming the finished construction.
All the necessary materials and tools can be purchased at the nearest hardware store. If there is no chair of the right size, you need to buy the frame, upholstery and the base for the seat, and subsequently make it with your own hands. All that is needed is to lay the padding or filling densely on the frame and fix the upholstery on top with a stapler. Or you can buy a ready-made plastic seat in a hardware store. Once the preparatory work is finished, you can proceed directly to the manufacture of the adapter itself.
Rotary mower for power tiller Ugra
Block: 3/4 | Number of characters: 50
The structure of a power tiller
By its design, the 4×4 adapter, which is designed for the Neva power tiller, is a rather simple device. It includes several fundamental parts:
- frame construction, on which other accessories can be installed;
- seat for the driver;
- Wheelbase, including the wheel axle;
- linkage mechanism of a power tiller and including.
In other words, an adapter is an ordinary cart with a seat that attaches to your power tiller.
Moto-blocks come in different brands and designs. Russian users know, for example, Caiman, Proab, VIKING, Crosser, Texas, Patriot and others. After hitching the motoblock and adapter, the resulting device in terms of functionality can be compared to a mini-tractor, however, such a comparison is somewhat relative, because the power will remain the same, because the engine is still the same, and it is from a motoblock.
What’s more, you can attach auxiliary attachments to the adapter, which further expands the potential list of jobs. Some varieties of adapters are equipped with special compartments, where you can put some weights. There are also models that are equipped with a lifting lever, which greatly simplifies the work with the additional device.
Block: 3/7 | Number of characters: 1292
How to make an adapter to a power tiller with your own hands?
Once you are familiar with the drawings, you can begin to assemble the adapter step by step. It is important to strictly follow the described algorithm.
If an adapter with a seat is used, a single-axle tractor turns into a mini-tractor. The seat is chosen at your discretion, but products with built-in shock absorbers are more suitable so that you do not have to install the springs.
The frame is assembled in a certain sequence:
- To a piece of pipe with a diameter of about 6 centimeters is welded shank. On it will be mounted swivel bracket, which is fixed with a pin;
- Frame is welded perpendicular to the angle-bridge with the dimensions of 55 centimeters;
- A three millimeter thick steel sheet is welded to the frame with an angle;
- The side edges of the sheet with a length of about one centimeter are bent down to protect against cuts;
- The wings are bent and welded. On the upper part are welded overfenders, which are equipped with reflectors.
The main frame is necessarily equipped with an additional sliding frame, which is 5 centimeters thick. Fasten them to each other with a bolt.
It is better to supplement the design with a luggage rack, which is made according to the following scheme:
- The frame is assembled. Need a 1-inch diameter central water pipe and several smaller diameter pipes (½ and ¼ inch);
- The center pipe is reinforced with additional tubes for support, the structure is welded to the trunk;
- Support tubes connect to the block rod and gearbox.
The height of the supports depends on the position of the trunk. It cannot be over the instrument panels, fuel or oil reservoir.
The swivel bracket is made by following this scheme:
- A piece of pipe 5 cm in diameter is welded and bent. Two steel bushings are welded to the upper part, which provide swinging of the device along and across the axis;
- One side of the bracket is fixed on the shank, and the other. on the motoblock itself;
- Handle can be welded on for free installation and removal of the bracket.
Take care of the rear-view mirror (will fit from a car or moped). The part is installed on the unit handle or fastened to the rear of the trunk.
You need to buy a ready-made mechanism. the brake system.
It is installed according to this scheme:
- Pull rod of the locking assembly is dismantled, the thread on its surface is extended with a special die;
- Create a sturdy stop of steel;
- A hole is drilled into the boom, the diameter of which ranges from 3-10 millimeters;
- The powerful return spring is inserted and fastened.
In the last step, the axle with wheels is installed. Parts from old machinery such as motorcycles or mopeds are suitable. Axle can be too long, so it can be shortened with electric hacksaw.
In addition to detailed drawings, it is also worth considering the suggested videos on making an adapter.
Self-made adapter according to the schemes described above can be used with the following brands of power tillers: Salut, Agro, Neva, MTZ.
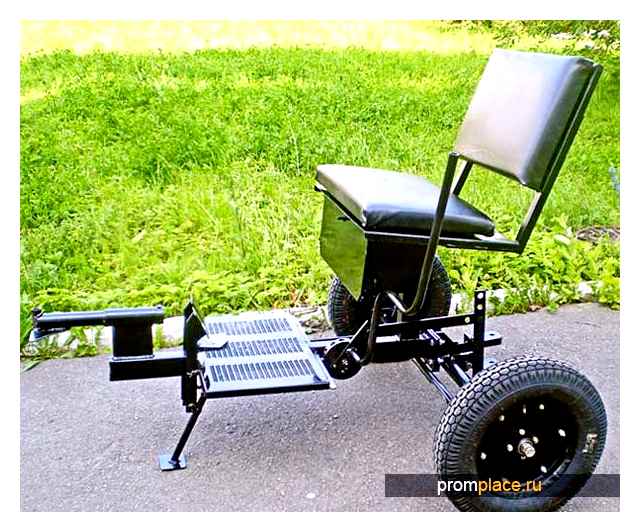
Front adaptor
Structurally it is similar to the previous adapter, but the coupling mechanism is at the back. This means that we get a full-fledged front adapter for the motor block brand Neva. The presented construction can be completely disassembled, which makes its subsequent transportation much easier. Naturally, the cost of any additions to the unit is formed separately.
Technical characteristics of the front adapter:
- Length. 190 cm
- width. 81 cm;
- height. 140 cm;
- ground clearance. 30 cm;
- wheel track. 75 cm;
- speed. ok. 10 km/h;
- Total weight. 65 kg.
.
How to produce one’s own hands
Of course, the purchase of an adapter to the power tiller, ready to work. this is the best and easiest way out of the situation. For all that, they do cost quite a lot, so not every farmer or just a cottager is ready to afford their purchase. No wonder why many people wonder how to make an adapter with their own hands.
It is certainly possible, and you can find quite a lot of recommendations on the web, which relate to the self-made adapters. over, there are also many drawings, giving the opportunity to consider this device more clearly and in detail.
Having used them, it is quite possible to create such a unit in domestic conditions, using a minimum of tools and materials. To make a homemade adapter will require:
- welding machine;
- wheel set;
- steel angles and sheets;
- driver’s seat;
- fasteners; iron pipes.
Before we begin work on the manufacture of the device, it is necessary to at least generally consider the finished scheme. It should take into account and indicate the load degrees for the various parts of the frame and the overall dimensions of the device. Now we can proceed directly to the production of the structure.
The whole work will consist of several steps:
- Take a square metal profile, approximately 1800 mm long. Across it, we weld the same iron flap, only smaller. about 600 mm. To this profile web in the future will be fixed wheel stands, the height of which should be about 300 mm.
- The struts must then be attached. They are attached to the center frame and to the wheels. The angle of location of wheel hubs in relation to the frame is whatever you want it to be. A beam is additionally welded to the metal profile. This is necessary to strengthen the frame.
- The frame for the additional equipment is welded from channel 0.
- It is aligned with the wheel axle by means of a piece of square tube and the seams are welded with a welding machine.
- Now to the frame we weld a control arm with three knees (200, 350 550 and millimeters).
- Attach another one to the lever (size 800 mm), it will adjust the force.
- Connect the arms with other bolts.
The first stage is finished. Let’s get to the next step.
Working with the construction of the adapter
Now starts the work with the adapter. To do this, carry out the following steps:
- You need to weld a piece of 300mm tube to the central frame. it will be a support for the driver’s seat.
- Perpendicularly to the frame weld 2 pieces of pipe on top. This is to keep the seat from falling off while working, and to make it more stable in the jolting motion of the work. The seat can be ready-made, or you can make it yourself from a piece of plywood and foam rubber, it is at the discretion of the master.
- The seat is attached to the cross pieces of pipe, which are welded to the stand itself, as well as to the stand under the seat. We use bolts as a fixing element.
- At the front we weld the mechanism of coupling with the tiller, and then the work can be considered over.
As you can see, it’s pretty simple. The main difficulty lies only in the need to have at least some basic skills with a welder, because there is no other method of connecting each component.
Adapter with steering control
If you have the skills, then if you want the design can be a little more complicated, making another self-made adapter to the tiller, which can be attached and a steering box.
To carry out this idea, you will need to prepare the following materials and tools:
This design needs to be attached to the adapter frame firmly to the tiller, otherwise the machine will be “dragged” as they say. For the construction you can take any ready-made steering wheel, even from old “soviet” cars (from the same VAZ, for example).
Adapters for any power tiller, including the Neva, enable the operator to significantly increase comfort when operating the mini-tractor. In fact, the driver won’t have to drag the apparatus all the time. Now he can just sit in a comfortable seat and do the same thing, but in comfort and more warmth.
The design of such units is quite simple, and independent production of them at home is quite possible. Here it is necessary to take into account that home assembling assumes presence at least of base skills in welding work, and also with the accompanying tools. You will also need to stock up on plenty of corners and metal pipes, so as not to stop work due to lack of material. In general, it makes sense to assemble the adapter by hand, especially considering that it saves a lot of money.
Operation and maintenance
The linkage hitch for the adapter is nothing less than a lifting lever, making it much easier to work with additional attachments. The lifting mechanism on steering models is usually located behind the adapter. Attach the attachment needed for the task in hand. For ploughing, for example, or to prepare the soil for hilling. The linkage itself is simple in design and can be operated by turning the lever.
By fixing the two-wheeled adapter to the tiller, you can take a comfortable sitting position and work. This will contribute to greater stability of the power tiller. Versions with a handcart are ideal for large farms. They can also be used not only for harvesting, but also to transport construction debris and various loads. You don’t have to worry about getting your feet under the tiller when using an adapter.
To extend the service life of your power tiller and spreader bar, remember the first startup, which requires the addition of oil and gasoline, followed by a running-in period. It is also necessary to take into account that during the work it is unacceptable to overheat the engine of the main unit and timely lubrication of the parts is required. Depending on the type of models, some of them will have to cover the operator’s seat due to the material of its manufacture. For example, if the base of the seat is plywood, it can be deformed in the rain.
Taking into account that the adapter can be made by yourself using improvised means (for example, wheelbarrow wheels or other spare parts), it is important to observe all the details of the drawing and the correctness of the assembly of the lifting mechanism of the attachment. As for the wheels, you should keep in mind: metal versions are better for working in the fields, the rubber ones with tread are suitable for working on the dirt road
The wheels’ radius is important in operation, because wheels that are too big or too small will cause the machine to tip over often.
Rear-mounted models require a larger track width, otherwise the single-axle tractor will not balance well. The wheel axle should be wider in this case. You can use the power tiller for guidance or to work the ground in a circular pattern. This depends on the size and shape of the area, as well as the adapter model. For example, it is easier to plow or loosen the soil in rows with a turn at the end of each one.
While working, the user can ensure that the soil is tilled evenly and that the attachment does not sink deeper into the ground than intended. Adjustment must be carried out before work. Timely inspection of the adapter and single axle tractor is necessary. This will ensure the smooth and safe operation of your power tiller during its entire service life.
It is necessary to change the oil in the nodes of the motor block in a timely manner, to engage in preventive maintenance of the electric motor systems, to adjust the control and lifting mechanisms
It is also important to keep your power tiller and power adapter clean. This means that they must be cleaned of dirt and soil, and then the single-axle tractor should be set in a horizontal position, using a third wheel (if available) or a stand that can provide a stable position of the machine
Do not forget about the sharpening of implements, because it directly affects the processing of the soil and the quality of its loosening. If your site is small, it is advisable to walk over it in advance and remove large rocks that can blunt the attachment.
Your power tiller and adapter must be stored properly. The room must be dry and well ventilated. It is desirable to place the equipment in conditions where it will be spared from contact with alkalis and acids. The machine must not only be cleaned of dirt, but also drain fuel from the tank and carburetor. It is also necessary to drain the oil from the engine crankcase. If the single axle tractor is to remain idle for more than three months, it must be placed on supports to unload the tires.
periodically inspect the tires for damage or defects. You can not use a single-axle tractor with reduced pressure in the tires, as this will shorten the life of the wheels. High pressure will also accelerate tyre wear
It is important to check the air filters of the power tiller, spark plugs and replace the muffler if necessary. Also check the strength of the adapter connections, because the operator’s safety depends on it
About how to make an adapter to the power tiller with your own hands, see the following video.
Adapter frame for power tillers
Visually, the device is similar to the cart attached to the power tiller. Someone calls such a machine “tractor”. The mechanism includes:
- frame;
- seat;
- the wheels, thanks to which it moves around the garden. The wheels can be rubber (with tread, allows you to ride on a tamped road) and iron (used to work with large amounts of arable land). In most cases, the wheels are sold as a set, but if there is a desire to change them, remember that there are options to choose from;
- Cast-iron or steel device for attaching to the working unit. This element is the most important component, it allows the vehicle to be stable.
Preparing for work and an overview of the elements
The adapter, without a doubt, is a very important component of the power tiller, so it must be reliable and comfortable. There are a few things to pay attention to:
-
The hitch mechanism. It should be strong and have the necessary stiffness. That is why it is always made of cast iron or steel. The gaps in the joints should be minimal, because it affects the strength of the bonding element.
- Fabrication material. According to operating experience it is obvious that the most reliable are adapters made of sheet steel. They are assembled using a welding machine. At the same time the quality of welds must be perfect. Otherwise, in the process of operation it is because of them there will be a breakdown.
- The driver’s seat. The seat is made comfortable and adjustable in height, because you will have to spend several hours in it during work.
If these conditions are met, proceed to manufacture. First, make with your own hands drawings of coupling for a motor-block or choose suitable ones on the Internet. After all, the more schemes and drawings are studied, the better the result.
Making a device with a movable joint
This is the simplest device. The adapter itself will be located behind the power tiller. To make it is not difficult, but the process requires attention and concentration. The quality of the work depends on the service life of the mechanism. Such an adapter is suitable for heavy power tillers, for example, “Neva”. It has an engine capacity of more than 7 liters. с. and a weight of 105 kg or more. This makes it possible to pull not only the adapter, but also agricultural implements without slipping.
The following materials and tools will be required for the manufacture:
-
Electric drill with the necessary set of drills;
- DC welder and electrodes;
- angle grinder with a set of cutting and grinding discs;
- hammer, file, angle, various hardware;
- Sheet metal with a thickness of at least 5 mm;
- several profile pipes of size 40 x 50 and 50 x 50 mm;
- round water pipe with thick walls with a diameter of 30-45 mm;
- steel rods with a diameter under the round tube;
- channel channel 40 x 50 mm;
- Two wheels from “Zhiguli” or “Oka” with bearings and hubs;
- driver’s seat.
The size of the adapter choose any, but based on the needs of the minivan. The frame itself can be made slightly above or below the axis of the power block. For the wheels, the optimal suspension is a gantry suspension, which provides decent ground clearance. You do not need to install shock absorbers on the adapter. this complicates the design. The easiest is to take a seat with built-in elastic elements.
Next, proceed directly to the manufacture of the individual components.
-
The hitch. It is a welded mechanism, which is a hinge that works in two planes. It is then installed in the base of the adapter frame and bolted to it. This consists of two pieces of 40 x 50 mm tubing welded together, and a piece of round water pipe. The welded tee is inserted into it. The tee itself consists of a rod and part of the same tube. This is the most responsible unit, so the welds must be perfect.
- Adapter frame. Here you will need a sectional tube and a channel. They are welded together, reinforced, and then the posts for the wheels are made. Next, fix the struts with struts welded to the frame and the wheel bushes. The wheels are installed and fastened.
- To the main frame several pieces of pipe are welded for mounting the seat.
- Fix and adjust the seat. It is placed so that when the steering wheel turns, the operator’s back does not come off the backrest. It is not necessary to move the controls of the power tiller. this is done when the power plant is located behind the driver.
- The ready coupling device is installed.
- Hook it to the tiller.
Bracket for the attached implements is made. It is placed on the rear crossmember of the frame. To do this, a few levers and rods are added, which will change the height of the lifting of agricultural implements.
Next, the mechanism for locking the wheels is made. To do this, they use a ready-made brake system from any passenger car and fit it to the installed wheel hubs.
Rating of the best models for 2022
If you’re not sure you understand how to make an adapter yourself, it’s best to turn to off-the-shelf options. Today the market offers a wide range of products from the best manufacturers. It makes no sense to ask which company’s adapter is better, because each manufacturer offers a product designed for specific models (although they can also offer universal devices).
There are many varieties of these devices: different capacities, different powers, with a body, without a body, long, short, etc.п. Different models have different functionality and direction of work, as well as different diameter of the coupling mechanism (unless it’s a universal coupling mechanism). The most popular ones are usually suitable for both tillage and transportation. They have a body and cost more, while bodyless versions are suitable only for cultivation and are not as expensive.
This review presents only the best and highest quality (in the opinion of buyers and popularity) models available in 2022, as well as our recommendations on how to choose a decent unit at the right price.
Another quality Russian product, manufactured at the Machine-Building Plant in Gagarin (Smolensk region). Gagarin (Smolensk region.). The device does not differ from the previous two models in terms of function. Equipped with a mechanism for adjusting the length and height of the hitch, which allows him to be equally freely coupled with any type of MB. from the lightest, to the heaviest.
Due to its versatility, the APM 350-PRO is considered a class above the already listed devices, although they are not inferior to it in terms of functionality. But this has no effect on cost.
Another important nuance: since the company that produces this series is also engaged in the production of power tillers Mobil K, specially for them from the factory was released attachment, which greatly simplifies the work with a rotary mower. Most of them have a classic design, completely unsuitable for connecting rotary mowers, while this model, combined with the Mobil K series of motorcycles, has a special boom that allows you to lift the mower over the area of mowed grass at turns, so you do not need to remove the mower. Very comfortable and practical.
| Length | 160 cm |
| Width | 70 cm |
| Weight | 45 kg |
| Price | 17,500 /pc |
- Has a mechanism for adjusting the length and height of the clutch;
- versatile;
- Comes with a mower attachment on the MB Mobil K.
Another brainchild of the Gagarin Machine-Building Plant. the APM-350 travel adapter with a body. Many owners of garden equipment do not consider the built-in trailer vital, because it can always be purchased. The average cost of a trailer varies, depending on the total weight of the goods transported and the width of the trailer itself (usually from 260 to 500 kg). The problem is that any owner rather quickly gets tired of walking after the MB, after which he will want to buy a trailer. And this is one of the most common mistakes when choosing adapters.
Since in this article we don’t just describe the existing types, but also recommend which one is better to buy, here is our advice for those who need a single-axle tractor with a trailer: buy options with a body at once! Although its cost will be somewhat higher compared to a normal trailer, but it will be much more advantageous than buying both a trailer and an adapter separately.
APM-350 is an excellent representative of this “combined” type. Its lifting capacity is 350 kilograms. The dimensions of the body are 800 x 1000 mm. The design includes the following components: frame, floating attachment, operator’s seat, belt brakes and body.
The manufacturer guarantees compatibility with MB of the following series: AGAT, OKA, Neva, AVANGARD and Tselina. Both passive and active equipment can be installed. Can be easily combined with power tillers with Ugra and MTZ universal joint shafts. However, such machines can be used only with a passive hitch (i.e. having no moving parts and working only with direct motion of the tiller in the field: plough, ridger, potato weeder, etc.).
| Width | 700 cm |
| brakes | straps |
| Weight | 92 kg |
| Body type | Tipper, non-galvanized |
| Price | 23 120/piece |
First up is Celina PM-05. classical and inexpensive option for those who need budget “workhorse” with good riding properties. It has a pretty simple design: frame, brakes, seat and elevator. The operator’s seat is adjustable. “Celina” is equipped with wheels 4.00 x 10 or 19 x 7.008, wheel weights included.
In reviews of the product there is mention of a rather weak braking mechanism and not very good quality floating linkage system. Active attachments (that is, all those tools that are powered by a rotating mechanism: rotary mower, sweeping brush, snowblower, etc.) are installed on the machine.) here is installed only on the drawbar, from the front of the motor block. models with such design include units of the following series: MB, Neva, Agat, Celina, Avangard, Mobil K.
| Width | 62 cm |
| Brakes | Ribbon |
| Weight | 50 kg |
| Price | 12,450/pc |
| Working speed | 10 km/h |
| Dimensions | 165 x 75 x 110 cm |
How to assemble an adapter to a power tiller with your own hands
It is not difficult to assemble the adapter at home by yourself. In fact, it is an ordinary trailed cart. The trailer is designed so that the center of gravity of the entire structure rests on the supporting frame. The most complex mechanism here is the mechanism of coupling with MB, because its durability determines how long the machine will work.
The design of the standard device consists of the following components:
- frame;
- rudder;
- wheel set;
- operator’s seat;
- coupling device;
- lifting mechanism of the coupling device;
- brake mechanism.
In the drawings below you can see the drawings, which, in the presence of skilful hands, you can build a simple device with your own hands.
Figure 1. Drawing of the footplate and part of the frame of the dolly to be hitched
In the manufacture, round or rectangular metal pipe or metal bar is usually used.
The coupling mechanism allows the attachment of the trailer to the power tiller, provided that the connecting brackets of the power tiller and the adapter match each other in diameter.
The step-by-step instructions for making the adapter can be seen in the corresponding video: