A tool to install eyelets and buttons
Button press. My favorite helper. And although I do not sew to order, but in the home it is constantly helping us (about a year ago I bought it). First of all, to repair clothes. On children’s clothing are mostly put buttons and after many washings favorite overalls are often spoiled. Buttons fly off, the fabric tears. Only with this press I was able to bring a lot of things to a decent look (before all the options looked outdated). It happened that I replaced the buttons with buttons. Mine, my husband’s, relatives clothes are also repaired (blouses, coats, jeans). And if you calculate how much such a repair would cost in the atelier, the price of the press does not seem so much. In addition to repairs, the press helped in sewing educational aids for children.
Of course, using it I do not use every day, and often myself with difficulty remember what attachments are needed, so I decided to make a visual guide to install buttons, eyelets, as well as denim buttons. And tell how I chose them in the store, maybe it will be useful to someone, if you’re thinking about buying, but did not know what to choose.
The press and nozzles, I bought in a store Welltex, he has many branches in different cities.
I will start with the buttons. On the site of the store there are tables that help determine what fits what. You choose the type of button and see if you need a punch and what the nozzle to buy.
I took a button L-10 nickel steel K-38 (in a pack of 1440 pcs.) for them punch and nozzle for L-10 buttons.
Button holder 11mm colour translucent (PU 500pcs), Plastic rings for plastic blocks 3 colour matt (PU up to 5000pcs)
Button L-15 15mm steel K-01,02,03,09; stainless steel KL-01,02,03; KMP L-15 15mm, painted L-15 15mm QC
Button booster plastic 11mm color translucent (PU 500pcs), Button booster plastic 15mm color black (PU 500pcs), Plastic rings for plastic blocks color matt (PU up to 2500pcs)
Button Amplifier Plastic 11mm color translucent (PU 500pcs), Button Amplifier Plastic 15mm color black (PU 500pcs), Rings plastic color matt (PU up to 2500pcs)
Button holder plastic 11mm color translucent (PU 500pcs), Rings plastic for blocks.3 color matt (PU up to 5000pcs)
Tool for installation of buttons, with buttons (200 pcs.)
Periodically need to repair clothes, or make some kind of detachable connections for the fabric. In this review, a device that allows you to quickly perform these operations. Especially useful when repairing children’s clothing.
In the 90’s buttons were quite popular and I remember that some people made homemade things to fix the item of clothing.
The package came in a plain bag in 3 weeks, but nothing was damaged: From the bag got the following kit: On the back of the package pincers is a brief instruction: Weight of the buttons: Weight of the pincers Dimensions pincers: Let’s see the jaws, they are different, one side has a hole, put there dockable part: Second part without a hole: White pads allow you to hold docked parts, which simplifies installation. A sample installation is attached: The whole set of supplied rivets looks like this: Let’s try to install the rivet set: Fix the outer outer part in the sponge without a hole: Connecting part in the sponge with a hole: With a little pressure connect the parts on the fabric: Similarly, fix the mating part: Result: The buttons connect perfectly, hold decent: Responsible parts see two, that is only three pieces, the reason is trite: the mating part I installed badly. there is only one piece to mix up. Of course, if you put the part upside down, it won’t connect. I figured it out by comparing the part with a pipette and a part without a pipette (Mom, Dad), the reverse side they have the same, just compare: The kit was hand finished (which was not needed. probably for very dense fabric) and spare sponge of exactly the same size:
Thanks to all who have read. I think the tool is good for occasional use. Would be handy to make pouches for non-standard tools and repair clothes, especially children’s clothes.
Item provided for writing the review store. This review is published in accordance with the clause.18 Site Rules.
Button tool, along with buttons (200 pieces)
Periodically need to repair clothes, or make some kind of detachable connections for the fabric. In the review, a device that allows you to quickly perform these operations. Especially useful for repairing children’s clothing.
In the 90’s buttons were quite popular and I remember that some people made homemade things to attach this item of clothing.
The package came in a package in 3 weeks, but nothing was damaged: On the back of the package pliers has a brief instruction: Weight of the buttons: Weight of the pliers Dimensions of the pliers: Let’s see the jaws, they are different, on one side there is a hole, put there dockable part: The second part without hole: White tips allow to keep dockable parts, which simplifies installation. A sample installation is attached: The whole set of supplied rivets looks like this: Let’s try to install the rivet with a device, a set: Fix the outer outer part in the sponge without a hole: Connecting part in the sponge with a hole: With a little pressure connect the parts on the fabric: Similarly fix the mating part: Bottom line: Connects the buttons perfectly, holds decent: Responsible parts see two, that is only three blanks, the reason is trite: I installed the mating part failed. there can only be mixed up one part. Of course, if you put the part upside down. it will not connect. I figured it out by comparing the part with a pipette and a part without a pipette (dad, mom), the reverse sides are the same, just to compare: The kit came with a hand fuller (which was not needed. apparently for very dense fabric) and spare sponges are the same size:
Thanks to all who have read. I consider this tool to be a good, infrequent power tool. It will be convenient to make covers for non-standard tools and repair clothes, especially children’s clothes.
Item provided for writing review by the store. This review is published in accordance with p.18 Site Rules.
Installing the press
Secure the eyelet installation location with adhesive material (fold fabric or leather in several layers). Install the punch in the press of the required size and make a hole.
Insert the main part of the eyelet from the front.
Place the eyelets in the press. On the wrong side, apply the second part of the eyelet. Place the eyelets in the press and press the lever down firmly but gently to expand the sleeve around the washer.
Needed tools for installing eyelets
Eyelets are hoops of varying diameters designed to hold firmly and tightly to the hole you have made in your fabric. Used widely enough, both at home and in industry. in the manufacture of shoes, advertising banners, decoration of curtains, scrapbooking, and other decorative tasks. They are fixed holes in the fabric, tarpaulin, paper and leather. Due to the eyelets, the material around the hole does not crumble, does not deform and looks neat.
Such products are made of steel, brass, wood, plastic. Varnishes, sprays, paints are used as coatings. Shapes can be very different. Loops are used to decorate curtains, to produce awnings, shoes. Square, oval, rectangular holes are usually used for decorative purposes.
Most commonly used round. Plastic ones are easy to install and inexpensive, metal ones are attractive because of their durability and stylish design. They differ in the following parameters:
Consists of a sleeve (block) and washer. The installation process includes three steps: punching a hole in the material, inserting the eyelets and flattening with special tools and devices. No rigid standards exist, so you need to check the compatibility with the tool when choosing.
Manual
Hand tools for mounting consist of a punch, punching tool and die. The hole is made by punch or puncher. On flexible materials, it should be a few millimeters less than the inner diameter of the eyelets. Insert the block into the hole, put the washer and flare with the help of a press or a presser with a nozzle. For each diameter requires a separate.
4-in-1 tools consist of a hammer, punch, clip punch, press and clamping nozzle. These products are quite heavy and noisy in operation. It is used to install eyelets with a diameter of 6 mm or more. They can be installed at any distance from the edge of the product. All work is carried out on a firm flat surface.
Pinch-setters resemble pincers, they put eyelets with a diameter of 4-5 mm. The kit may include hole punches. Working principle is based on interchangeable nozzles for punching and for mounting. Flattening is done with tongs.
Pliers have a hole punch attached to the side of the tool. Designed to install products with a diameter of 4 mm. They are lightweight and easy to use.
Despite the complexity of their design, the croppodile tools are quite easy to use. They make punctures and mount rings in different kinds of dense materials: felt, plastic, leather, metal. It’s enough to set the tool to the necessary mode. drilling or mounting, choose the appropriate size, and mount the product with one pressure of the hand. The disadvantage can be attributed to the fact that some models have restrictions on the maximum indentation from the edge of the product.
Fiskars setters are sold complete with nozzles for different hole diameters of 1.6-4.8 mm. They are designed for working with loose materials: foil, thin plastic, soft cardboard, paper.
Semi-automatic
Different from hand tools in that the washer and sleeve are placed in the press manually, and the hole is punched with the edge of the block. When buying eyelets for such installation, choose products with a sharp edge.
They have a high throughput of up to 1,300 pcs./ hour and relatively low weight. up to 6-7 kg.
There are also models in which the hole is made not by a block, and the tool itself. In the semi-automatic press AMGPPROLUX, which differs by the principle of punching holes, it is possible to work with banner fabrics with a density over 510g./sq. m and tarpaulin.
Semi-automatic holemakers are the most popular, thanks to their versatility and affordable prices.
Automatic
Used for mass production. Rather bulky constructions that automatically pierce and install rings of particular sizes on materials of any density and complexity. For installation of 1 pc. Requires about 2-5 seconds., Their capacity per hour is about 1500 pieces.
Model of automatic installer DKA-1350 with a capacity of 150 watts and weighing 42 kg has a capacity of piercing 1500 pcs./has products with a diameter of 13.5 mm. Spacing can be fixed or selective. Functions from 220V power supply.
To extend tool life and quality reliable operation, it is necessary to:
Crop-a-dile: description, principle of operation
“Crop-a-dile is the most commonly used manual eyelet setter, which has a rotating head and cubes for changing positions, a switch.
The tool has small feet for upright storage
The device has almost no limitations on the diameter of fittings. It is capable of:
- The Crop-a-dile can be used to accurately make holes of several sizes;
- securely mount buttons, eyelets
- Replaces three different tools;
- switch from one mode to another;
- cut through fabric, leather, plastic, paper, thin metal, chipboard, CD and other dense materials;
- Can fix a piece at any distance from the edge.
The Crop-a-dile is able to install the eyelets more than 15 cm from the edge of the material
The eyelet tool is available in various colors. With the device it is easy to clamp parts with a size of 3.2 mm, 4.8 mm, buttons, elements with pins 8.3 mm. To do this, first a suitable hole is punched, then the workpiece is inserted into it, pressed firmly.
Cropodile is not cheap, but it has good quality and reliability
-
The first one has a 3/16-inch diameter hole.
Use the convenient switch to change from one operating mode to the other
The photo shows an example of a crossover installation with the Crop-a-dile tool
There is also a compact version of the Crop-a-dile for installation of eyelets, which is characterized by the fact that it is not able to make holes far from the edge of the workpiece, only within 2.5 cm.
Compact model is made in the form of pliers with short jaws, the length of which limits the capabilities of the tool
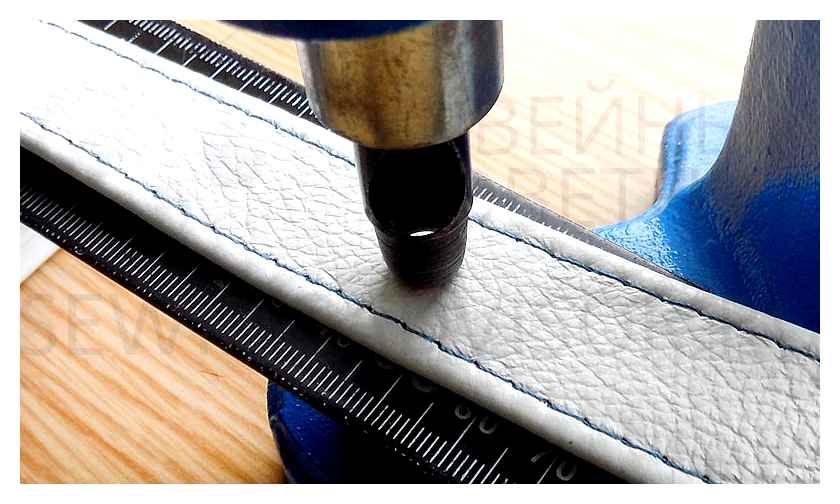
Installation of eyelets with Ter-2 press
Universal press “Ter-2” is used for installation of metal accessories. This is an improved design of “Ter-1” device. To work here are used removable nozzles, which are used for eyelets details, up to 14 mm in diameter, straps, buttons (ring, shirt buttons), denim buttons, etc.
The press allows you to quickly and accurately install a large number of fittings
Punches of different diameters are also removable parts. Installation of eyelets with size from 15 mm requires considerable efforts, therefore, for installation of such elements it is recommended to use another press. “Der-2”.
With a special nozzle on the press can cover the buttons
The main disadvantage of this product is that all removable parts must be purchased separately from the main unit. Significant advantages are several: the relatively low price of the device, small size. The device is ideal for installing parts on dense, heavy materials.
Wrap the nozzle of desired diameter, set the eyelets in the hole and press the lever
It is important to choose the right size nozzles. if the parameters do not match, the luver element will be deformed, will not be able to fully perform the functions assigned to it.
Testimonial: Hemline Button Hole and Pinhole Pliers. Taki comes in handy
There was a period in my life when I was actively searching for a hobby. I grabbed at everything, little by little tried different kinds of needlework. I sewed toys, took a great interest in cross stitch, costume jewelry, kanzashi, arts and crafts. At one point I sewed educational toys for children with my own hands. I dreamed of making my own clothes. That’s when I got this fancy tool in my arsenal. It is intended for installation of buttons and eyelets of standard size. Made of high-strength steel. It is packaged in a pretty strong silicone pouch.
On the cardboard insert are listed options for metal fittings, for which this tool is suitable.
This is a variation of the nozzle for installing eyelets.
But if you spin the applicator one hundred and eighty degrees, the pliers become suitable for button installation.
There is a fixing spring on the back side of the applicator for secure fixation and to avoid its spontaneous rotation.
The pliers have a lever that securely holds them closed.
The pliers come with simple instructions that are not too long in meaning.
You can take the yellow rubber bands off the applicators, put the part in them and put them back on. Their main function is to gently fix the button part in the required position.
This is what the two parts of the button look like tucked into the applicators of the forceps.
You pick the right spot on the fabric and. go for it!My son brought the costume before the festival and said he needed to do something with the collar. a button or a button. And it’s eight o’clock at night)))). I wasn’t sure if I could line up a neat buttonhole, so I decided to install a button. I was, of course, terribly worried.
But all thank God it worked, thanks to my pliers. True, it took a lot more effort than just squeezing the handles. This tool is designed more for brute male force. I just had to rest the pliers on the floor and push them down with my body weight.
The Hemline button and eyelet pliers are a five star recommendation. Personally I think they are a useful tool for people who are at least a little bit familiar with sewing.Thank you for your attention to my review and see you soon!
How to Use the Tool Properly
The eyelet press (also called a button and eyelet setter) is fairly straightforward to use correctly if you follow the included instructions, which are sometimes written in a very abstruse language that leaves average users baffled.
When choosing the right model, be sure to pay attention to its characteristics.
First choose the most suitable option. manual, pneumatic or electric, as the method of application is not much, but different.
The most convenient to use a special press to install eyelets.
The pneumatic press is usually used in sewing shops and works on compressed air energy. It is designed to fix on a fabric-base buttons and eyelets.
Its main advantage is that it can immediately make a hole and install a metal finish.
First you need to place the eyelet on the place selected for it, then place it under the metal press and start working. Press itself punch a hole, strengthen the fabric eyelets and connect the two parts to each other.
Manual press
The manual press, which is used for the same purposes as the pneumatic press, differs in many ways from the previous model considered. Not only can the buttonhole tool be used to install eyelets, but it can also be used to simply punch holes in the fabric.
If it is a small workshop, where there is no need of mass production, then for this purpose, the manual press for eyelets is better suited.
To make the manual press work, you need to put on a special place over the “puncher” fabric with fittings already applied and press the lever of the press, then in a second the hole in the frame of the metal ring will be ready.
The manual press is compact and designed for installation on a workbench or workbench.
To simply pierce the fabric, you have to do the same thing, but with the removal of both parts of the eyelet (sleeve and washer) from the base.
The press is actuated by pushing the lever.
Universal
Why are some manual eyelet presses called universal presses?? The answer is quite simple. such machines can be used if you need to install eyelets, buttons or eyelets of different diameters. The main thing in this case is to choose a suitable nozzle.
Each puncher is designed to make holes of a certain diameter, and each pair of nozzles. to work with one or another fittings.
There are a variety of nozzles for hand presses:
- Punching bits for eyelets of different diameters.
- Nozzles for double-sided hinges.
- Nozzles for single-sided hold-downs.
- nozzles for buttons.
Depending on the hardware at hand, choose the appropriate nozzle that will be most suitable.
Placement of nozzles is made on the upper shaft and the lower platform of the press.
IMPORTANT! Do not use accessories with unsuitable head, they would not only break the eyelets and buttons, but also the tool itself.
Variety of tools for setting eyelets and buttons
In addition to the various types of presses for the installation of fittings it is possible to use a punch or collapsible hammer. An undoubted advantage of these tools is less expensive than the presses.
Press for eyelets or machine for installation of eyelets and buttons. equipment that must be available in various workshops, but at the same time in home use it is not so urgent need and it can be quite easily replaced with the tools that are at hand.
Tools for installation of fittings. necessary equipment for sewing and shoe shops, large and small industries.