What to make a gasket for the carburetor
Numerous gaskets and washers can be rubber or cardboard, also for this purpose is used paronite, which is used in those places where the temperature conditions of the unit, does not allow the operation of rubber or paper parts. In addition, in order to ensure the sealing of assemblies working in especially harsh conditions, textolite gasket is used.
A device that uses all types of the listed materials is a carburetor, and, despite the fact that for the preparation of the working mixture in modern cars this part is no longer used, the garage technician may need information on how to change or make their own gasket for this part.
Types of gaskets used in the carburetor
The following types of gaskets are used in the carburetor:
- Gasket between the carburetor and the intake manifold. In most engine models this part is made of paronite. This part is installed directly on the plane of the manifold;
- Heat sealing gasket. This part is also installed under the carburetor. The gasket is thermally insulating, usually textolite, so it does an excellent job;
- Lower carburetor gasket. Install between the thermal insulating gasket and the carburetor flange. The bottom carburetor gasket is made of metal-textolite material. This gasket is excellent at preventing leaks at the bottom of the carburetor mount;
- Upper Gasket. Install between the carburetor and the air cleaner nozzle. It is made of dense rubber, so it provides a tight connection, preventing the leakage of unclean air;
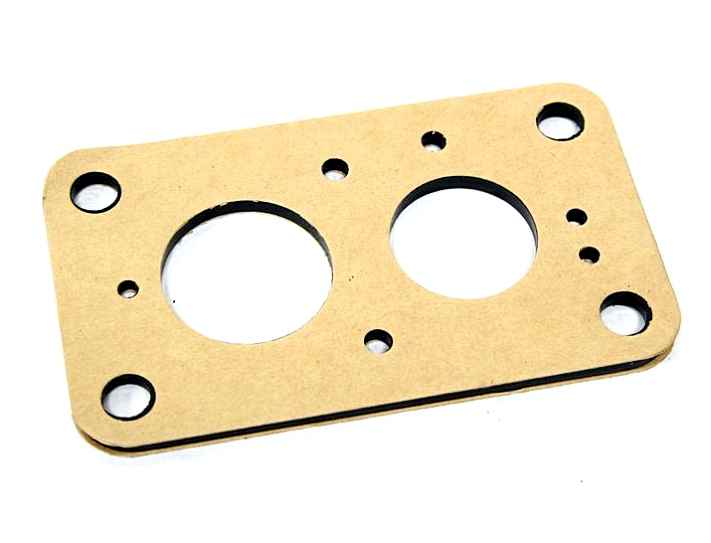
- The gasket of the carburetor cover. Made of thick cardboard and serves to reliably seal the two halves of the Solex carburetor. The gasket of a Solex carburetor is the most common cause of failure of a carburetor, but this problem can be easily solved if the old gasket is replaced with a new one.
Types of gaskets used in the carburetor
The following types of gaskets are used in the carburetor:
- Gasket between the carburetor and intake manifold. In most engine models, this part is made of paronite. This part is mounted directly on the plane of the manifold;
- Heat Insulating Gasket. This part is also mounted under the carburetor. The gasket is thermally insulating, usually textolite, so it does an excellent job;
- Lower carburetor gasket. This part is installed between the thermal insulating gasket and the carburetor flange. The lower gasket of the carburetor is made of metal-textolite material. This gasket is excellent at preventing leaks at the bottom of the carburetor mount;
- Upper Gasket. This part is installed between the carburetor and the air filter nozzle. It is made of thick rubber, so it provides an airtight connection, preventing leakage of unclean air;
- Carburetor Cover Gasket. Made of thick cardboard, it serves to reliably seal the two halves of the Solex carburetor. The Solex carburetor gasket is the most common cause of carburetor failure, but this problem is easily solved if the old gasket is replaced with a new one.
Replacement of the cardboard gasket
The installation of the gasket will not take much time, but during this operation it is necessary to be careful and cautious not to damage the delicate internal parts of the carburetor, as well as to exclude the possibility of ingress of dust and dirt into the float chamber.
Kits of carburetor gaskets can be purchased at an auto parts store or ordered from the online store. In the latter case you won’t have to stand in a queue
For the Solex carburetors you can find separately sold cardboard gaskets. In this case, the cost of repair will be almost imperceptible to the budget.
After the carburetor will be removed, unscrew the five bolts that fix the cover. The cover is then removed and the float, which is held in place by a pin, is removed.
The pin should be carefully knocked out of the hole with a thin nail and a hammer.
When the pin is removed, the float is disconnected from the needle and completely removed. The old gasket can now easily be removed from the carburetor top cover and the new carburetor cardboard part can be installed in its place.
Then assemble the carburetor and install it in the reverse order from its removal.
It is necessary to screw in the bolts of carburetor which hold the upper cover evenly and crosswise in order to avoid distortion and possible in this case air drainage into the mixing chamber of the carburetor.
How to make a gasket by yourself
The gasket for the carburetor can be made by yourself. Such a need arises when it was not possible to find the original part. To make the gasket you will need the following tools and materials:
Any thick cardboard can be used to make the gasket. The thickness of the material should be about 0.8 mm. If the thickness is greater, then such cardboard can also be used for making the gasket, but in this case it will be necessary to additionally adjust the position of the carburetor float.
To make the gasket, you need to remove the carburetor from the engine. Then remove the cover and the float in the manner described above.
Old gasket is removed and the carburetor cover is cleaned of gasoline residue.
Then the stem of the ballpoint pen is cut with scissors, and the ink is applied thinly to the surface of the carburetor cover.
The next step in the manufacture of the gasket must be done as carefully as possible. The cardboard should be leaned against the carburettor cover and pressed slightly against the surface of the part, but in such a way that the sheet does not shift at this moment. Then the cardboard is sharply separated from the surface of the part with the ink.
After carrying out this procedure on the cardboard sheet you will see an exact imprint of the horizontal plane of the cover. According to this imprint with manicure scissors cut the gasket for the carburetor.
The holes for the cover bolts can be made with a shell casing of suitable diameter. For this purpose, the blank gasket is laid on a wooden board and the hollow side of the shell is applied to the marked places for the holes, and precise blows are made with a hammer from the side of the capsule socket.
The manufactured gasket is installed in the usual way, but if the thickness of the cardboard for the manufacture of the gasket was significantly different from the original, it is necessary to adjust the float position in the chamber, as well as perform adjustment of the carburetor in idle mode.
Blitz tips and recommendations
Replace the gasket of a carburetor or make it from cardboard is not difficult, but you should be very responsible to the selection of material, as well as the accuracy of manufacturing this part. After replacing the product, the carburetor is installed on the engine and a test run of the engine is performed, as a result of which it will be clear how correctly all the repair operations were performed.
Not everyone knows that the installation gaskets under the Solex carburetor are its very important and integral part. The fact is that on the bottom plane of the Solex there are open channels and openings of its individual systems. For normal work they should be tightly and hermetically closed from below. and this role is performed by the gaskets, which in norm should be 3:. thick ( 5-10 mm) and mechanically strong gasket with 2 identical round holes (in no case with one oval ! );. thin elastic petrol-resistant gasket with 2 identical holes (not with one oval in any case) ! );. a thin elastic gasket with one oval hole (instead of it, you can use the second one with 2 holes). The gaskets are installed in the following order: first the thin one with an oval hole is placed on the intake manifold, then the thick one, and on top the thin one with two. And then we install the carburetor. By the way, very essential moments is zasyahka 4 nuts fastening carb. they NEVER DO NOT TURN ON ALL OF THE DRIVE OR DO NOT TURN ON A HOT ENGINE ! Alloy from which the carb is made, very plastic and simply “leaks”. the bottom plane of the carb is simply bent arc and gaskets no longer fit tightly to it. And it affects first of all. on efficiency, at once begins the wild overrun of gasoline.
ADVERTISEMENT
Quick and urgent repairs made in a hurry, often ends with unpredictable results, changing the initial idea about the device and the availability, available in our use of technology.
All the same our assumptions about insignificance of similar problem often lead us into a dead end, and sometimes even scare us from the possibility to repair it ourselves or from the desire to find the reason of malfunction.
When opening the carburetor of a faulty lawnmower, you can identify the source that led to the malfunction as a whole, or you can wash, purge and reassemble all the assembled elements into one product and continue to scratch your scratched head, suspecting that something is wrong. And where it’s wrong?
The fuel pump membrane usually has no visible damage, and it is not worth looking for anything on it, because it is very well visible when the carburetor was installed and how long it has been running.
The metering chamber diaphragm, on the other hand, is in good condition when it shows no signs of mechanical damage and retains its elasticity.
The valve of the fuel system of the dosing chamber, called by our adverb as the fuel needle, should open easily at light pressure on the control lever.
Significant wear at the heel of the lever from the metering chamber diaphragm pusher can be seen upon detailed inspection. Wear does not particularly affect the operation of the fuel valve, but is more an indication of some technical faults of the mating elements when the diaphragm pusher rests against the heel of the fixed control lever.
- Fuel valve in dispensing chamber may become stuck when closed. The diaphragm pusher needs more force to push down on the valve lever. Additional frictional forces generated between the diaphragm pusher and the heel of the lever, increasing wear at the point of contact.
- If in the example just described the cause of wear on the heel of the fuel valve control lever was seizing of the valve in its seat, in the other case substantial wear occurs with our intervention or with careless assembly, when the heel of the lever is bent slightly upwards.
It is worth mentioning that the stiffness of the spring is also important, as it needs to hold the valve closed while at the same time not prevent the diaphragm on the lever of the valve from opening easily and freely.
The operation of the carburetor and the entire engine depends on the state of the pulse channel, its tightness, preserving the integrity of the channel for the passage of the pulse from the engine crankcase to the supramembrane cavity of the carburetor fuel pump, which is easier to call a pulse pump, but here to anyone as convenient.
The strength of the pulse depends on the condition of the crankshaft oil seals and the condition of the piston rings. Tightness of the channel is ensured by the state of the fuel pump membrane and tight fit of the contact surfaces of the mating parts of the carburetor and its nozzle, the carburetor nozzle and the cylinder of the piston chamber, the cylinder and the engine crankcase.
Replacing the cardboard gasket
Installation of the cardboard gasket will not take much time, but when carrying out this operation, care and caution are necessary so as not to damage the delicate internal parts of the carburetor, as well as to avoid the possibility of dust and dirt getting into the float chamber.
You can buy carburetor gasket kits at an auto parts store or order them from the online store. In the latter case, there is definitely no need to stand in line
On Solex carburetors you can find separately sold cardboard gaskets. In this case, the cost of repair will be almost imperceptible to the budget.
After the carburetor is removed, unscrew the five bolts that hold the cover in place. Then the cover is removed and the float, which is retained by the pin, is removed.
The pin should be carefully knocked out of the hole with a thin nail and a hammer.
When the pin is removed, the float is disconnected from the needle and completely removed. The old gasket can now be easily removed from the top cover of the carburetor, and in its place a new piece of cardboard.
Then assemble the carburetor and install in the reverse order of removal.
It is necessary to screw in the bolts of carburetor which hold the upper cover evenly and crosswise in order to avoid distortion and possible in this case the air suction in the mixing chamber of the carburetor.
Blog im. sancta → Making a gasket (my experience)
Today I want to tell about how I make gaskets.
On the Internet I found a description of what people make gaskets. I used to make them out of paronite. But I don’t like the material itself. Oil makes paronite soft as snot. Connections need to pull through constantly, it gets wet and looks extremely sloppy.
Paper is the best choice. And t.к. working in printing. I could choose the paper for the gaskets more consciously. I tell you right away. I do not like coated paper (from the covers of magazines as advised in
Internet), although it was the one I had a huge selection of. The main disadvantage of it I think is that it practically consists of one chalk (and now there is just a shaft of low-quality paper from China). No matter how you look at it, chalk is an abrasive. Though very weak. No one wants to have abrasive in the engine. Less suitable paper is chrome ersatz (as on doctors’ journals, medical charts). But still. this paper also has chalk on it.
The criterion I had. no chalk. And it seems that for printing such paper simply does not exist! But it’s in a different form. So. I found it. Write the name. calibrated cardboard (I was PAVAN) 0.5 mm, color. gray. It’s a counterfeit material (it’s put under the offset rubber). You can find it in companies that sell consumables for printing. And also in printing houses with offset machines. This cardboard is replaced by printers and simply disposed of after some time. If you know someone. go ahead and ask.
The main advantage of this cardboard is that it’s really stiff. There’s no chalk in it. And it is very accurate (the difference in thickness is no more than 0.01mm).
My way is not fast, but the most accurate for home use.
We take the sealant and apply a thin layer to the surface. I just take the sealant on my finger and tap it lightly (about the same way I apply thermal paste to the processor). Next, I put the sheet on a flat surface and press the lid to the paper with something heavy.
In my case I tightened the lid through the hole in the center with a stud.
Next I wait about 24 hours (that is why the method is not fast). Roughly trim the perimeter with a couple of centimeters of reserve with scissors.
The cardboard is already well adhered to the surface with the sealant.
Take a penknife in this grip and cut the outer contour.
Next, to find the inner contour, we press the contour with our fingers. It was not visible in the photo, but after that the inner contour begins to be clearly visible. Cut the inner contour in the same way
I carefully drilled holes with a hole punch (it’s nice to have a lathe, though!)
And here’s the result. pretty decent. Next, purging, rinsing with alcohol.
Apply sealant to the mating part (also try to use the minimum of sealant).
And one more “trick”. pulling with an electric screwdriver with torque limitation. Gradually adding more torque to tighten all the bolts. Leave it for a couple of hours and tighten it with a wrench (without fanaticism).
This is not the first repair with this technology. I have used them several times already and they do not have any problems at all. They do not get wet, do not sweat. Holds great. Knowing this technology I am not afraid to open the engine, even for inspection. Т.к. I know I can do this gasket for free.
I hope this information helps someone and good luck on the road!
How to Make a Gasket by Yourself
The carburetor gasket, you can make your own. This is necessary if you can not find an original part. To make the gasket you need the following tools and materials:
Any thick cardboard can be used to make the gasket. The thickness of the material should be about 0.8 mm. If the thickness is greater, then such cardboard can also be used to make a gasket, but in this case it will be necessary to additionally adjust the position of the float of the carburetor.
To make the gasket, remove the carburetor from the engine. Then remove the cover and float in the manner described above.
The old gasket is removed, and the surface of the carburetor cover is cleaned of traces of gasoline.
Then the stem of the ballpoint pen is cut with scissors and a thin layer of ink is applied to the surface of the carburettor cover.
The next step in making the gasket should be done as carefully as possible. The cardboard should be leaned against the carburetor cover and pressed lightly against the surface of the part, but in such a way that the sheet does not shift at this moment. Then the cardboard is sharply separated from the surface of the part with the ink.
After this procedure, the cardboard sheet will show an exact imprint of the horizontal plane of the cover. Using manicure scissors cut the gasket for the carburetor based on this indentation.
The holes for the cover bolts can be made with a shell of suitable diameter. For this purpose, the gasket piece is placed on a wooden board and the hollow side of the shell is applied to the marked holes, and the exact blows are made with a hammer on the side of the capsule seat.
The manufactured gasket is installed in the usual manner, but if the thickness of the cardboard for the manufacture of the gasket was significantly different from the original, it is necessary to perform an adjustment of the float position in the chamber, as well as adjust the carburetor in the idle mode.
Blitz tips and tricks
To replace the carburetor gasket or to make it from cardboard is not difficult, but you should be very responsible to the selection of material, as well as the accuracy of making this part. After replacing the product, the carburetor is installed on the engine and a test run of the engine is performed, the result of which will be clear how properly all the repair operations have been performed.
If you have any questions. leave them in the Комментарии и мнения владельцев below the article. We or our visitors will be happy to answer them
How to make a gasket by yourself
The carburetor gasket can be made by yourself. Such a need arises when you can not find the original part. To make the gasket you need the following tools and materials:
For making the gasket you can use any thick cardboard. The thickness of the material should be about 0.8 mm. If the thickness is greater, such cardboard can also be used for making the gasket, but in that case you will need to additionally adjust the position of the carburettor float.
To make the gasket, you will need to remove the carburetor from the engine. Then remove the cap and the float in the way described above.
The old gasket is removed and the surface of the carburetor cover is cleaned from petrol traces.
Then the rod of the ballpoint pen is cut with scissors, and the ink is applied thinly to the surface of the carburetor cover.
The next step in making the gasket should be done as carefully as possible. The cardboard should be leaned against the carburettor cover and pressed slightly against the surface of the part, but in such a way that the sheet is not displaced at this point. Then the cardboard is sharply separated from the surface of the part with the ink applied.
After this procedure, the cardboard sheet will show an accurate imprint of the horizontal plane of the cover. Using manicure scissors cut the gasket for the carburetor from this print.
The holes for the bolts on the cover can be made with a shell of suitable diameter. For this purpose, the gasket blank is laid on a wooden board and the hollow side of the sleeve is applied to the designated hole locations, and precise blows are made with a hammer on the capsule socket side.
The produced gasket is installed in the usual way, but if the thickness of the cardboard for making the gasket was significantly different from the original, it is necessarily necessary to make adjustments to the position of the float in the chamber, as well as to make adjustments to the carburetor in the idle mode.
Trouble in the booster pump Solex 21083 carburetor
If there is a leakage of fuel from the pump cover, then in this case, there is probably a hole in the diaphragm in the booster pump, which must be replaced.
Can be clogged sprayer gas pedal pump, it can be checked by simply pressing the accelerator pedal with the engine not working, if at the time of pressing from under the distributor did not appear steady stream of fuel without air bubbles, then the reason is obvious.
- lack of fuel in the carburetor float chamber;
- atomizer is clogged gas pedal pump;
- Defective check valve in the gas pedal pump atomizer (the system should be blown).
The absence of fuel in the float chamber is determined by checking the presence of mixture on the inlet to the carburetor Solex 21083. Next, if the fuel is fed, it is necessary to check the shut-off needle and the mesh filter in the carburetor, then check the gasoline pump, etc.д.
Disassembly and assembly of a Solex 21083 carburetor in this case should be performed accurately and in the correct order. Otherwise, in the process of assembling you can break the correctness of the installation of jets carburetor Solex 21083, filter, sliders, etc.д. Which will subsequently lead to unstable operation of the carburetor or a carburetor failure.
A depleted mixture is determined by the following reasons:
If there is no fuel in the chamber float and serviceable fuel pump can check the flow capacity of the carburetor, and directly the hose supplying fuel to the carburetor.
Next, check the strainer and the serviceability of the fuel valve needle. it is unlikely that the needle can be jammed in a closed position, it is only possible in the absence of a retracting bracket that connects the float to the valve needle, or needle is badly worn.
Washed the mesh clogged filter with solvent or acetone, and previously removed from the carburetor housing, blow the filter with compressed air and install it in place. The faulty fuel valve should be replaced with a new one.
Repair kit for Solex 21083 carburetor
Solex 21083 carburetor repair kit is best to have a spare, so that in cases of malfunction it is on hand. It will be useful not only during the repair of the carburetor, but also in the process of tuning a Solex 21083 carburetor, if there is such a need and desire.
Further, the failure of the mixture can be determined by the position of the air damper. Possible jamming its drive rod, lever, axle, malfunctions associated with the starter or improper adjustment.
Mixture depletion can be caused both during operation and when starting the engine by a low fuel level directly in the float chamber. There may also be a leak of air in the exhaust manifold, where it connects to the carburetor.
In winter, at subzero temperatures, there is a probability of freezing of water directly in the fuel line and carburetor channels, blocking with ice plugs or freezing in the area of the mixing chamber diffusers. The result will be a stoppage or a drop in motor power.
Unstable rpm or no idle speed
If the Solex 21083 carburetor systems are working properly, clogging of channels or idle speed jets is possible. Damaged rubber gaskets of quantity and quality screw rings, loose valve solenoid: these are all probable causes of instability of the car.
Cutting out. gasket
The gaskets are cut as follows. Put a sheet of paronite under which you want to put a sheet of plywood, lightly press the head and turn the spindle at a speed of 3. 4 r / min. When lowering the spindle with a mandrel, cutting rollers, rolling on paronite, cut the gasket. When cutting out under the action of a compressed spring, the pressure head, remaining stationary, tightly presses a sheet of paronite. This mandrel allows to cut gaskets with diameter up to 300 mm. The gaskets are cut with both tools on a wooden pad. To reduce the friction the cutting edges should be moistened with soapy water during cutting.
The gaskets are cut as follows. Press lightly the sheet of paronite, under which it is necessary to place a sheet of plywood, by the head and turn the spindle at the speed of 3. 4 rpm. Lowering the spindle with the mandrel the cutting rollers roll on the paronite and cut the gasket. During cutting, the pressing head remains stationary and presses the sheet of paronet firmly against the gasket by the compressed spring. This holder allows to cut gaskets of up to 300 mm in diameter.
The gaskets are cut out with both tools on a wooden pad. The cutting edges should be moistened with soapy water while cutting in order to reduce friction.
Gasket cutting is performed on drilling machines with special devices, as well as in punching dies on driven mechanical and hydraulic presses.
| Cutter mandrel for cutting gaskets. |
The spacer is cut as follows: a sheet of spacer material is attached to the faceplate of the lathe. Depending on the width of the shim the corresponding cross feed of the cutter is selected. The cross feed of the slide is engaged. The knife moves from the center to the periphery and cuts the washer in an Archimedean spiral.
| Universal fixture for making round gaskets.| Circular saw for cutting discs and shims.| Roll shears ( zig machine. |
Gasket cutting on large shears can also be performed with a circular shear or a zig-zag cutting machine with special equipment for cutting gaskets.
Gaskets are cut with a circular cutter or chisel; rubber gaskets are cut with a knife. These shims have a significantly lower sealing ability and require significantly more material to produce. If a new gasket is prepared, proceed to uncouple the flange connection, for which the appropriate section of the pipeline is previously turned off from work; a bucket is placed under the uncoupled flange connection to drain the liquid contained in the pipeline; flanges are thoroughly cleaned of the old gasket remains, two adjacent bolts are inserted; a new gasket, pre-treated accordingly, is inserted between flanges; properly cut gasket will take the proper position if its edge touches the. Bolt nuts are tightened gradually, in sequential order, not more than 1 / 2 turns at a time.
Cutting out the gasket of the lorry seat cushion frame (size 430 X 880) is made of waterproof cardboard with thickness 2 mm with a knife punch (fig.
| Hydraulic flange extension device.| Apparatus for replacing the gaskets. |
To cut the pads different devices are used. The attachment is inserted into a drill chuck.
| Hydraulic flange spreading device. |
Blitz tips and tricks
It is not difficult to replace the carburetor gasket or make it out of cardboard, but the selection of material and accuracy of manufacture has to be done with great care. After replacing the product, the carburetor is installed on the engine and a test run of the engine is made, as a result of which it will be clear how correctly all the repair operations have been performed.
If you have any questions. leave them in Комментарии и мнения владельцев under the article. We or our visitors will be happy to answer them
Gasket carburetor: Variety and materials for making their own hands
Numerous gaskets and washers can be rubber or cardboard, as well as for this purpose is used paronite, which is used in those places where the temperature conditions of the unit, does not allow the use of rubber or paper parts. In addition, to ensure the sealing of nodes working in particularly harsh conditions, textolite gasket is used.
The device, which uses all kinds of listed materials is a carburetor, and, despite the fact that for the preparation of the working mixture in modern cars, this part is no longer used, the garage master may need information on how to change or make their own gasket for this part.
The gasket on the carburetor with his hands
Material? Where to find it? As far as I remember for this purpose you can use paronite. Choose a certain thickness, use punches to “create” the holes. Cut well with a pair of scissors. Heat resistant. Used on sovdepovskie cars in garages
The fact that I have at least two gaskets on a Solex carburetor And one you can say divides the carburetor in half and many make it out of cardboard, but it also costs a penny in the store.
And the gasket that separates the carburetor from the manifold is probably made of paronite.
And indeed such a gasket is not easy to buy. My car came from the factory without such a gasket. There was one insert and then I ordered it from the factory.
It is possible to make it yourself from paronite and it was done in front of my eyes. And this process is not complicated, the main thing is that you have a suitable paronite plate.
Numerous gaskets and washers can be rubber or cardboard, and paronite is also used for this purpose, which is used in those places where the temperature conditions of the unit, does not allow the operation of rubber or paper parts. In addition, textolite gaskets are used to provide sealing of units operating in especially harsh conditions.
The device in which all types of the listed materials are used is a carburetor, and, despite the fact that this part is no longer used for the preparation of the working mixture in modern cars, the garage technician may need information on how to change or make their own gasket for this part.