Do it yourself: homemade hand cultivator
Cultivator on a mini-tractor. an indispensable unit for every landowner. This unit is designed to work the ground surface without disturbing the top layer of fertile soil. Practice shows that without the use of this equipment, it is difficult to count on a good harvest. However, not every farmer can afford to buy a cultivator. If this is the case, self-made machines are the answer. Subject to compliance with all the rules of assembly, the landowner gets an opportunity to assemble an effective homemade cultivator, which will be almost in no way inferior to its factory counterparts.
The cultivator is a gardening machine that cultivates the ground before sowing and after harvest. It can be used to till and loosen soil, remove weeds, and fertilize. It can also be used for row spacing, hoeing and thinning.
They also differ in weight and power:
- Ultralight. machines weighing not more than 30 kg are designed to work on small garden plots;
- lightweight. units weighing 30-60 kg can handle large plots of land. They can be used on ploughed fields and on virgin land;
- Medium. equipment weighing 60-100 kg;
- Heavy. cultivators with a weight exceeding 100 kg, cultivate large farmland.
How to make a cultivator out of a chainsaw
The possibilities of a homemade power tiller, made from a chainsaw, are wide: loosening hard soil, eliminating excess plants, dipping rows of plantings. Powerful tool at the base of the cultivator allows you to work quickly, productively. For this version of a homemade power tiller you will need:
Device of a cultivator from a chainsaw
After preparing the parts for making a motocultivator with their own hands, the assembly of parts of the unit takes place: the use of welding or bolts is recommended in order to connect the parts. First, a homemade rectangular frame with plates arranged transversely is made. The unit should also have a plate at the back, with motor mounts on it.
The gas tank and the engine of the self-made cultivator are attached at different levels. the tank is above. Intermediate shaft is installed at the front. Another important element when making a cultivator is the installation of a chain on the gearbox, which goes to the running and intermediate shaft.
How to make a trailer for a power tiller with your own hands
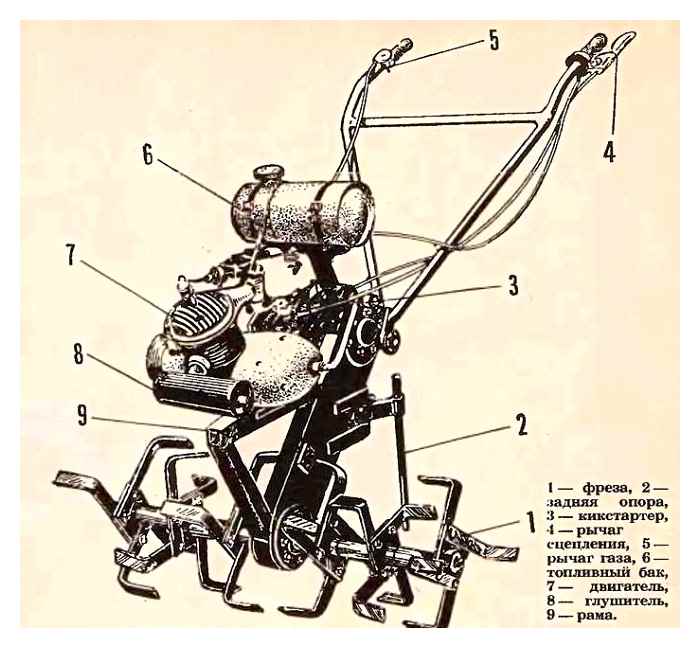
Single axle tractor “Neva” and attached equipment
How to make different elements
To expand the functionality of the motocultivator, additional attachments are put on it. To make such attachments use diagrams and drawings.
Stroke-reducer
A useful accessory for the cultivator is a travel reducer. It is designed to reduce the speed of the cultivator, which is necessary to redirect the power not to the speed properties, but to the torque or traction.
Such a product is easy to make yourself, using the following components:
Several calculations must be made before you begin. The role of the generator can perform a part from a domestic motorcycle Ural. The main thing is that it must be powerful and demonstrate a stable torque.
The next stage involves the arrangement of the drive shaft based on the shells of two bearings, which will run the gear. The flange bearings are placed on the opposite side of the gearbox, and a metal washer is left inside.
See ” Top 3 Pubert petrol-powered tillers
Fix the pinion on the idler shaft and secure the idler pulley at the end of the work. A spring nut and washers are used for this.
After completing the installation work, check the travel brake by connecting it to the coupling of the machine with the wheels. If you do everything correctly, after starting the device, the wheels will spin more slowly, and the unit itself will press against the ground.
Cutters
The main task of cutters for the cultivator is to destroy weedy plants. cutting elements can plow the soil, mix soil layers and level the surface of the vegetable garden.
Cutters in a special way are useful when cultivating clayey, wet or hard substrate. They are often used for garden work on virgin land or pastures.
Because of the simple design, you can assemble the cutting element yourself. Before this, it is necessary to make drawings or find a ready-made diagram, where the dimensions, the required amount of materials and elements.
Specialists do not recommend making cutters with a diameter larger than 50 cm.
By constructing a plow with your own two hands, you can achieve the operating parameters needed in the field. These include:
Depending on machine power, the right plough design is selected. Quality materials must be used that can withstand heavy loads without compromising performance.
Wheels
Cultivators can be made by putting the wheels of an old motorcycle, moped, bicycle, or any other vehicle with the right dimensions.
Groomers
The accessory is necessary to improve the grip of the cutting elements with the ground. It helps the machine to function freely in difficult conditions and cultivate the soil without stopping.
Trailer
The presence of a trailer will make the cultivator as useful and functional as possible. But before making such a design, you need to make sure that the car will be able to pull it.
A tiller
The product is necessary for the dip of potatoes or other vegetable crops. There are such variants of homemade okushnikov:
Adapter
Any work in the garden requires a lot of effort. To make the process comfortable, you should create a special seat. an adapter.
Homemade cultivator: what is needed for assembly
How to level the area for the lawn at the cottage with their own hands
Before sorting out how to make a homemade motocultivator, you should find drawings and find out what parts may be useful. Above all, it is:
- Engine (can be a moped or chainsaw engine) or compressor motor.
- Gearbox. It is indispensable and a must for the assembly. Due to it the speed of the shaft rotation is reduced, but the rotation force increases.
- If the machine is planned to be self-propelled, a pair of wheels is required. If not self-propelled, then the cutters.
- A frame made of any sturdy pipe or profile handle that will be used for steering.
- Sometimes a walker is required. Attachments especially need it, but some people solve the problem of excessive speed by selecting wheels with a large diameter.
Homemade electric cultivator
If the necessary materials are available, the owners also make a walker for a motocultivator with their own hands, drawings and diagrams for both the entire design and for each element are available online, or they are made on an individual basis.
Types of cultivators
Classification of devices is carried out depending on the mechanisms used. Cultivators with the following equipment.
- Electric. Mainly used for the treatment of large areas. The device can work only if there is source of electricity. The design has a small weight and compact size, in addition, such devices do not pollute the atmosphere with harmful substances.
- Cordless. This type of equipment is used to work on small areas. The advantages of battery-powered cultivators are their high mobility and small size.
- Gasoline. Another type of equipment, which is considered one of the most common among gardeners. High performance, good mobility, easy to use. But such devices must be properly maintained, not to mention the pollution of the atmosphere with harmful substances.
- Mechanical. It is no secret that manual cultivators are very easy to use, they do not take much time and effort, and are notable for their low cost. There are several types of designs of hand cultivators, ranging from a simple “Tornado” cultivator, which is a simple fork with bent fingers on the bottom, to a flatbed.
The advantages of manual cultivators can also include the fact that it is easy to make them yourself. You do not need special skills, it is enough to follow the recommendations. To make this or that design you need a correct drawing of the product, a little free time, patience and, of course, some tools and materials.
Flower pots with their own hands
In our new article we share the best ideas for flower pots! The most original and beautiful options, step by step instructions for making, useful tips. all this can be found in this article!
What you need for work
To make at home various devices for processing the ground, it is necessary to prepare special materials for this. The first thing you need to take care of is getting steel. The more different pipes, sheets or metal rods you have, the better. You can not do without a set of tools, but they are present in any garage, so you do not have to worry about finding them.
A welding machine is one of the most important tools for working with metal products. With its help you will be able to connect different parts made of metal in just a few seconds. Of course, in most cases you can do without welding machine, connecting the parts using self-tapping screws. But the quality of such connections can not be compared to the quality of welds.
How to make a hand cultivator with their own hands
Make a hand cultivator with their own hands is simple enough. you do not need a large expenditure of time, or specific skills, or rarely available mechanical components. There are a lot of advantages of a homemade construction: in operation there will be no need for fuel or electricity, because it is driven by physical force, and if it breaks (which happens very rarely). it will not be difficult to repair. Materials required for the home production of hand cultivator, probably found in every workshop or even a garage (the assembly will need a welding machine and, mostly, steel elements), but the garden with a minimum of effort will always be well-groomed.
There are three types of cultivator, according to the peculiarities of actuation:
- gasoline-driven;
- electrical;
- physically actuated (this type of cultivator is the easiest to make with your own hands).
Depending on the functions performed and the design features, there are rotary cultivators, rippers and even miniature hand cultivators for indoor plants.
Sprocket / rotary cultivator
This unit has the following design: the metal shaft is fitted with discs (so it is also called a disc cultivator) of star shape, which, when rotating the shaft, plunge into the soil. The effect is loosening the soil and uprooting harmful weeds (i.e. it performs a double function). The scope of operation of the rotary cultivator is extensive. it can be useful in the treatment of lawns or flower beds, potato beds or the root zone of young trees.
Loosener
The classic example of a tedder is the Tornado. The device is surprisingly simple: the working part in the form of spiral-shaped sharpened teeth is attached to a cutter with a long perpendicular manual. It is operated by turning the handle, which digs into the ground and retrieves the tines, loosening it. Even compacted or overgrown soil is amenable to the cultivator. Unlike the star rotary cultivator, it is mainly used in small, problematic areas. Compared to other constructions of this type, to make a manual ripper with their own hands is the easiest.
Root remover
Both a Tornado-type cultivator and a Ezh cultivator can be used as a root-cultivator. Working part of the hedgehog is represented by rotating steel bars. This part is attached to the stem (with or without perpendicular hand pallet). Like the “Tornado”, the hedgehog is used not only for pulling roots of weeds, but also for inter-row loosening, which is accompanied by compact dimensions of the working part.
Potato digger
Domestic market agricultural equipment offers a lot of structurally different potato harvesters (mostly vibrating, working as a hitch for power tillers). A special niche are manual potato diggers, used for moderately spacious areas. Work is carried out thanks to the two axes with teeth (one of which is stationary and serves to establish a support, while the other, when pressed, ejects undamaged tubers). This simple construction can be made by yourself from a fork.
For indoor plants
Cultivator for indoor plants is a small trident with sharpened curved teeth. This device can be easily made on your own, using a strong wire. The handle can be made from decorative materials or decorated to any taste.
How to make a home-made hand cultivator
Absolutely everyone can make “homemade”: it does not require any special skills or tools. However, each design has its own features, which must be taken into account when assembling.
Ploughshare
For the manufacture of ploughshare we will need a profiled tube (preferably with a square cross section), steel band (0.3 cm thick), a wheel (ready-made bicycle wheel or specially made). Here is the assembling scheme:
- make a fork from a steel band, attach the wheel to the fork;
- Make a V-shaped frame from a profiled tube (welding angle. 300);
- Weld the fork to the frame and the handles on top. For the convenience of setting in motion between the handles (in the upper part) a crosspiece is welded.
To the wheel is attached a knife, made from the tip of a double-sided saw or a strip of steel (3-4 mm). The angle of inclination of the blade can be varied by planting it on the adjusting screw. Particularly popular are ploskrezy, the base of which is made from a bicycle fork or frame.
“Tornado.”
Manual cultivator type “Tornado”. an elementary unit, which is complete with a handle, a cutter perpendicular to it and the working part. In appearance and principle of operation, it resembles a large corkscrew: screwed into the soil and reliably extracts weeds with a root system. You can make such a simple device in two ways: using steel band or from old forks.
“Tornado” of steel tape is made according to the following instructions:
- Take a metal tube with a diameter corresponding to the cutter, which will be inserted into it;
- the sections of the spring steel strip (up to 1.5 m long, 0.15 cm thick and up to 2 cm wide) are shaped like a spiral with a couple of coils and the ends are to be sharpened
- Using welding to fix the spirals to the pipe.
It is also desirable to make a metal handle (length about 0.5 m), or take for consumption of durable plastic.
“Tornado” of forks is made even easier: using a hammer, you should give the tines a spiral shape. It will simplify the work by heating the metal with welding. The shaft is made in the same way.
Making a star cultivator
For this design you need (depending on the desired width of the working part) to make the following number of identical star-shaped blades. You can assemble the cultivator according to the following scheme:
- blades are welded to the axle at intervals of 5-7 cm;
- The axle is fastened to the metal fork so that its free rotation was possible (it is necessary to drill holes in the spurs of the fork, into which the rod with the knives already worn is inserted, bend the rod at both ends);
- the fork is welded to the tube, to which the stem will be attached.
The diameter of the sprockets can vary depending on the intensity of weeding or loosening, as well as the type of soil. The most effective is considered a modification, to which the fork with knives is attached to the back (a sharp steel strip is bent into a triangle and attached with a joint to the tube). If you use flat discs instead of sprockets, you’ll have a rocker.
Cultivator from a bicycle
Unused bicycle. the optimal basis for making a manual cultivator with their own hands. There are two variants, differing in complexity: using a bicycle fork with a wheel or on the base of the frame.
To perform the first option, you will need:
- a bicycle fork with an unremovable wheel (it is best to use a child’s bicycle, since a cultivator with a large wheel is not as comfortable to use)
- ploughshare (you can use the cutting part of a two-handed saw or use a ready-made cultivator head);
- handles (it is desirable to use metal ones).
You need to attach two handles to a bicycle fork with a wheel. A crossbeam is welded or bolted between the handles. A stray cultivator head or a pliers made of a saw’s edge are welded to the crossbar.
For the second version (the basis. a bicycle frame) will need a bicycle frame with a rear wheel. Assembly instructions are as follows:
This option has advantages: firstly, it is more reliable, and secondly, you can use any attachment, as long as you fasten it with bolts.
Homemade hand cultivator will be indispensable in any agricultural activity. Knowing how to make a homemade cultivator, you can significantly save (of course, if we are not talking about hectares of cultivated soil), both on fuel and on repairs. You can be imaginative and modify the design in every way, or it can be customized from the start. with comfortable handle inclination, the right attachments, and the right size. There is no limit to how far the design can be improved.
well-known manufacturers
In specialized stores you can see a large number of cultivators, which differ not only by price range, size and functions, but also by country of production.
Specialists recommend paying attention to the goods of domestic manufacturers, which have a number of advantages:
- simplicity of use;
- affordable price range;
- Availability of a large number of additional functions;
- manufacturing of component parts from high-quality materials with modern equipment;
- ability to replace deformed parts;
- work only by high level specialists.
The most popular domestic models are such devices as “VIKING”, “Gardener”, “Neva”, “Mole”, “Celina”, “Farmer”, “Strizh”, “Batrak”, “Roe”.
VIKING has a powerful petrol-driven engine and is equipped with power tillers and a rear hoe. This machine has several models, which have different equipment, functions and can be used to work with virgin and black earth
Specialists recommend paying attention to the Viking’s ability to change the width of the land, as well as its maneuverability and versatility. The wide price range makes it possible to buy a device for different categories of people
The main advantage. reliability and long period of operation.
A budget option of cultivators for small seedbeds, greenhouses and greenhouses is the “Gardener”, which will allow you to perform work even in hard-to-reach areas. The designers have provided for the installation of the Honda engine on the machine. Steering and anti-vibration function make the work much easier. The advantage is the location of the center of gravity at the bottom.
One of the most popular heavy cultivators is the “Neva”. This device is used only for large areas. Disadvantage. low maneuverability, grabbing a large area of the ground. Dignity. availability of spare parts and the ability to quickly install them. twin wheels and a steering wheel make it easy to do the job.
The leader of sales in the average price category of this group of products is a cultivator “Mole”, which has a simple design and high power. Availability of spare parts makes it possible to eliminate all faults in a short period of time.
For loosening and digging light soil, you can buy the device “Tselina”.
Among the main advantages, experts highlight the following:
- easy operation;
- application of a minimum amount of physical effort;
- possibility of adjusting the control knob;
- availability of rear wheels;
- easy transportation;
- Availability of metal carrying brackets.
Experts recommend paying attention to the cultivator “Farmer”, which has three gears and reverse travel. Small size makes it possible to use the machine near houses and trees
Cutting elements penetrate into the virgin soil to a depth of more than 20 cm. Manufacturers produce several models of this device with different price range.
Among European manufacturers it is necessary to note the French company “Caiman” and the German companies “Brill” and Gardena, the production of which is notable for high capacity and reliability.
Most of the goods in modern stores are cultivators made in China. the main advantages of these products are low price range and high level of aesthetic indicators. Before buying a Chinese cultivator, it is necessary to know about its disadvantages:
- the use of low quality raw materials;
- brittleness of the starter in the engine;
- rapid deformation of the cover;
- regular replacement of component parts;
- fast breakage of worm gears.
Experienced gardeners recommend paying attention to the manual cultivator KR-1, which is a universal tool. The designers have made it possible to attach a large number of attachments to the metal frame, and the height and size of the device is in harmony with the physical features of all gardeners
Has the functions of reverse movement and self-cleaning.
VKR- 400 forked cultivator. an interesting development of domestic designers, which can completely replace the shovel and increase the speed of work. The tool has a horizontal handlebar and a stop. The device makes it possible to loosen soil without lifting a heavy layer of soil, which completely eliminates the load on the bone skeleton.
Cultivator with their own hands and for their own strength
Some craftsmen make cultivators, turned by 180 degrees. That is, they must be pulled, not pushed. It is claimed that such a process is easier. The choice of direction is up to you, or rather your one man power. And it is on average equal to one tenth of a horsepower. To haul a hand cultivator with your own hands.
These self-made machines are made by Russian hobbyists, their experience can be adopted by anyone who can hold various tools, understand simple drawings, assembly. And a hand cultivator with your own hands can be assembled in a couple of weeks.
In rural homesteads what not only did not accumulate for decades: still serviceable various electric motors, internal combustion engines from a moped, motorcycle, wheel from a rotted “Zaporozhets”, and certainly bicycles. from the youth to road or sports.
And many of the above will figure in the drawings and on the assembly of homemade cultivators. Will suggest and interesting idea of improvement, how to make a cultivator with their own hands.
What are cultivators?
They started to cultivate the land quite a long time ago. When the garden-living lifestyle was at its peak, hand-held cultivators were especially popular. Tools were purchased in the factory version and made by their own hands. Particularly popular today are such types of hand cultivators:
- ploughshare. The product resembles a traditional hoe, but it is a mechanized version;
- star. The function is reduced to the successive cutting of the soil by stars in the form of knives;
- hedgehog cultivator. The principle of operation is similar to the previous version, but the ground is loosened with steel rods in the form of a porcupine;
- tornado. The tool is similar to an ordinary pitchfork, but only the bars are used twisted.
Cultivators can be used for a number of tasks, such as:
- loosening the soil, making it breathable;
- Cutting rows for planting vegetable crops, followed by sprinkling;
- removing weeds;
- breaking up large clods of earth and leveling the ground.
Most of the work on the ground involves physical labor. Cultivators are popular because they make work easier. Of the pluses of such a tool stand out:
- ease of use;
- No lubricants or flammable substances are required;
- neatness of cultivation;
- the ability to work the ground in confined spaces, e.g. flowerbeds, greenhouses.
However, the cultivators do not have any disadvantages:
- the tool is obsolete;
- Depending on the device, the discs need to be changed from time to time;
- low productivity;
- requires physical effort;
- low efficiency on virgin and hard ground.
Cultivator with their own hands with an electric drive
Two electric motors of 1500 watts each are used as the power plant. They are linked together by a belt and pulleys of the same diameter. One of the motors has a double pulley, and with the help of an idler pulley, the torque is applied to the working pulley, connected with the primary shaft of the gearbox.
Rear wheels are not driving, when installed on the front axle of the rotary nozzle, they become a supporting structure. If you put the wheels on the drive axle, the rear axle adds stability to the construction. This design can be fitted with different implements, from a cultivator to a spear-shaped ripper.
Gearbox in this design is used ready-made, from the broken motor-block “Neva”. After the worn out gears are replaced, functionality is restored.
The advantage of this gearbox is in its strong casing. That’s why it is used as a building block for the cultivator. The front drive axle is an extension of the reducer’s secondary shaft.
The frame is assembled from improvised materials, from a powerful ventilation system from decommissioned military equipment. The aluminum tubes for the tiller arms stand are taken from the same place. Bracket for attachments is made from a plow holder from a discarded farming machine. The wheels are taken from it.
The only purchased element is a power cable. Lengths of 20 meters. Enough for four acres of land, with a socket in the corner of the field. Moto-cultivator with engine from moped.
The drawing of the device is shown in the illustration:
D8 moped motor used as power unit. The air cooling on the cultivator is not working, because of the low speed. Therefore, around the cylinder a tin container is soldered, in which water is poured. By periodically topping up the liquid you do not let the cylinder block get warmer than 100° C.
A chain reducer, two-stage. Sprockets from bicycles and mopeds were used. Covers welded from 3mm steel sheet. The lower gear stage has a power function, so the output shaft is reinforced by steel bushes attached to the gear housing.
Conclusion: The design is robust and reliable, tried out by dozens of gardeners. In any of them you can always make changes based on the materials that you have.
Motor cultivator with a moped engine. video. Homemade frame is made of 40x40x5 angle bars and 20×20 profile pipes. VAZ 2101 gearbox is set, transmission from engine to gearbox is through a chain. Simple and tasteful. Other details in the video clip.
Block: 4/4 | Number of characters: 2576
What is needed for work
To make at home a variety of devices for processing the ground, you need to prepare special materials for this. First of all, you need to take care of getting steel. The more different pipes, sheets or metal bars you have, the better. You can’t do without a set of tools, but they are present in any garage, so you don’t have to bother looking for them.
When working with metal pipes you can not do without special tools
A welding machine is one of the most important tools for working with metal products. With it you can connect different parts made of metal in just a few seconds. Of course, in most cases you can do without a welder, connecting the parts with self-tapping screws. But the quality of such joints can not be compared to the quality of welds.
Inverter welder
Block: 4/6 | Symbol number: 933
Option #3: The rotary disc cultivator
Making a rotary cultivator with your own hands is not easy at all. You need both special skills and good physical training. If you have all the listed qualities, you can try to build this tool, which will be much more effective than all the previous ones. It can be used not only to cultivate but also to harrow the earth, deftly breaking up large lumps.
The rotary disc cultivator consists of: 1. disc, 2. axle. 3. hub, 4. large bracket, 5. small bracket, 6. stem, 7. tube, 8. handle
The working elements of this cultivator are the convex discs, which must be welded to sleeves that are mounted on the axle. The axle ends are pinned in place with cotter pins, which are secured in a large bracket. Then a hole is cut into the top of this bracket. The handles with the crossbar are fastened into it. A 25 cm long and 24 mm diameter rod is to be welded to the small bracket. A 16 mm diameter rod is screwed into it. Part of the rod protrudes over the crossbar.
The desired spherical shape of a 4 mm thick disc is not easy to achieve. For this you need to be able to work with a hammer. A firm and precise blow to the center of the disk transforms it into a bowl. This is where the main physical effort is required. Special wing nuts on the crossbar regulate the angle of the spherical discs relative to the direction of the cultivator itself.
Option #4: A production meat grinder to help us
All of the above equipment is quite simple. But in your own workshop, you can also make a homemade electric cultivator. This proves once again that the capabilities of home craftsmen are almost limitless. To implement this idea you will need an old production meat grinder. On its basis, and will be constructed effective electric assistant gardener.
Electric cultivator can be made on the basis of a meat grinder production: you get a fairly powerful unit, which will last for several years
Everything is not as difficult as it seems, if you have a welder and a craftsman who knows how to use it for its intended purpose. To the gear crankcase two angles should be attached. Tubes with a bend are welded to the corners, which will be used as handles. Between the resulting handles, another section of pipe is welded. a spacer, which gives the structure the necessary strength.
We had to weld the axles for the cultivator wheels to the corners. The wheels are of medium size, so they are easy to work with and do not fall into the soil.
The shaft is the main component. We need to cut it out of scrap iron. They are connected in the same way as the original: with a slotted groove. The sleeve of the grinder is hammered with a sledgehammer, after which a sleeve with thick cast iron walls is left. Inside the axle is a billet made of scrap metal, to which are welded the bolt-shaped serrated hooks. They are cut from car springs. Other material options were used for grousers, but they were not viable.
The grousers are placed at an angle of 120 degrees. They need to screw out along the rotation, then they will be easier to enter the ground, and the cultivator itself will be easier to control. The motor of the machine is connected according to the scheme “delta”, the start. capacitor. The motor switch for the convenience of work is installed on the handle of the cultivator. The machine will last a long time if you lubricate the interface of the homemade shaft in the cast iron sleeve with any waste oil before starting work.
Take a good look at what the tines should be and how they should be positioned: this determines the effectiveness and durability of the device
The quality of land treatment depends on the speed of movement of such a cultivator. Fast plowing will be rough, while slow plowing can literally pulverize the soil into dust.