How to cut a corner on the ceiling plinth with and without a jigsaw: an instruction for “dummies
The novice craftsman, starting repairs in the house, wonders how to cut a corner on the ceiling plinth with a chisel and without a chisel. Homius editorial staff will tell you how to beautifully lay the baseboard on the ceilings in the apartment, using different methods.
Chisel for baseboards: basic rules for use
Everyone will be able to understand how to properly cut the corners of the ceiling plinth. For the process to go smoothly, you should familiarize yourself in advance with the basic ways to create beautiful and even blanks.
The main rule of work. the observance of the slope of the corners. If the baseboard is fixed to the right, the corner will be cut from the left side, and vice versa.
The chisel is a handy tool for fast processing of blanks
Polyurethane ceiling plinth: what is it, advantages and disadvantages, what it consists of, what kinds there are, how to choose, step by step installation of the baguette, coloring, restoration methods, the average cost. in our publication.
Cutting a skirting board for ceiling decoration
Another type of ceiling plinths. from extruded polystyrene foam. They are much denser than conventional foam products (so they do not crumble), cost a little more, but also cut them a little harder. You can still use the same metal saw or a hacksaw for work.
The most expensive baseboards are made of polyurethane. These are elastic, strong and moisture-resistant products, which are very easy to cut with a construction knife. However, they can not be used in all rooms, since polyurethane is sensitive to high temperatures. it deforms, begins to crack or crack.
To work with wooden skirting boards, only a hacksaw with fine teeth is suitable, you can use a tool for metal.
However, many novice craftsmen are not so much interested in how to cut the ceiling plinth in the corners. This process requires from the performer a careful calculation and accuracy. In some cases, if the interior of the room allows, you can not think about how to saw a corner on the ceiling plinth, and use prefabricated corner elements. They can be purchased at construction stores. In this case, the baseboard is simply cut straight and inserted into the corner piece. All irregularities and imperfections will be hidden.
Using a skirting tool to cut baseboards
In the carpentry business is often used a special device made of wood, metal or plastic. the plough. In it, special slots are made that allow you to carry out a straight cut at 90º, 45º, and in more complex devices. even at 60º. There are also professional skirting boards that are equipped with a swivel mechanism. In them, the cutting tool can be installed and fixed at any angle to the workpiece. Before you can make a ceiling plinth in the corners, you need to understand the details.
To cut the inside corner of a ceiling plinth using a woodcutting jig, you need to:
- First, the baseboard blank must be placed against the ceiling surface and the length must be marked.
- Now a piece of skirting board is placed in the jig in such a position as it should be placed on the ceiling.
- Press the skirting board firmly against the back wall of the woodcutting mill.
- Hold the workpiece with one hand so it does not shift during cutting.
- The hacksaw is set at a 45º angle to the workpiece.
- Trim the skirting boards, checking the pressure of the hacksaw so as not to damage the piece.
- Then proceed to cut the counter piece of baseboard. It is also pressed against the far wall of the jigsaw.
- Press and hold the workpiece by hand to prevent it from shifting.
- The hacksaw is set at a 45º angle to the workpiece so that the direction of the cut is opposite to the first baseboard piece.
- Cut the corner of the baseboard.
After trimming the ceiling plinths in the corners proceed to the joining of the resulting elements. If the cutting was done accurately, they will fit snugly together.
Note that it is recommended to start cutting the inner corner of the baseboard from the front side. Then the line for the trimmer cut will be more accurate and even. As for the wooden elements, any flaws on them will need to be deburred with a file. “How to properly trim a ceiling plinth in the corners. options and methods for plinths made of different materials”.
Consider how to cut the outer corner of the ceiling plinth using a jigsaw:
- It is better to begin marking and measuring the ceiling skirting boards from the inner corner, and only after it is done, begin to cut the outer corner. Otherwise, the plank may be short, it will not be enough to fill the entire length of the ceiling.
- The skirting board is applied to the ceiling and its length is marked.
- Then the workpiece is placed in the jig and pressed to the front wall.
- The hacksaw is placed at an angle of 45º and, holding the workpiece by hand, saw off the corner.
- Similarly, you need to cut the opposite part of the outer corner.
- The workpiece is pressed to the front of the plinth.
- Place the hacksaw at a 45º angle to the skirting board, and saw off the workpiece.
When the work is complete, the pieces of the skirting board are docked together, checking if everything is done correctly and evenly.
It is worth noting that the plough can help to cut the corner of the ceiling plinth as evenly as possible only if the walls are strictly perpendicular. If they are uneven, and the corners are not accurate, this device is unlikely to be useful. “How to properly cut the corner of the ceiling plinth. rules and methods”.
Skirting boards made of foam is one of the cheapest options. However, the advantage in the form of low cost is offset by a large number of disadvantages. In particular, foam plastic itself is quite fragile and soft material, which is very easy to break. Even if you just squeeze such a product in your hand, it can deform.
Because of the low strength, it is very difficult to handle foam baseboards. If there is little experience in cutting such parts, then most of them in the process will fall into disrepair, so all the benefit from the cheapness of the skirting boards will be leveled. To cut foam tacks, a hacksaw or a well-sharpened knife is usually used.
Styrofoam
By and large, polystyrene foam is a type of foam that has an increased margin of safety. The cost of products from extruded polystyrene foam is somewhat higher compared to the foam, but also the reliability of such skirting boards is much higher. Breaking such a piece is already problematic.
To cut the polystyrene skirting boards requires any sharp tool such as a construction knife or hacksaw. Due to the high strength of such products is much easier to work with. they almost do not break or deform in the process of work. There will be less waste in the end.
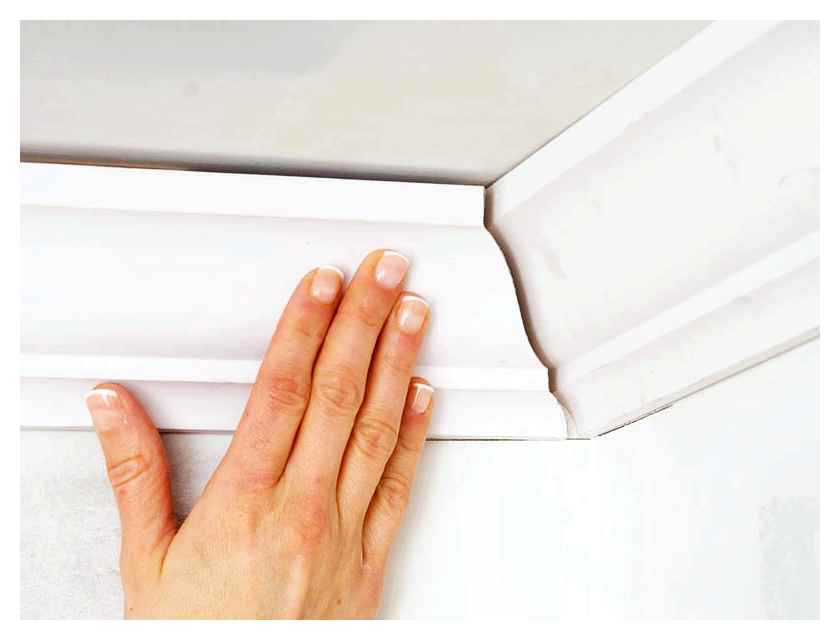
How to properly join baseboards in the corners
Properly designed corners look attractive
As a rule, the design of corners, both internal and external, takes the bulk of time. Due to the fact that the ceiling skirting boards are characterized by a very complex shape, it is not easy to just take and cut them at the right angle. It is necessary to cut so that they dock in the corner without noticeable gaps. To make the corners literally perfect, there are several ways.
Using the plough
The chisel, as a tool, is suitable if the corners in the room are joined at an angle of 90 degrees. The tool is a U-shaped trough, turned upside down. On the walls of the gutter made cuts at different angles. To evenly cut the decorative element, it is placed inside the trough, and then the saw cut the element at the desired angle.
This is what a pitching tool looks like. Can be plastic, wood or metal
Due to the fact that the baseboards are complex in shape, they need to be placed in the chute so that they simultaneously pressed on two surfaces. the bottom and the side. Depending on which corner is formed, the baseboard is pressed to the bottom and side, either the opposite or the near surface.
As a rule, corners are trimmed at an angle of 45 degrees. First of all, you need to determine the length of the skirting board, setting certain marks on it. After that, the decorative element is placed in the chair so that the mark corresponds to the maximum length of the element, and then the element is cut off. You must also remember that the left side of the baseboard is placed on the left side of the jigsaw, and the right side. on the right.
How to cut a corner on a ceiling plinth: correctly install it in the jigsaw
Ceiling baseboards are attached to the ceiling with one hand and the other to the wall, so the part that is attached to the ceiling is placed on the bottom surface of the jig saw. It is very important to hold the baseboard firmly and securely while cutting, because otherwise the cut surface is unlikely to be flat and smooth. Having cut in this way the left and right part, you will get either the inner or outer corner.
How to cut a corner on a ceiling moulding: hold it properly in the jig
First, both parts are applied to the place of attachment without glue to check the quality of the work. If the corners do not match, they are corrected with a suitable tool. The advantage of polystyrene ceiling plinths is that small errors can be hidden by covering them with putty.
After the final check, a thin layer of special glue is applied to both surfaces of the plinth.
How to make the inside corner of the ceiling plinth using a wire cutter
The technique of fitting ceiling plinths in the corners is almost the same, regardless of which corner it is, internal or external. After applying glue, the skirting board is pressed to both the wall and the ceiling. Naturally, the force must be controlled, especially if the decor elements are made of foam plastic. over, you must wear gloves, so as not to smear the surface of the skirting boards, which can get dirty easily.
Material and name
The first material from which began to produce skirting boards for ceiling design, was plaster. They had to be cast in special molds, and then they were attached to the ceiling with plaster mortar. Similar decorative elements were called skirting boards and nowadays they are practically not used, and you can see them in old houses, which have hardly survived for that time. These are expensive elements of interior decoration, so no one uses them today, and their name is practically unknown to anyone. Today, there are cheaper and more practical skirting boards for finishing ceilings.
Part of the assortment in the specialty store
Nowadays, ceiling plinths are made of materials such as polystyrene or polyurethane. These are inexpensive decorative elements, which have a number of other advantages, such as ease of installation, practicality and attractiveness, as well as “weightlessness”, compared to the elements of finishing from plaster, which have an impressive weight. Such plinths from polyurethane or polystyrene are made of various widths (from 5 to 250 mm), and also have a wide range of forms and drawings, so there is an opportunity to pick up such decorative elements for any style of decoration. The only exception is represented by buildings made of wood, decorated in the appropriate style, where elements of wood are taken as a basis and here it can not be helped, because the style always dictates its terms.
There are still skirting boards made of plastic, which are not afraid of moisture, so they are used for finishing rooms where there is high humidity. For the sake of justice, it should be noted that polystyrene decorative elements are also not afraid of moisture.
Trim ceiling skirting boards in the corners with some methods, while such options are not suitable for trimming skirting boards made of plastic.
Tools used
Depending on the material of manufacture, different tools are used for fitting baseboards: when working with wooden baseboards, wood hacksaws are used, and when working with plastic or polyurethane baseboards it is better to use a hacksaw for metal. Elements of foam decor are easily cut with an ordinary, sharp office knife. In most cases, a plier is used, allowing a precise cut of the skirting board at a certain angle. If you use a hacksaw for metal, you should not press hard, as the cut may not turn out even, with burrs, and the material can crumple and lead to disrepair. Ceiling plinths of polystyrene and polyurethane require careful handling.
If you have no experience with such tools, as well as elements of the decor, it is better to take a small piece of finishing material and practice with different force of pressure, which will later help in solving the problem.
How to cut the corner with a chair
Chisel. joinery tool, with which you can cut any material at an angle of 45 and 90 degrees. The mortar can be made of wood, plastic or iron. Even the simplest fixture has openings for a hacksaw, the more expensive models even have a swivel mechanism.
The principle of working with a crosscut is extremely simple. Insert the slat into the groove, press it down and make the cut through the side holes. The result is a cut at the right angle.
- Take measurements.
- Put the skirting board face up into the groove of the wood skating rink.
- Press down on the slat with your hand, but not too hard (if the skirting board is made of Styrofoam it can easily be broken).
- Insert a hacksaw into the hole of the wood chisel at a 45 degree angle and make the cut
- In a mirror reflection in a similar way cut the second piece. You get the inner corner formed.
Tip! You can cut the skirting board with a metal saw, but if the baseboard is narrow it is better to use a construction knife, it makes a more even cut.
Cut the outer corner just as easy. Step by step instructions:
- On the underside of the skirting board mark the desired length, but its edge should protrude a little.
- We put a plank in a chair at an angle of 45 degrees and make the cut through the holes.
- Mirror-cut the second slat.
- Once the elements are cut and ready to install, lay them against the wall. If everything is straight, then we glue, and if there are flaws, we simply remove them with a sharp knife.
If you have to work with a wire cutter for the first time, it is better to pre-practice on extra pieces.
How to cut a corner without a joiner
It is possible to cut a corner and glue the baseboard and without a jigsaw. Let’s tell you how not to spoil the appearance of the baguette.
- On any solid surface draw a line for a trimmer.
- We set back 10 cm from the line and trim one more line for the trimmer.
- At a right angle draw a line through the parallels.
- From the line on each line we do a 5 cm mark and connect the lines of the opposite points.
- The lines with parallels as a result form an angle of 45 degrees.
Thus we receive a selfmade jig, and now it is necessary to define an inclination and to make a cut of a skirting board.
- We put the strips to the ceiling and determine the direction of the cut for accurate and correct installation.
- For an inside corner, the top edge must be shorter than the bottom edge.
- For the outer corner, the upper edge must be longer than the lower edge.
- Baguettes should be cut in a mirror image.
- On the baseboard, which will be located on the right side, you need to make the cut on the left side. On the plank that will be on the left. the cut on the right side.
- Lay the slats on the homemade diagonal cutter along parallel lines and, taking into account the direction of the angle, make the cut according to the marks.
To make the cut without roughness or splintering, you must carefully advance the knife in one direction.
The first method is with the joiner
A professional power sander with a pivoting hacksaw
The chair usually looks in the form of a tray with vertical holes for the hacksaw. It can be made of wood, metal or plastic. This tool is the oldest and simplest carpenter’s tool, designed for cutting wooden parts at 90° and 45° angles. There are types of such a device and for professional work, with a rotating mechanism, in them the cutting tool can be rotated and fixed in any position.
How to cut a ceiling plinth properly
Ceiling corners are divided into internal and external, the method of joining them is slightly different.
If necessary, you can make a plier with your own hands. You will need three pieces of plywood or boards of equal size. First, they are applied in the form of an inverted “U” and make a marking of the corners. Then, according to the markings, cut slots for a hacksaw almost to the bottom, and the boards are twisted.
Inner corner
- Making the correct measurements.
- Install the baseboard plank in the jigsaw so that this position is exactly the same as the placement on the ceiling.
- The skirting boards must be pressed tightly against the opposite wall of the mortar. Hold it and press it down with your free hand.
- We put the hacksaw at an angle of 45° in a special hole and cut the part.
When cutting soft materials (PVC, polystyrene foam) use a metal saw or a regular construction knife. Then the work will be neat and with straight edges.
Outer corner
- Measure the length of the skirting board from the nearest wall to the outer corner, leave on the wrong side of the line for a trimmer with a pencil, marking the desired length. Note that the edge (its top) should extend slightly outward.
- The skirting board is moved into the mortiser and cut.
- Adjacent strip should also measure with a margin and cut in a mirror reflection to the first part.
Try on the skirting board: the junction of the parts must be perfectly straight. If the result is not achieved and there are irregularities at the joints, you can trim the edges with a regular knife until the perfect joint.
The second method. without additional tools
For the inside corner, you can use the easiest way to perfect the joint. by marking on the ceiling. Another example of how to cut a nice, even corner.
The end result is an even angle of 45 ° if you run a line trimmer from the intersection point to the edge of the detail. Note that the above method of marking works only when the corners are perfectly even.
Self-Made Jigsaw
If you have skills in working with drawings, you can try with your own hands to make a handy tool from paper. To do this, you need to prepare cardboard, wattman or other paper, a protractor, a pencil.
The template is made in the following sequence:
- First draw two parallel lines and determine the location of their center.
- Then use a protractor, setting aside on paper with its help all the necessary angles.
- Also, before you cut the corner of the ceiling plinth, you should check the distance between the walls with a special angle and measure them with a protractor.
- Tacks are cut off only after all the manipulations are completed. Do not forget that the right side of the parts is cut from the left side, and the left side, respectively, from the right side. As for the jig, the parts are placed in it vice versa. The right side. left side, and the left side. the right side.
Making a wooden jig
There are two ways in which a wooden tool can be made:
- First option. Prepare three pieces of wooden boards. If they are not on hand, you can use planks made of wood or plywood. Using a hammer and nails, knock out of the boards a shape that has the shape of the letter U. On the sides of the resulting product, mark the corners necessary for the work and make cuts along them. The result is a kind of a jig in which holes are made with a hacksaw. The skirting boards are inserted into them and trimmed.
- The second variant. It is a combination of a plane made of paper and wood. Two boards or strips are needed. The figure in the form of a corner is assembled of them. On a piece of cotton paper, they draw lines equal to the angle of the cut of 45 or 90 degrees. Before you make a corner from the ceiling plinth, you can draw any angle. in this feature is the advantage of a homemade tool before the purchased ready-made device. The skirting board is placed against the mortiser and pressed with the left hand. The template is placed in the place where the cut will be made, and the baseboard is cut according to the line drawn on the paper.
There is another way to substitute a chair from the store. It does not imply the creation of a tool made of either wood or paper. To do this, you will only need to take any objects that form an angle. For example, it can be a wooden tabletop. Before trimming the baseboard, you should carefully take measurements. To outline the corner of the fillet, located inside, the length should be measured from it.
There are nuances in how to make the ceiling skirting the outer corner. in this case, for its marking should be guided by the fact that the tack will protrude into the room at a distance equal to the width of the product. In accordance with all the described calculations and make the marking of the baseboard lines.
It should be noted that the work associated with the trimming of fillets is complex and laborious. Rarely does a novice home handyman manage to correctly and accurately cut off products so that the parts fit perfectly in their places without gaps and gaps from the first time.
In the event of failure, you should not despair, because you can always redo the work with mistakes by filling the empty space with putty. When the ceiling mouldings and ceiling brackets are in place the ceiling will have a neat and finished look.