How to make a snow scraper: materials and instructions for making it yourself
In winter, it is important to remove the snow immediately, while it is still loose. Spreading it with a shovel is not productive, in addition, it is impossible to capture a lot of snow at once. This is why many people consider buying a snow scraper. However, these devices are only available in one size at the store. It might be too big for some and too small for others. If you make a snow scraper with your own hands, you can create a suitable size device.
All scrapers have the same device. This tool consists of a handle and a working cloth that directly cleans the snow. However, the shape, size of these elements can be different, depending on the purpose of the tool. For example, scrapers to remove snow from the roof have a long handle. It comes in one piece or telescopic. Working canvas is fixed perpendicular to the cutter. A squeegee is more like a rake.
For clearing snow from paths and areas scrapers make wide. The easiest version is a rectangular sheet of sheet metal or plywood with a handle. The shaft can be one or two, and straight or curved. On wide scrapers make a U-shaped handle.
If we talk about building their own hands scraper for snow removal, the scraper of this variety sometimes has a working canvas with sides. The bucket allows you to grab a large volume of snow and take it to a specified place.
Important! To facilitate manual cleaning of large areas, craftsmen came up with a kind of scraper mounted on skis.
There are many configurations of snow removal equipment. However, all homemade scrapers for snow removal have the main difference in the material of manufacture. Tools are made of metal, plastic and wood:
- Plastic tools are most often bought in a store. However, you can make such a scraper yourself from a used plastic barrel, tray or other household item. Plastic is lightweight, no snow sticks to it. These advantages simplify the work with the scraper. The edge of the working blade is usually protected by a frame of metal strip that protects the plastic from abrasion. There are reinforcing ribs on the store’s products. They add strength to the working blade. Plastic scrapers are lightweight, comfortable, and do not shed snow
- The most popular when assembling a snow scraper with your own hands, where the material used is plywood and a wooden handle. It is not hard to find blanks for such tools in almost every home. The wood is easy to work with, but has one drawback. Plywood strongly absorbs moisture. It begins to stratify over time. Tools swollen by water become heavy, and wet snow sticks to the scraper blade. Wooden tools are usually made of plywood
- Metal scrapers are in first place for durability. But not all tools are equally good. Metal is not like other metals. If you use standard tinplate and a pipe for the handle, it rusts fast. It is heavy. The snow freezes to the working canvas. Optimal in price and quality is considered inventory of galvanized sheet steel. The protective coating prevents rapid corrosion. But the scraper is still heavy. Over time, the galvanized layer wears off and rust stains appear. Aluminum scrapers are the best. The tool is lightweight, rarely freezes with snow, and does not tend to rust. You could also consider stainless steel, but the metal is expensive. Metal scrapers are strong, resistant to moisture and mechanical stress
Despite many disadvantages, wood is still one of the most popular materials.
Auger option
The attachment with the blade has disadvantages, and the main one is the waste of time and effort to shovel the layer of snow picked up by the blade. It is often left right beside the road, creating high snowdrifts, which is not always acceptable.
Option snowplow with an auger will even get rid of roadside debris, because its design provides for throwing the captured mass at a distance of several meters. This will help clean the yard or street completely, leaving piles by the fence.
This option is welded or bolted to the front of the frame with wheels, which can be removed from an old wheelbarrow, for example.
Another design is a wheelless version, controlled by a tube. The body is mounted on a frame made of angle bars, with the skis bolted to the bottom.
Basic units and materials of both variants:
- The box is welded from sheets of metal;
- The center shaft. is a ¾-2 inch tube;
- Gripper (shovel). plates made of iron or pieces of channel bars;
- supporting elements;
- auger. made of rings or tape;
- a sprocket from a motorcycle;
- ski made of plates or pipes;
- A frame made of angles;
- bearings;
- Pipe for throwing snow. can be taken from the stove.
-
Four rings and six support plates are cut from roofing sheets or other metal.
- Clamp the middle part in a vice, grasp one edge with pliers and pull aside. Do the same with the other end.
- Weld one edge to the support element at the blade and stretch.
If the rings are made of thick material and it is difficult to grasp them with pliers, you can use two clamping devices, such as vise.
After making the auger, a sheet of metal is drawn out and the box is welded together. In its middle part, a hole is cut out for the snow discharge pipe. You can make it yourself or use a ready-made from an iron stove. Some craftsmen use plastic.
Then a rectangular hole is cut into the body opposite the sprocket for the chain to pass through. The box is installed on a frame with skids or wheels and strengthen the chainsaw.
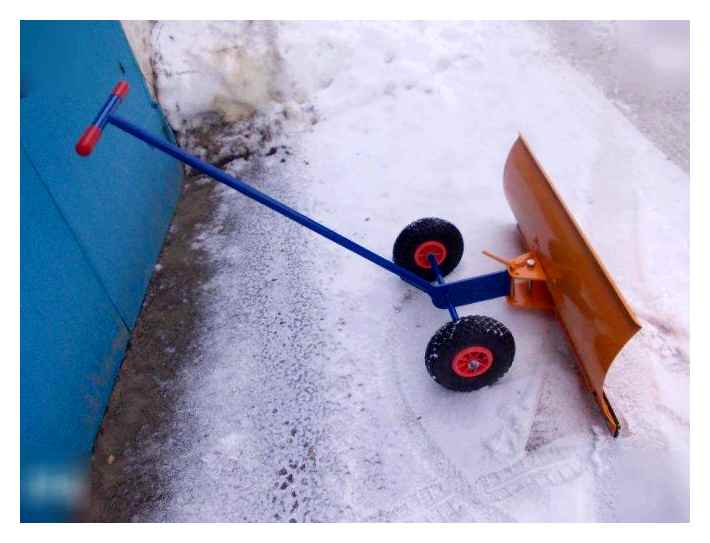
The simplest snow thrower with their own hands
To create such a snowthrower, you will need handles, 2 small wheels and a blade for the bucket. You can use the handles from an old baby carriage or, for example, a household stroller, popularly known as “kravchuchka. If such devices are not available in the farm, you will have to bend a metal pipe or, for example, to assemble a handle from thin plastic pipes, using the connection-fittings. The last option is easy to perform and cheap.
Wheels can be taken from an old children’s bike, scooter, stroller, etc.п.
It is better to make the snowblower’s working blade wide. A piece of thick plywood, plastic, or metal would work for this. Fasten the parts with bolts or welding. Plywood or plastic blade is installed obliquely. so it is more convenient to clean the snow, the metal blade is usually bent.
If you need to clear snow from the winding garden paths, it is better to fix the shovel not on two small, but on one large wheel (eg, a bicycle wheel). It is better that the mechanism is movable, which means that the shovel can be lowered and raised, and turned on its side to throw the snow on the side of the track.
It is possible to install the shovel-scraper not on wheels, but on skids. For example, attach a handle to a child’s sled on one side and a shovel on the other. Two old skis stitched together in parallel can also be used to make an easy-to-move snow thrower.
However, the snowplow will glide over the snow not only on sledges or skis, but just on a metal frame. A bucket-scraper on skids is very handy. we use it to gather the snow. Although you can also install such a bucket on the wheels.
Another option for creating a homemade, quite powerful and convenient snow thrower. attach a sturdy metal blade to the front of the garden wheelbarrow. The attachment will help rake the snow, which can immediately be thrown into the wheelbarrow and taken away. With the onset of heat blade detach, and the wheelbarrow continues to use for its intended purpose.
How to make a good shovel for shoveling snow: a guide to making
Country properties covered with a layer of white fluffy snow. a truly fabulous picture, which you can spend hours admiring, sitting by the window with a cup of tea. But sometimes you have to go out into the street, but not for aesthetic reflection, and with the purpose of cleaning snow deposits from garden paths and car parking lot. A snow shovel, a primitive but very useful tool, will help you stretch your muscles and clear your territory.
Purchased products are good: durable, beautiful, lightweight. But why not make a shovel for snow with your own hands? Almost all the tools and materials can be found right at home, and the work takes only 2-3 hours. As a result we get economy of time and money, but the most important is the satisfaction of our own work.
The advantages of a wooden shovel are obvious: it is light compared to a metal shovel, quite durable, and most importantly, suitable for self-made
Step I. The preparatory stage
The basis will be a regular piece of plywood. Its size can be different: if the shovel is designed for an adult. a square 50×50 cm will do, for a child’s tool is enough 30×30 cm. The plywood element is fixed on a piece of board, sawed from the workpiece, the length of which is equal to the width of the shovel (respectively, 50 cm or 30 cm). For the handle, you need a slat or a long thin bar (about 2 m).
In addition to the basic materials, you will need a thin metal plate and fasteners. ordinary nails. As you can see, all of these are the simplest items that anyone can find in the home. Special tools are also not needed, you need a saw (jigsaw), planer, sandpaper, hammer, pliers.
The place of work depends on the weather. On a nice day you can sit right outside, setting up near the house carpentry table. In bad weather, any outbuildings will do
Step II. Making the end piece
We take an untreated piece of board and saw off the part necessary for making the so-called end part. the basis for fastening the plywood sheet. Planing the workpiece with the planer on all sides so that it becomes smooth. Using a pencil we draw the outline of the future part. draw an arc on one side, the second remains straight. The width of the middle is 8 cm, and the edge is 5 cm.
Measure twice, cut once. the proverb is very relevant. For exact calculations we need to use a ruler, an angle piece and a pencil
Remove excess wood and have a finished edge.
In addition to manual tools, electric tools can also be used for woodworking: the efficiency of the work increases, and the quality becomes better
Step III. Handling the handle
Beforehand it is necessary to define, what shape handle of the product will be, because in snow shovels you can find both round and rectangular handles. We will make a handle with a rectangular cross section, but for the convenience of a little rounded edges.
Cut a two-meter wide piece of wood, about 4.5 cm wide, from a board or batten of a suitable length to begin with. Make sure that the wood does not contain knots. these are critical, weak points that will break under the first load. It is not terrible if there is a small bevel (discrepancy in width) along the entire length. it does not affect the strength and convenience of the cutter.
If the shovel part of the shovel is attached to the cutter at the right angle, it will be easier to work with. It will take a lot less effort to clear snow with this tool
If there is bark on the side, remove it, and then file the workpiece, leaving a slight rounding of the ribs. Finally, we sanded the shaft, making it smooth. Do not leave any untreated areas, as they can injure your hands.
Step IV. Sawing out the opening
To fix the shovel securely in place at the end, you need to saw an opening. It is exactly in the center of the part, and the width of the kerf corresponds to the width (or diameter) of the handle. It’s neater if you saw the gap with a jigsaw and then use a chisel.
The depth of the opening should be different on each side: 4 cm and 4.5 cm. Half a centimeter is left for the bevel, which ensures the ideal fit of the handle. The angle of the shovel part depends entirely on this bevel, it may be different. it depends on the height of the person and his manner of working with a shovel. The difference of half a centimeter is very convenient for most people, so we can stop here.
Wood is a soft and pliable material, so work with it with care. One inaccurate movement and the workpiece becomes defective
Next, you need to determine on what line the shovel cut should be made. This is where the angle piece comes in handy. Carefully cut off the unnecessary length, taking care of the angle of cut. the bevel on the edge of the cutter must match the opening. Connect the two parts, checking the work.
Step V. Shovel Assembly
All parts are prepared, you can begin to assemble the snow shovel. Nail a piece of plywood to the end piece. Only three nails will be needed: one nailed in the middle, two on the edges.
Before joining the plywood and the end part, you must find the middle of both parts and hammer the first nail right in the center, and then the other two. on the edges
You can use one trick, which will save the plywood from splitting. Bite off the sharp parts of the nails, and their blunt end will not pull apart the fibers of the plywood, but simply tear them.
Alternative variants
If the dacha is seen as a place of rest and there are difficulties with materials and tools, you can buy a ready-made shovel in a store. There are a lot of product options. metal, plastic, wooden.
For large areas, electric snow blowers are suitable: their performance is higher, but a power source is definitely needed.
To clear the path to the gate, a small shovel made of durable plastic is enough. it will last for many years.
Shovels made of plastic and aluminum are valued for their low weight. and this is important when shoveling snow, which itself is heavy.
Wooden shovels are chosen by creative people who “finish” them themselves. give them a beautiful appearance. The canvas of the product can be painted with paints. you will get an exclusive model in folk style.
Snowplow with your own hands: general principles and different designs
To study the main assemblies and important details, you can use a sample of typical equipment of this class in a good configuration
This list shows the components of the design with Комментарии и мнения владельцев:
- Handle heating element (1) integrated in the handles (1) increases the level of comfort when operating the machine in winter conditions.
- the torque range of the drive shaft and the direction of travel the gearbox (11) is fitted with multiple forward/reverse speeds.
- A mechanical actuator (3) adjusts the angle of the chute through which the snow is ejected along the desired path.
- Torque (4) to control the auger movement. If released, it stops rotating.
- Toggle switch (5) for handle heating.
- Turn the chute in the desired direction using the rotary lever (6).
- Power unit (7). This model is equipped with a gasoline engine with more than 5 kW. A 6-litre fuel tank (10) is installed for the fuel reserve.
- Rotating snow chute (8) with an adjustable angle.
- For more reliability and comfort there is a combined electric and manual starter (9).
- To improve flotation in difficult terrain, the wheels on the axle can be locked with a special cotter pin (12).
- Off-road performance is improved by wide wheels (13) with large cleats.
- Blades (14) trim the snow. This is useful for breaking up high snow drifts.
- Adjust the height of the bucket against the ground (15) using the screws.
- This section is equipped with a grid (16) for an even distribution of the snow flow and better ejection parameters.
- Remove accumulated snow from the working elements with a snow shovel (17). The tool is inserted in special grips on the back of the bucket.
- Ribs (18) reinforce the structure. This model is capable of cleaning a 66 cm wide path in one pass. The maximum height of the snow cover is 55 cm.
- Two bolts (19) provide protection. Heads shear off when excessive force is applied when hard objects get inside. This simple solution prevents damage to the auger, drive unit and other expensive components of the snowplow.
- Surfaces of metal parts are protected against corrosion by multilayer coating (20).
- The power to the auger is transmitted through a worm gearing (21).
- The bottom scraper blade (22) will wear out over time. Screw fixing is used to simplify replacement.
- Toothed auger (23) of snow plough makes it easier to cut through dense snow and ice crust.
- Shaft (24) is mounted in the side walls of the bucket on bearings.
- Headlamp with LED light (25) for good visibility in rough terrain.
Some parts are too complicated for a homemade snow blower. Others are possible to apply to your own project. So, LED lights are not only characterized by economical power consumption. They are durable, resistant to vibration. They can be safely used in a wide temperature range, in conditions of high humidity.
Single-stage rotary machine
Start with relatively simple models
With this drawing, it’s not hard to make a snowplow with your own hands. Here, the impeller (D) is mounted on the motor shaft. As it rotates, it ejects snow to the side through a chute (E) rigidly attached to the body. The machine is assembled on a sturdy frame with skids (K). To move it, the user pushes it in the desired direction via the support handle (H).
Simplicity is a major advantage. Even without careful study, the minimum price of a snow blower is clear. It is possible to create it in a short time, using improvised means and simple tools. Wooden parts are made using hand carpentry tools. A suitable electric motor from a defective grass trimmer can be used for the drive.
Similar solutions are used in the design of professional machinery
Two-stage auger snow blower, wheeled and tracked versions
This design is more complex. However, a self-propelled gasoline snow blower built on its basis will better meet the requirements of modern consumers. Here the rotor is complemented by a discharge pipe, which is useful for adjusting the slope and throw distance. The auger mechanism directs the snow to the central part with a relatively larger working width. Straight walls of the bucket are subject to less stress, so they will last for a long time.
They cut through snowdrifts with their sharp edges, making complex work operations easier
The main disadvantages in this case. the complexity and the corresponding increase in the cost of the project. For the completeness of the review it is necessary to note the peculiarities of different ways of moving a snowplow machine.
Creating a homemade snowplow for the house with their own hands: step-by-step instructions with useful tips
For a detailed study, we use a simple design of a single-stage snowplow machine
The photo shows the factory model. The same principles are applied by the author of the project. The main difference from the options discussed above are the blades (marked with arrows), which are moved to the middle of the working shaft. When rotating fast enough, they will throw the snow into the hole made in the upper part of the bucket. The following table describes how the project was put into practice.
How to make an auger with your own hands for a snowplow correctly
For snow removal with a power tiller you can use this attachment
In this design, the sprocket is installed in the center. It is driven by a chain drive, which is connected to the sprocket of the gearbox of the motoblock. A special universal joint shaft is also used.
Spiral belts are created, as in the example above. It is better to use separate spacers to secure them. The fixation directly to the body itself can damage the bucket. The snowthrower with its own hands install trunnions of the closed type. They prevent moisture and dirt from getting into the bearings.
Features of the snow blower with their own hands from a chainsaw
The process of creating such equipment is described in detail above. This section notes the nuances that deserve a separate mention. The chainsaw engine is well suited for the task at hand. It does not weigh much; it is designed for continuous operation with a varying load mode. A quality power pack of this category is easy to start in severe cold, it is fast and simple.
How to make a homemade snow blower for the house with their own hands
Homemade snowplow for the house, made with their own hands, this is a real opportunity to save quite a bit. After all, the shown in the table, especially gasoline models are quite high. And electric devices can not always cope with the objectives.
So, the task is set: to collect the snow blower, which has a working body will be the auger. First of all we have to make it.
How to make an auger for a snow blower with your own hands
Before you start doing auger for a snowplow with their own hands, you need to prepare some materials. Purely constructive auger is a shaft to which the blades are welded in the form of rings. For the shaft, you can use an ordinary steel pipe with a diameter of 40÷50 mm and a length of 80 cm. For the blades we use steel sheet with thickness of 3÷4 mm.
- The latter is cut to the shape of rings with a specific diameter, usually within 10 cm.
- Autogenous pancakes are cut out to the required size flatness with a grinding wheel. But it is better to do all these operations on a lathe.
- And at the same end the internal holes are cut out for the shaft.
- All the circles are put together, and a segment is cut into them with a hacksaw or autogenome.
- After that, the opposite cut edges of the two rings should be welded together by electric welding. In this way all the elements are joined into one structure, which will represent a spring.
- The spring is put on the shaft (pipe) and one end is welded to it.
- The second end is stretched to the opposite end of the tube, where it is also welded.
- After that, all the edges of the rings in contact with the pipe (shaft) are welded.
As mentioned above, a snowplow auger is two sections with the blades at different angles. And they must drive the snow to the center of the shaft. Assembly should be carried out in accordance with the direction of snow movement. Therefore, it is necessary to stretch the spring to the middle of the pipe and weld it. Then exactly the same to carry out all the work on the other side with the installation to the middle with the other spring.
Attention ! To strengthen the auger blades, weld “soldiers” to them. These are pieces of rebar bent at 90°. One part is welded to the shaft, the other to the blade.
The shaft is specifically chosen such a length that it can accommodate not only the blades, but also two other elements. These are the two trunnions under the bearings (they will be of the closed type, so as not to penetrate the snow) and the shank, through which the connection to the engine will be made.
Assembling a snow blower from a chainsaw with your own hands
To make a snowplow from a chainsaw with your own hands, you must first make the body for the auger. This will require sheet iron 2÷3mm thick. Two pancakes with a diameter greater than the diameter of the auger by 6÷8 mm are cut from it, as well as a rectangle with a length equal to the length of the working body with blades, and a width equal to half the length of the circumference of the pancakes cut.
A rectangular piece is bent into a semicircle to form a semblance of a trough. Pancakes are welded to it from the sides, in the middle of which the holes are cut out for the auger shaft. On the outside of the trough the trunnions with bearings are welded on. The assembly itself is done as follows:
- Assembling the trough with one pancake.
- Fitting the auger.
- Installing the second pancake on the shank side of the shaft.
- Welding it to the trough.
Now in the back of the body is made a hole with a diameter of 100 mm, which is inserted the same size tube. It is welded around the circumference of the joint. This will be the snow thrower box. The sprocket for the drive is installed on the shank. For this, one can use, for example, a sprocket from a motorcycle.
Now we need to make a frame for the machine and the motor, for which it is better to use a profile pipe. The frame can be any shape. The main thing is to make it strong enough to support the weight of the engine. On the Internet today you can find drawings of the frame for the snowplow, made by your own hands. Although for a simple design, the usual standard version in the form of a rectangular frame, tightened with cross bars, will do. The latter are usually installed under the motor and serve as its supports.
Attention! It is necessary to consider that the engine should move freely along a frame for adjustment of tension of a chain with the subsequent its rigid fixing by bolts. That’s why it’s better to use a metal corner as a support under it.
So, the fence device is ready, so is the frame, the gasoline engine from the chainsaw is in place, it is now necessary to assemble the whole machine.
- First, an auger is installed on the frame in the housing.
- Then the motor. It should be placed close to the auger structure.
- After that, they are connected by a chain. And the motor is displaced to the handles of the frame, that is, away from the fence chamber. The chain is tensioned.
- On one of the handles is the throttle from the engine. With its help it will be possible to regulate the work of the motor.
Do not forget that the machine should move on something. Depending on the terrain it can be attached wheels, skis (skids). Wheels are suitable for flat areas and paths, for uneven terrain skids.
Snowplow with their own hands from a grass trimmer: assembly sequence and video
Snowplow from the trimmer for grass with their own hands collected by a different technology than the modification with a gasoline engine. Be sure to watch the video, which shows all the nuances of the assembly process.
If it was a simple electric motor, the distinguishing feature of the design is the way the auger drive. Everything will depend on how to position the motor in relation to the shaft of the working body.
Synchronized work of the cleaning team
Let’s calculate how much water we need to humidify one room with one person inside.
It doesn’t really depend on the area, only on the air exchange. Let’s take 30m3 /h according to the standard of 1(!) a person. Baseline temperature data:
We take an absolute humidity calculator ( https://planetcalc.ru/2167/ ) and we get the humidity outside 0.0011kg/m3. required in a room of 0.0092kg/cm3, the relative humidity will be 50%.
Total we need 0.0081kg of water for each cubic meter of air from the street.
5.8 liters of water per day just to keep the humidity at a normal level. Neither a jar with a rag, nor an aquarium will help with it. Even a serious humidifier is a challenge.
And you also need to consider that over-dried furniture and wallpaper absorb a huge amount of water. If we start humidification in winter, the effect will appear only after 2-3 days.
Automatic humidifier 2.0.2.1
The design is shown in the photo below: napkin, jar, wire.
May be useful. Now it is frosty and the air is very dry, the moisture freezes.
Choice
In terms of their design, gasoline snow blowers can be of several types:
Rotary.The best option for homemade
For making at home, the best option is considered a rotary snow blower. There are several reasons for this:
The principle of operation of a two-stage machine
Two-stage (auger rotor) snowplow works as follows. the auger rakes the snow, and the rotor throws it through a special chute. The augers in these snow blowers can be smooth or toothed. It is acceptable to make them from metal or other materials, such as reinforced rubber. This equipment can be both self-propelled and manual. The rotor impeller can have from three to six blades. They are made using polymers or metal.
The schemes of the snowplow are not very technically complex, and to make them with your own hands is quite possible.
Fitting auger bucket
Myself make a bucket, which will serve as the body to install the auger, is also not difficult. Roofing iron is usually used for this purpose. The drawing below shows the dimensions of the bucket.
You can use plywood or a 10 mm thick piece of OSB board for the sides of the bucket. The latter option is more suitable for this purpose, as it is more moisture resistant than plywood. On the sides of the body are installed bearings (can be 205-second, closed), and already in them is inserted the auger shaft. The bearings must be covered with cups.
Important! When assembling the snow removal unit, it is necessary to make a small gap of about 2 mm between the bucket and auger to prevent the latter from touching the body.
To drain the snow from the bucket, a hole is cut in its upper part. You can use a sewage plastic pipe with a diameter of 150 mm or another one as a diverter chute. the main thing is that the diameter of the trough should exceed the width of the auger’s flail blade.
To guide the snow thrown with a shovel to the side, you can put a plastic outlet on the pipe.
A bucket with an auger is installed on a frame made of metal angles (50 x 50 mm) (see drawing above). drawing above). Angles 25 x 25 mm are used to fix the motor on it.
Tip! If you attach a slightly curved sled to the frame, as shown in the following pictures, it’s much easier to work with the snowblower, because you can tilt the mechanism to get a better grip on the snow.
But this machine can still be slightly improved. The snowthrower is modified by adding small wheels to the back of the skid. This makes it easier to pull the machine backwards and transport it.
Assembling the auger snowblower
Snow blowers based on an auger are the most powerful and can handle even icy snow. In addition, the auger is most often used in self-propelled snowplows.
Based on a chainsaw
This snowplow is made with their own hands quite simply. Since it will run from the chainsaw engine, a few additional parts will be needed for the chain drive. For this purpose, you can use the front and rear sprockets from a motorcycle, as well as a chain from it.
How the frame and auger are made was described above. Attached to the frame is a long handle. On the auger shaft on the right side, a large sprocket from a motorcycle is installed, and on the shaft of the chainsaw engine. a small one. Next, the chainsaw is mounted on the frame, and then the chain is put on the sprockets and tightened. To control the engine, the throttle cable is led to a handle attached to the frame.
Below are the drawings samodelka on the chassis, where as the main part of the drive is used chainsaw.
Based on a grass trimmer
To make a snow blower from an electric grass trimmer or from a lawnmower, you will need to install a gearbox: it will serve to transfer the rotational motion from the grass trimmer shaft to the auger shaft.
But there is a nuance here. Gearbox for this type of units is quite expensive, and it is not expedient to buy it for making attachments to the trimmer. Therefore, based on the latter, rotary-type snowplows are made, which will be discussed below.
On the basis of a power tiller (power tiller)
The simplest addition to a power tiller is a snow blade.
Homemade snowplow attachment (shovel) on a single-axle tractor is screwed to the frame of the machine, after which it turns into a small bulldozer.
Advice! Instead of the moldboard, an auger can be attached to the front of the frame of a power tiller or motor cultivator, resulting in a self-propelled snow blower. This attachment for the power tiller can be easily detached from the main machine if it is not needed.
Below is a diagram, which clearly shows the construction of a snowplow on the basis of a cultivator.
The scheme is deciphered as follows.
- Snowblower drive that connects the engine to the auger.
- Caterpillar drive.
- Power transmission belt.
- Roller (parasite) to provide reverse travel.
- Intermediate shaft.
- Roller for tensioning the belt. It allows the machine to move forward.
The self-propelled snow blower greatly facilitates snow removal, especially on large areas where the use of the unit on skis, pushed by the operator, requires a large expenditure of physical strength of the latter.