Rules of chain replacement and tensioning on a chainsaw
In considering how to correctly put the chain on a chainsaw, let us note the point that the modern version of the tool has a special setting wheel. Due to it the procedure is greatly simplified. The following are some of its special features:
- Considering how to correctly put the chain on the chain saw, we note that first it is necessary to prepare a flat surface. This prevents the tool from being damaged. After that the main part of the tool, the bar and the chain are laid out separately.
- The next step is to remove the protection, which is designed to protect the sprocket. In most cases it is secured with a common wing nut.
- On the bar the tensioning sprocket is turned to the right as far as it will go. This is the position in which the tool is installed.
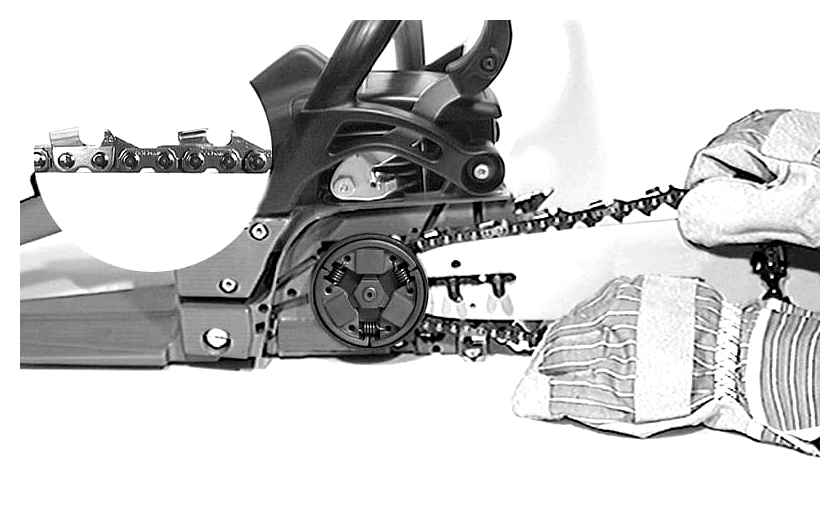
- Then the chain is gradually laid over the fixing element. A rather common question is which side of the bar is facing the right way. Installation begins at the top, the chain is rotated so that the bar is on top. Such operations should only be performed with thick gloves that can withstand the cutting edge. Chisel face should be forward.
- Both elements are put on the sprocket.
- The next step is to reattach the chain sprocket cover. It is important to make sure that the pins are aligned with the holes. A loose fit can cause rattling or other problems.
- Make sure that the guides are in the special groove.
- Visually check the condition of the chain after fixing it.
The next step is to directly check whether the chain has not been overtightened. To do this, release the chain brake and pull it back in line. Check only with special gloves.
In general it can be said that the procedure under consideration is quite simple to perform and does not require special tools. However, not all chainsaws are as easy to service as the above.
Chain guide line and which side of the chain to wear
The chain saw chain, if you look closely, has the saw teeth pointing in one direction. Therefore, the correct direction of the saw teeth on the guide bar is very easy to determine: If you place the chainsaw itself in the plane it is in when you work, the row of teeth on top of the guide bar, the sharp edges should point toward the end of the bar. Whereas, the row of teeth on the bottom of the chain saw has the sharp edges facing in the opposite direction to the drive sprocket.
It is impossible to put the chain with its teeth facing inward against the grooves of the guide bar, it would just not stick to the guide bar. That’s why you should guide the chainsaw chain onto the guide bar so that the guide lugs of the saw blade links are facing into the guide bar.
How to look after your chainsaw chain
Your chainsaw’s productivity depends on a number of factors:
The degree of tensioning influences the cutting performance of the chainsaw, but the sharpness of the teeth influences the cutting speed
That’s why it’s important to pay special attention to this aspect. A good tooth sharpening results in a much more efficient, precise and safe sawing process
The regularity of the sharpening procedure does not have any special regulations, but professional woodcutters recommend that it be performed several times a day. This is due to the fairly rapid blunting of the teeth during heavy sawing.
Most chain sharpening is measured with reference to chainsaw performance. In addition, the tool needs sharpening when the guide bar starts to run to the side. Another measure of bluntness is the condition of the shavings. As a rule, properly sharpened teeth produce a uniform chip pattern. In this case the sawdust is rectangular or square. If the chain is blunt, dust prevails in the chips and the shape of the sawdust will resemble the shape of a needle from a simple hacksaw.
If you regularly check the tension in the chain and sharpen it in time, your chainsaw will last a long time. But even hard wood is no problem when you are sawing.
If you are not experienced enough, it is a good idea to call in a specialist. Professional woodcutters determine the condition of a chainsaw and its components upon first inspection. They will determine how worn it is, whether the chain is too tight or the teeth are too sharp.
Severe wear and tear on the saw blade
A guide bar lasts much longer than a chain. But that doesn’t mean you can use it forever without thinking about changing it. It usually needs to be changed after 2-3 worn chainsaws. Before replacing a chainsaw guide, you need to assess its technical condition. If your chainsaw is fitted with a genuine Chinese guide bar, it will wear out sooner than the chain. That’s why if you find your chainsaw has a crooked cut in wood, you need to have the guide bar checked.
To see if the tire is worn out, you need to remove it and inspect it. Usually the wear is indicated by shortening one of the beads. Sometimes it is very difficult to find visually, so a caliper is necessary. A difference of a few tenths of a mm indicates that the tire needs to be replaced. It’s also easy to check the wear on the guide rail with a straight edge. To do this, the tire is placed on a level surface and an angle piece must be attached to the side of the tire. If the top and bottom walls of the guide are in contact with the angle, then the part is serviceable.
This is interesting! The only way to extend the life of a chainsaw guide bar is to periodically turn it upside down. To do this, make sure that the tool is equipped with such a possibility, as indicated by the corresponding markings on the headset.
Rapid guide bar wear can be caused by a malfunctioning oil pump. If the grease is fed with long intervals, then friction increases, and hence the parts wear out faster. If the lubricating mechanism works properly, then it multiplies the life of not only the headset, but also the entire tool.
A step-by-step installation algorithm
Not all new chain saws have a locating wheel, which makes the function of setting the saw blade much easier. The system with the setting wheel in the middle of domestic chain saws is generally unique. That’s why it’s very important to know the chain-saw mounting technology and sequence.
The main points to which you should direct your attention:
- Prepare a level surface on which you will assemble the chain and bar. This minimizes the chainsaw’s chances of damaging it or losing small parts. The bar is laid out on the prepared surface and the chain next to it in parallel.
- Remove the protection star, on modern chainsaws rather twist wingnut, an older model may be useful lug wrench appropriate size.
- At the bottom on the guide barTurn the idler sprocket all the way to the right. This is the only position in which the chain.
- Later on the chain is put on the fixing groove of the guide bar link by link. install the chain from the top of the guide bar, turning it evenly so that the bar is always at the top and the chain at the bottom, this will allow it always be in tension and fit into the guide slot without fuss. Be sure to wear thick protective gloves when doing this step, because your fingers will be touching the cutting edge. When you look from above the blade is always positioned forward towards the end guide bar.
- Put both bar and chain on the sprocket.
- Secure sprocket cover in its proper location. Make sure that all mounting pins are in line with the holes. Incorrect installation with skewed or not all the way can be a prerequisite for extraneous noise, rattling.
- Make sure the guide bars “fit” in the guide bar groove.
- After fitting, check that the chain is locked in position on the chainsaw and guide bar. Everything should be firmly fastened without backlash.
The most important thing is to tension the chain properly after installing it. Setting the right tension is painfully easy and takes less than 3 minutes. At the beginning it is necessary to loosen the nuts on the cover. Using the freely rotating adjusting screw find the correct tension, so the chain doesn’t slacken more than 3-5mm from the bar edge.
Only screw in the nuts and check the tension. If you need to make an adjustment, you can adjust the tensioning again.
How to set the bar and chain on your chainsaw, see next. which shows the exact method of operation:
Chainsaw features and construction
In order to understand the peculiarities of the procedure under consideration, it is necessary to consider in detail the devices of the chainsaw. Among the peculiarities, the following points can be noted:
- The main part is represented by the motor. In most cases, the installation of a design with one cylinder is carried out, as it is enough for cutting.
- The piston system is two-stroke and the cooling is air cooled. During operation, a relatively small amount of thermal energy is released, so blowing for heat removal is also sufficient.
- As in many other designs, the one in question requires oil, which ensures the smooth running of the moving element. The oil is added directly to the fuel. Oil and fuel are mixed in the 1:20 or 1:50 range, depending on design.
- The air filter is also an important design element. Fuel is mixed with air to produce a defined mixture, which is fed into the combustion chamber. If the filter element is not cleaned constantly, there is a chance that debris will enter the cylinder block. This will cause rapid wear and tear or even lead to the unit jamming.
- A special construction is presented as a starter, which is actuated by a rope with a handle. A firm pull on the rope sets the flywheel in motion.
- The main operating mechanism is the bar with the clasp. It is designed to guide the chain and secure it.
- The classic chain has three teeth: driving, cutting, connecting. The cutting edge is fastened with rivets.
it is quite common to have to pull on the handle for a long time. It is related to the fact that the carburetor does not mix the fuel with the air properly. In most cases it is sufficient to adjust the device to the operating conditions. The chainsaw will not last long if not properly maintained.
What you need to change the chain
A few words about elements that fail along with the chain.
First of all, it is important to note that it is better to choose original accessories or original accessories with original parameters, then everything will fit exactly, and in addition the use of these accessories with this model is already tested and standardized, so you get a kind of guarantee of safety.
In addition, replacing the chain involves a couple of essentials:
Chain tensioning
First release the brake to check tension. Then pull the chain back in the middle of the headset, normally the shanks should not come out more than 2/3 of the way. It is recommended to crank it by hand. no jamming or slipping too quickly. If necessary, tighten the nut on the cover plate.
Figure 5. Checking Chain Tension
Installing and checking chain tension on the bar is an important process in any chainsaw. easy to do yourself. Regular maintenance of the tool avoids injury and loss of productivity even when working with dense types of wood.
If there is a need to shorten
Often when working in the woods or on a remote construction site you will not be able to find a replacement for a sprained chain. After taking all the advice and making sure it is necessary to shorten the chain, it is important to know the sequence of steps and possible ways of replacement.
They are not numerous and depend on how many links need to be removed, and in what conditions the repair will be made.
It’s important to know: a chainsaw chain consists of cutters and connecting links, which are riveted together in the factory. Attach a shorter chain in the same way, but with selfmade rivets.
Each link (the cutter and the links that connect them), has two of these rivets. If the “natural” connecting links nearby are damaged, you can use parts from any other similar chain on any piece of equipment, even automobile ones. Only need a file to fit the profile, especially at the bottom where it has a small groove.
We also suggest that you read about the rules of electric welding for beginners in the following article:
The easiest way is to take a long chain, in which you can easily remove several segments. At least this way you can use the original links. They can be removed with a hacksaw for metal, but it’s better to use an emery machine.
Initially, you need to grind off the unnecessary rivets, and then cut off the excess. For this you need to use a knife and beat the rivets out of the unnecessary links with a homemade piercing pin.
When putting together a new chain, you have to make a homemade riveting of the links. The rivets can be bought in a store, but if you don’t have them, you can use steel wire, or, better yet, a short bolt with a flat head. Riveting is performed on a rigid base (metal workbench or vise). Alternately, slip the elements of the future rivets through with a hammer and flatten them on the back side.
You might also be interested in sharpening the chain with your own hands. Read about the types and features of modern chainsaws here.
And in this article you can learn how to repair a STIHL chainsaw 180.
What to do if the chain slackens
If the chain slackens, you run the risk of injury to the operator because the saw blade may break or fly off the guide bar. Of course, modern chainsaws have safety and emergency stop systems, but these systems do not always work correctly.
It is important not to install on a chainsaw chain with defective or damaged saw links, in addition to the danger of breaking at any time, such a chain will sharpen the guide bar grooves, which will lead to its warping, uneven cutting and failure of the guide bar.
Why the chain can sag during even a short period of use?
- There could be a problem with the guide bar. Sometimes a lack of care by the operator or by excessive wear of the threads of the stud bolts that hold the guide bar in place can lead to vibration which causes the chain to loosen. Check the condition of the fixing bolts and, if necessary, replace them with new ones. When the bolts are sufficiently tightened, such problems do not occur.
- If a chainsaw is handled reasonably carefully, over time, any chain can wear out. It is useless to try to repair it or assemble several sprockets to form one. If the chain headset is stretched due to natural causes, it is best to buy a new one.
- The sprocket is misaligned. Sprocket teeth misalignment could cause sagging. If this happens, it’s best to call a service center to have the drive sprocket repaired and repositioned. To fix the drive sprocket in the correct position is difficult enough, because you have to dismantle many small parts, remove the guide bar, and then reassemble everything in the reverse order.
What to do if the chain is slack
If the chain slackens, you run the risk of injury to the operator because the saw blade can tear or just come off the guide bar sprockets. Of course, modern chainsaws have safety and emergency stop systems, but these systems do not always work correctly.
It is important not to put a chain on a chainsaw with defective or damaged saw links, in addition to the danger of breaking at any time, such a chain will grind the guide bar grooves, which will lead to its warping, uneven cutting and failure of the guide bar.
This can cause the chain to sag during even a short period of use?
- There can be problems with the guide bar. Sometimes vibration can occur, caused by operator negligence or by the threads of the tensioning screws on the guide bar being badly worn, and that can lead to slackening of the tensioning chain. Check the condition of the fixing bolts and replace them with new ones if necessary. When the bolts are sufficiently tightened, these problems do not occur.
- If you handle your chainsaw carefully enough, any chain will wear out over time. Trying to repair or remanufacture it is a futile attempt. If the chainring is stretched due to natural causes, it is best to buy a new one.
- The chain sprocket is misaligned. Sprocket teeth misalignment can cause sagging. In that case, it’s best to call a service center to have the sprocket repaired and repositioned. To fix the drive sprocket in the correct position is quite difficult, because you have to remove many small parts, remove the guide bar, and then assemble everything in the reverse order.
Which Way to Put the Chain on a Chainsaw
How to install the chain on a chainsaw, how to pull it correctly and check tensioning
If you have a chain saw in your home, you should know that it takes special care. You need to periodically clean and sharpen the chains, clean the air filter, oil supply and tires. And, of course, you need to keep an eye on the chain tension, because if the tension is poor, there is a risk not only of damaging the saw, but also of damaging your health if the chain comes off at high speed.
Chain saw device functions
The main part of a gasoline saw is the engine. Most modern units have a single-cylinder engine. Air-cooled, two-stroke piston system. Oil in these types of engines is added directly to the gasoline, all because the fuel constantly flushes the crankcase. The oil to gasoline ratio varies from 1:20 to 1:50, depending on the chainsaw manufacturer.
The air filter on a chainsaw is just as important. It needs regular cleaning. If you let the filter get very dirty, the dust from it will fall directly into the piston system, causing damage to the engine.
If the filter is clogged, the saw loses rpm and the engine starts to overheat, and this can cause the piston rings to burn.
Starter on chainsaws. is a rope with a handle, by pulling which you control the engine. When you pull the rope, the teeth catch on the ratchet, the flywheel starts to rotate.
Many people complain that it takes a long time to pull the rope to start the engine. It depends on whether the carburetor is positioned correctly. If the carburetor produces the right mixture of oil and gasoline, there are no problems.
The main working mechanism. Tire with a buckle.
A chain consists of three types of teeth: driving, cutting, and connecting. They are riveted together. The cutting teeth are on both sides: right and left.
Chains are divided into two types: high-profile and low-profile. The first type includes clamps in which the teeth are arranged with a large gap, in the second. with a smaller gap. In addition, chains can vary in shank thickness and line length.
The chainsaw chain is attached to the bar, which guides it to the right side. The end of the bar has a specific groove that holds the links and allows the chain to rotate. In front of the bar is the sprocket. The chain and bar are referred to as a headset because they are removable parts of the chainsaw.
When to tighten the chain
Based on all of the above, we can conclude that the chain on the chainsaw needs to be tightened every time after:
- purchase and assembly of a new tool;
- replace the chain;
- sharpening outside the bar;
- Significant loads;
- hard objects in the sawing area.
Generally speaking: the chain on a chainsaw needs to be tightened if you can visually see that it is sagging. And it is necessary to monitor it both before and during the sawing process.
Can the chain be shortened on its own
If a chainsaw chain is so stretched that it can no longer be tightened, it becomes necessary to shorten its length.
It also has to be done when the existing bar is shorter than the chain and it is not possible to find a suitable sawing element.
It is also possible to extend the saw element by adding new links, which can be bought separately or removed from a similar link. In stores you may see chainsaw chains wound on coils that are sold by the metre. In general, chain repair for chainsaws can also be done at home, because it is not difficult to find all the components for it.
How to remove the rivet
To change or shorten a chain element, separate the links as follows. Clamp the chain element in a vice and grind away the rivets, especially the protruding parts. You can use a file or nadfil. Make sure the sides of the link are not worn away.
Do not use an angle grinder, because there is a risk of overheating the links, which will change the physical properties of the metal.
Using the bead (as shown in the photo below), hammer out the rivet.
There is another way to disconnect the links. You don’t have to grind the rivet heads to do this. Position the link. or rivet. over a hole in the metal or over the slightly divided jaws of a vice. Next, you need to put a locksmith’s chisel on the rivet’s head and hit it several times with a hammer.
Continue breaking out the two rivets one after the other because they are firmly anchored to the opposite side of the link. The rivets will gradually come out of the top of the link and it will come apart.
The advantage of this method is that the rivets can be reused, as they do not wear out.
How to join the links
First, you need to buy links at a specialty store that match the type of chain you have. You have to do this if you were grinding rivets when you disassembled the chain element. Then you need to correctly assemble the link, taking into account the arrows on it. Put the assembled element on the anvil and rivet with gentle blows of the hammer.
Don’t be afraid to over rivet, because the rivet has a thickening in the center that acts as a stop.
Some craftsmen advise connecting the links by welding. This method is suitable if the rivets were ground with a file. But first you need to experiment on some metal to choose the right welding regime.
Welding should be done with a shorter and thinner electrode. A rivet is welded to the side of the link, and any extra metal is removed with a nail file. The only disadvantage of this method is the overheating of the metal of which the chain elements are made. As mentioned before, overheating can decrease the durability of the links.
There are a lot of chainsaw chain models on sale right now. To begin with you need to know which size fits your chainsaw and you should not make a mistake when buying. The second step is to install it correctly on the chain saw. This is a somewhat time-consuming process, but if you know how to put on and adjust the chain on the saw bar yourself, then the radical owner should have no problems. We did our best to describe in detail how to install the sawblade on your chainsaw.
We hope you will be able to do it right the first time after reading this article. But to minimize the occurrence of problems with the chainsaw and chain in the future, do not forget the 3 basic rules:
- If the chain is worn out and sagged. replace it with a new one;
- If during sawing vibration and bad cut appear, watch the chain tension on the chainsaw;
- Never use chain saw blades that are defective or have been repaired by dubious specialists. your health and the health of those around you is much more important than saving money on a new and reliable chain.
Necessary tools and equipment for tightening the chain on the chainsaw
In order to properly perform tensioning, you will need knowledge of some simple mechanisms and simple tools. With STIHL chain saws, tightening is easy with the integrated chain tensioner. This is the easiest way to do it and is very quick to tighten. To tension or adjust the degree of slack in the chain, the manufacturer recommends doing the following
- unscrew the sprocket cover with the wing nut;
- Turning the adjusting wheel determines the necessary length of the chain, tightening it to the desired degree;
- close the sprocket cover again, and the chain is securely fastened to the bar.
If it is not possible to tighten the chain of a chainsaw with a built-in mechanism, use these tools (using a Sparky electric saw as an example):
- angle grinder with metal disk;
- hex wrench, 5 mm diameter;
- A piece of wire;
- A wooden stick or sturdy chip;
- flat screwdriver.
After having switched off the power saw, unscrew the screws with an allen key, remove the housing cover, unscrew the tensioning screw with a screwdriver and take out the stem nut. The side of the screw against the saw housing is ground with a disc. The saw is then reassembled in reverse order. The chipper is required for clearing sawdust from the body.