How to cut corners: let’s cut a ceiling and floor molding correctly
Installing the baguettes and baseboards gives a finished and neat appearance, but only if the trimming is done correctly and all the joints fit perfectly straight. For trimming, there are different tools and methods that make the job easier, but it is also important to consider a lot of nuances, which we will discuss today.
Installing the baguettes and baseboards is no less important stage of the repair than any other. And trimming the corners here is the most difficult. It is important to choose the right tool for the job and the most appropriate way to cut.
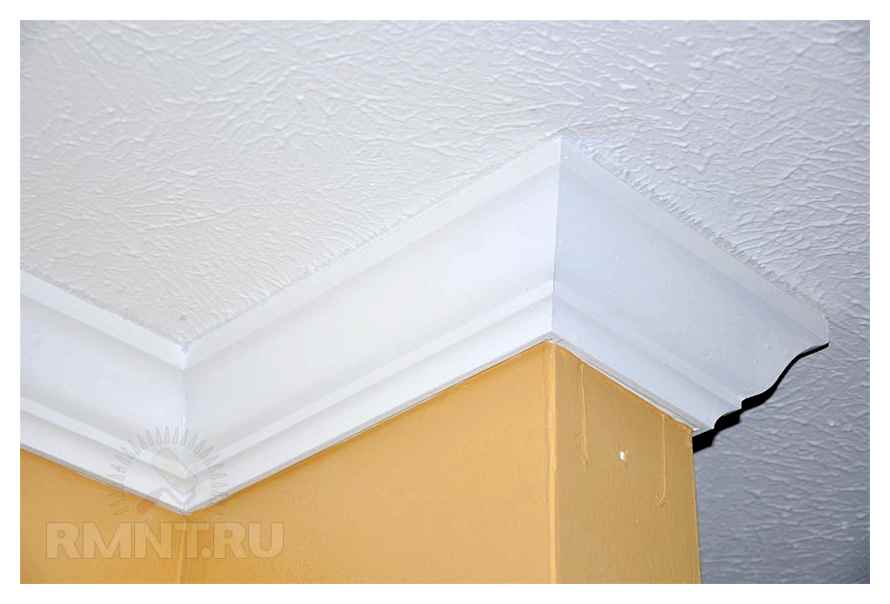
Ceiling skirting
Ceiling moldings, also known as moldings, fillets, borders or just skirting, are mostly used for finishing joints between the wall and ceiling. Although sometimes they are used to cover the inner corners, make decorative frames or panels, and design niches and architectural elements. There are several of the most popular materials for making ceiling moldings:
Plastic (polyvinyl chloride). Wide and rigid moldings are easier to cut with a metal saw. If a more gentle tool is needed, a jigsaw is used.
Foam (polystyrene foam). A very light and porous material that is best cut with a sharp construction or office knife.
Wooden baguettes. For cutting, saws with a helical sharpening, specially designed for baguettes, are suitable. You can also use hand or electric jigsaws.
Skirting boards
Modern skirting boards can hardly be called a strip, covering a gap. This is a structural component that complements the design and accentuates the overall design. Baseboards are made of several materials:
Wooden can be made of solid wood or veneer. Flat or circular saws, jigsaws are used for trimming.
Plastic baseboards are “dangerous” competitors to traditional wood. Easy to install and cut with a regular metal hacksaw.
Aluminum baseboards. the last word in interior design. Are usually cut through with an electric saw or a hand saw on metal.
Only on wooden skirting boards have to do a corner trim. The rest are cut evenly and connected using special corners.
Types of corners
Corner docking and trimming baseboard differs depending on the type of corner, there are: internal, external and non-standard.
Inner corner, in other words, the angle of the room is less than 180 °, usually 90 °. When trimming the inside corner, the bottom of the ceiling plinth always protrudes over the top. The first thing you must still measure the angle between the walls, if it is standard and equals 90 °, then the strips are trimmed at an angle of 45 °. Baguette, which is glued to the right side must be cut to the left, and the left slat. to the right.
The outer corner or outer corner is less common, it is more than 180°, usually about 270°. When working with such corners, everything is exactly the opposite. The edge of the baseboard, which will be pressed to the ceiling, must be larger than the bottom.
Custom corners. By these most often mean the corners with a degree greater or less than the standard of 90 ° and 270 °, as well as various kinds of curvatures. Trimming in this case is carried out “by eye” or with a marking on the spot. Areas with roundings are collected from several small elements, each of which is fitted in turn.
How and what to cut a plastic plinth. 3 my favorite ways
SlavagodM May 17, 2016 Specialization: master of interior and exterior finishing (plaster, putty, tile, drywall, laminate, and so on). In addition, plumbing, heating, electrical, conventional cladding and expansion of balconies. That is, the repair in the apartment or house was done “turnkey” with all the necessary types of work.
The question of what to cut plastic baseboards with can be answered quite concisely and unambiguously, pointing to a hacksaw for metal, but it will still not be quite accurate information. After all, by and large, there is an implication in this question, indicating the complete action, rather than the tool itself, so that without a complete familiarity with the process, the purpose of this or that tool is difficult to understand. So, I want to tell you about my own experience, gained over the years of practice, and in addition you can watch the video in this article.
Cutting the corners of floor and ceiling skirting boards
By baseboard in the Russian language means a decorative plank, overlapping the joint wall and floor (ceiling). The name comes from the Greek πλίνθος and the Latin plintus.
Tools and Devices
Let’s start with the fact that the cutting of baseboards at 45⁰, 90⁰ and other angles can be done with any cutting tool, but here, as everywhere else, there are preferences:
- the most convenient tool, which leaves behind the most high-quality cut, can be called a metal hacksaw, and, moreover, this applies not only to plastic, but also to wooden baseboards and fillets;
- Due to the fact that the blade has quite fine teeth, the cut is sharp, and most importantly. accurate, which is important for the joint of the profiles. the more accurate its processing, the better the joint, as there will be no gaps;
- of course, as we said, the instructions do not necessarily indicate one or the other tool, so for plastic you can also use a construction knife;
- there are variants, as such knives are similar in that they have a removable blade, but it can be of different thickness and length (for wallpaper, as on the top photo or for plasterboard);
- But in these cases such a tool is only suitable for thin-walled profiles. polyurethane, for example, cannot be cut with it.
As an option, you can use an angle grinder for cutting, and the disk will be suitable for any. But this should not be seen as a rule, but rather as an exception.
A carpenter’s chair with a full set of corners
For precision in the fitting of joints, a joiner’s baseboard cutter is often used, which can be different:
- the difference in the design of such a tool is the full or incomplete presence of all the grooves for angular cutting;
- the tool with complete set has slots at a slope of 45⁰, 60⁰, 67,5⁰ and 90⁰ (its price is not much higher), whereas the simplified tool has everything reduced to 45⁰ and 90⁰;
- the full-setting mitre saw, like the one pictured above, also has slots for cutting boards, meaning that here you can easily cut a profile in the shape of a flat rail.
What it looks like in practice. method one
So, the cutting of the corners of the ceiling plinth (or floor) first of all comes down to the correct direction of the slope, because the joint can be internal or external, respectively, the configuration of the corner. Let’s understand this with the help of the image above. there, on the left and right are two opposite options. the red color shows the surplus (to be removed) parts of the profile.
If we are decorating a ceiling, the one on the left will do for the outside corner, and the one on the right will do for the inside corner. For floor decoration everything will be identical, but exactly the opposite. the inside corner will be on the left and the outside corner on the right. The middle between the options shows the correct position of the profile to be worked on.
If you are using a carpenter’s chisel, you should cut the corners at the edge of the tool closest to you!
The second way
The jointing gap should be minimal
But, as you have seen, the number of those or grooves for cutting corners is limited even with a full set of the chair, which makes such a tool in some cases simply useless. The fact is that in houses you often have to deal with the fact that the rooms do not have right angles, hence, the 45⁰ slope for the joint will not suit you, because after such a connection there will be a gap.
But there is a way out, and quite uncomplicated. you can mark the profiles with your own hands.
Let’s see how to fit the joint in the inner corner without using a joiner’s jig, and for this we place the profile against the adjacent wall and run a trimmer line along the ceiling, as shown in the top photo. We do the same on the other side and as a result we have two crossed reference lines where the crossing will be the starting point for the cut.
The bottom point will correspond to the angle of the junction of the two walls. in the image the line for the cut trimmer is highlighted in red.
If the corner is outside, then the intersection of the marking lines will naturally be farther away, and you will not need to rest the profile on the adjacent wall, but to extend it beyond it to extend the line. Similar marking steps you will need to perform for the floor skirting, only it will all look in a mirror image, vice versa.
When you make a cut ceiling skirting boards (flooring) without a jigsaw, by hand, then the hacksaw should be directed to the center of the corner, that is, its slope will be about 45⁰.
The third method
Exactly the same way, with a slope, it is necessary to cut the profile for its extension in straight areas of the ceiling or floor and if you cut the bar for this purpose under 90⁰ or even under 45⁰, you will see a gap. Therefore, you can in such cases, you can use a joiner with grooves at 60⁰ and 67.5⁰, that is, the length of the cut should be at least twice as long as its section.
The choice of the tool for cutting
Before making corners on the ceiling plinths, it is necessary to find out what construction material is made of:
- Styrofoam. The material is extremely brittle and crumbles easily. Its advantage is the price available to many consumers. When working with styrofoam because of its fragility, you should use a knife or hacksaw. Do not press too hard, but take it very slowly and carefully, otherwise the skirting board will break.
- Polyvinyl chloride. Products made of it are inexpensive, but they also need to work with them carefully. PVC skirting boards are highly electrostatic and therefore strongly attract dust. To cut these products use a hacksaw or knife.
- Extruded polystyrene foam. Dowels made of this material are durable and reliable, but their cost is higher than the previous samples. They are not easy to break, and when cut, they do not crumble. When choosing what tool and how to cut corners on the ceiling plinths of this material, it is best to use a construction knife or hacksaw, which are designed to work with products made of metal.
- Wood. Wood is the strongest type of these products. This reliable product is the hardest to work with because of the high resistance of the material to physical impact. Wooden baseboards are cut with a hacksaw, with fine teeth.
- Polyurethane. It is used to produce durable skirting boards for ceiling surfaces. They have a big disadvantage. polyurethane products react poorly to temperature differences and are sensitive to heat or cold. These nuances must be taken into account before trimming the ceiling plinth in the corners.
Special fittings are available for sale, which facilitate the process of installing the fillets. These are the corners for the ceiling plinth. They help to hide all sorts of errors that occur during installation. In these corners should simply insert the skirting boards. You only need to trim the fillet at right angles. The corner will cover existing errors.
The inside joint
Workpiece is placed in a special device. a jig. This uncomplicated tool is inexpensive and should be purchased by all means. Consider the maximum width of the cut slat that can fit in the jig. it should not be less than the width of your parts. Firmly press the strip to the wall of the plinth cutter, and through the slit, under which is marked “45 degrees”, you saw off the skirting boards. We get one blank. The second is heated exactly the same way, but, the cut is made in the other side and the bar should be applied to the opposite side of the jigsaw.
After these operations we get two elements, perfectly adjacent slices to each other. The result is a ninety-degree internal joint. It is recommended that the cut be carefully deburred with sandpaper before installation. If sawn wooden blanks, then to get perfect joints need wood filler. often when sawing there are small chips.
Ceiling
Ceiling bars for cutting are applied to the side of the tool closest to the person working.
Let’s now understand how to cut ceiling baseboards, in what this process is fundamentally different from the trimming of floor products.
The main rule to remember is that ceiling tacks are applied for cutting to the side of the mortiser that is closer to the person working with it. The side of the baseboard that should be lying on the ceiling, we will have it lying on the base of the tool.
Interior
Quality completed installation of the trimmer strips.
Instructions for cutting the inner corners of the ceiling plinth:
- Prepare two pieces of the strips to be butted together;
- Take the first piece, turn it over and put it into the mortar from right to left so that it rests on the base of the mortar as on the ceiling and leans against the wall of the device closest to us, as against the wall;
- We make the bar from the left end, passing the saw through the slots under the number 2;
- The second piece is inserted into the jig from left to right, precisely observing the orientation;
- we saw it from the right end, through the slots number 1.
Outside
- Prepare two pieces of the strips for joining;
- We take the first piece, insert it into the tool from right to left so that it lies on the base of the machine as on the ceiling and leans against the wall of the tool closest to us, as against the wall;
- We cut it from the left end, through the slots at number 1;
- The second piece is inserted into the jig from left to right, precisely observing the orientation;
- Cut it from the right end, through the hole number 2.
Selection of tools for cutting ceiling skirting boards
To cut a ceiling plinth correctly and accurately, you need to use the right tool for the cutting. It is chosen depending on the material from which the baseboards are made:
-
Styrofoam. Characterized by low strength and costs relatively inexpensive, and therefore foam models are becoming increasingly popular. Their strength does not particularly affect the performance, because usually the ceiling plinth is not subjected to mechanical stress. An ordinary office knife is suitable for cutting.
You can buy it in a construction store or make it with your own hands according to these instructions:
-
Three 5015 cm planks are nailed together with a long edge into a three-sided, rectangular box shape. Pay attention, between the side skirting boards and the transverse board must comply with the angle of 90 degrees.
To work with this homemade device was convenient and safe, the boards should be well sanded before stapling.
The technology of cutting ceiling plinths
For prompt and quality work it is necessary to pick up the tool according to the material of the plinth and choose a way of cutting. If you have a chair, there are no special difficulties in the process. If it is not there, then there are two options: to cut according to the template and measurements on the ceiling, or to make this tool yourself.
Features of cutting ceiling plinths in the jigsaw
Work with this device should be extremely careful not to dull the tool and not to leave scoring in unnecessary places. In the process, we adhere to the following instructions:
-
Fix the baguette in the chair the way you plan to place it on the wall. The side that will be pressed to the ceiling on the mortar must be adjacent to the sidewall.
When cutting and trimming foam plastic and polyurethane products, remember that these materials crumble and get squeezed, so tools must be sharp enough, and strong mechanical impact on them is undesirable.
Technique for cutting ceiling plinths using a template
This method can be used if you have even corners, and it requires trimming the skirting boards to exactly 45 degrees. To do this, before you cut the ceiling plinth in the corners, you need to draw a jig on heavy paper. Draw two parallel lines and mark the corners at the desired degrees, using a protractor.
We place the fillet in this case in the same way as in a traditional jigsaw. Keep in mind that you need to cut the skirting boards, keeping the tool in a strictly vertical position.
Rules for cutting ceiling plinths by the marking
This method is used to cut the skirting boards in cases where there is no chisel or parts from which it can be made.
To do this, make a marking on the wall in this order:
-
Apply the baguette in the corner to the mounting point.
When cutting in this way, it is important to accurately draw all lines and mark points. A mistake of even a few millimeters will cause a gap. This method is suitable for cutting and docking both inside and outside corners of the ceiling plinth.
How to cut a skirting board without a chisel
To accurately join in the inner corners of the tacks, you can do without a joiner.
-
We put the end part of the baguette to a sheet of paper and trace the contour of the convex side. It is more convenient to use a small part of the skirting board (if it is available).
How to make the inside corner of the floor plinth
Despite the fact that the rooms are usually a regular rectangle, their corners may not correspond to 90º. About perfect angular convergence of walls, as a rule, builders and repairers only have to dream.
How to cut the corners of the floor plinth, if you are still lucky, and your apartment has the right corners, then to cut the skirting strips, you need to do the following
You can order the (good) plinth saw itself HERE. Before ordering, make sure that the width of your skirting board corresponds to the maximum width of the jigsaw!
Using a chair for skirting board corners
- On the side of the tool look for a 45º mark, insert a hacksaw into the corresponding groove, saw off the excess part of the workpiece;
- After that the cut edges should be carefully treated with sandpaper.
Important: ! When cutting the skirting board, note its location (positioning side). It is recommended to saw with some magnification, which will give you the opportunity to fit the skirting board as tightly as possible in the future. If a wooden skirting board is used, the joint is additionally treated with a special filling compound for painting.
What to do if the corner of converging walls is uneven?
In this situation, gypsum plaster and a wide strip of gypsum will help.
- At the junction of adjoining walls about 10 cm on each side is applied a small amount of plaster mortar.
- Then the reinforcing tape is put on the corner and gently pressed down with a wooden bar.
Reinforcing corner to level the corner
Important! Work with a trowel very carefully, so as not to disturb the position of the tape-serpent, but also not slowly, so that the plaster does not dry out
How to join the outer corners of the floor skirting
When the outer corners of the room are 90º, the procedure for cutting the skirting board is the same as for the inner corners. It is important when cutting to remember the future side of the placement of the plank. The ends of the joints of plastic skirting boards are closed with special plugs. If the cutting of the slats was not very successful, you can fix such a defect with mastic, and then cover it with a plug.
How to join the corners of a skirting board, if they are not 90º:
- first the skirting board is attached to the first wall;
- We outline all borders with a pencil (marker);
- Similar actions are done with the second baseboard, attached to the other wall;
- when marking should get a rhombus, as in the situation with the inner corner joint, only it will be located on the outside, respectively the diagonal is a fishing line for the trimmer cut blanks;
- After sawing the ends of strips grind with sandpaper;
- Further we install the skirting board, cover the corner joints with a plug (for plastic products). The joints of the wooden skirting boards are covered with putty for painting.
Sawing a plinth corner (in the example a ceiling plinth, but the technique of sawing the corner is similar)
After completing the attachment of the skirting boards in the corners, you can finally fix them all around the room with self-tapping screws, liquid nails, finishing nails or a special adhesive.
The main varieties of floor plinths
To date, for finishing the premises are used skirting boards made of the following materials. wood, plastic, wood-fiber board.
Skirting boards made of wood. a traditional type of finishing product. In old houses were laid on the floor only such. Wooden skirting boards have a textured surface on the outside and special grooves for mounting wires and cables inside them. They are fixed with self-tapping screws, less often with nails. Allowed the use of sealant for their fixation on the floor. If self-tapping screws are used for fastening, then dowels are pre-installed in the walls.
Among the advantages of wooden baseboards are durability, environmental friendliness, safety for humans and animals, reusability.
However, their use does not always allow you to hide the wiring. In addition, after the installation of the wooden baseboard, it is necessary to additionally patched and covered with varnish, paint, stain. In addition, wood. an expensive material, and therefore the products made of it will be different high cost. And before you cut the skirting boards on the floor, you will need to prepare special equipment.
Plastic skirting boards are simple and convenient products for finishing flooring. In them, most often everything is thought out in detail: the design of external and internal corners, s for laying cables and wires, plugs for the ends, special fasteners for fixing on the wall and floor.
Plastic skirting boards are notable for quick installation, a variety of colors, no need for putty and painting after installation, the presence of additional elements for seal the joints. Such finishing goes well with any flooring material: parquet, carpeting, tile, laminate, linoleum. Whatever flooring you have, you can easily find a plastic baseboard to go with it.
However, plastic is a fragile material, and a strong impact on its surface can cause chips and holes. It will require complete replacement of the entire product, at the very least. Despite this disadvantage, modern builders prefer plastic skirting because of the large number of its advantages.
Baseboards made of wood-fibre board are ecological and attractive products. Dyed paper is glued to their front side. over, the process is carried out at high temperature and under pressure. This eliminates the peeling of the decorative coating in use.
On top of the paper is applied melamine coating. It protects the skirting boards from moisture and persistent contamination. Even if exposed to direct sunlight, the product will not lose its appearance for many years. The advantages of wood-fibre board skirting boards are also the quick installation, easy care, economic efficiency and the wide range of colors.
Before you dock a floor plinth in the corners, you should remember that Fiberboard is very fragile. In the process of assembling and cutting such a product is important extreme accuracy.
Plastic or wood-fiber board, from which skirting boards are made, are lightweight materials that have a large number of colors. That is why the product is easy enough to match any finish of the premises and design solution. Most often, when choosing the color of the skirting boards are guided by the shade of the flooring.
Tools for installing a skirting board
The procedure for trimming and joining baseboards made of different materials is not much different. The main difference is that wood, plastic and Fibreboard have different hardness and density, and it is more difficult to work with wood, for example. While a sharp knife is good for cutting plastic, a hacksaw is needed for wood.
To work with wood, plastic skirting board or wood-fiber board you will need:
Chisel. a special joinery tray for sawing, on the sides of which there are slots at different angles.
Cut corners of a skirting board
A skirting board is the most common type of finish. Usual skirting boards are made of wood and plastic. Inexpensive sorts of wood and veneer are used for wooden skirting boards. Plain skirting is designed for flooring.
PVC skirting boards are durable, easy to install and maintain, and inexpensive.
The most popular is a skirting board with a cable channel, with an inner cavity provided for laying communications.
According to the rules, skirting boards are usually started from a corner. Outer corners are filleted, it means the cutting angle is also 45 degrees. Of course, a straight cut “on the bevel” is only possible with a joiner. Trim the ends of spliced skirting boards with a rasp or rotary sander.
A skirting board with a cable duct
Preparation of a floor skirting consists of cutting elements of a certain length on the entire wall. Measure carefully and accurately, taking into account the locations of corner plugs and joints. When measuring, the baseboard should be in an unassembled state. After marking, the skirting board with cable channel is disassembled, because the main panel and the decorative trim are cut separately.
Each part is marked in a diagonal plane and cut with a saw or hacksaw at the required angle. Plastic skirting boards can be cut at right angles, because the edges will be covered with a decorative plug. This is how the outer and inner corners of the skirting board with cable duct look like.
This video will explain in detail how to cut the corners of the skirting boards floor and ceiling.
Skirting moldings, flexible and connelux. How to cut corners
Connelure skirting, designed to be installed on the wall, is a plastic plank in the form of a rounded trapezoid. Such skirting is installed and smoothly wound onto the wall. The rounded profile does not require preparation and cutting of the corners when joining.
And finally, the easiest method of decoration is a soft plinth or plinth tape, the corners of which can be cut without the use and application of appliances.
Such a flexible joint is convenient when joining curved and uneven surfaces, as well as when edging columns.
A textured elastic joint consists of a profile and an assembly moulding, which is easy to fit. To do so it is enough to heat the skirting, install and click the mounting plank. There is no need to cut corners for flexible skirting.
To trim the corners of ceiling moldings with a large pattern, proceed as follows. Cut a piece with a textured pattern from the molding and add a few centimeters on both sides. Then we divide the cut in half and make a marking in the traditional way. The result of the docking should be a neatly matched overall pattern.