Cutting tiles at 45 degrees: how to do it best?
The technology of cutting tiles at 45 degrees allows you to aesthetically cover any outside corner when finishing walls with ceramic finishing materials. Thus it allows to get rid of the necessity to buy and further use of special decorative corners, whose appearance can have a negative effect on the general design of a room. Plastic and metal corners. it’s not only unaesthetic and unfashionable, but also not practical. Given this fact, it is worthwhile to understand how tile trimming at 45 degrees and what recommendations are worth observing in this case.
The technology of cutting the ends at 45 degrees eliminates the need to use decorative corners when finishing outer corners. By doing this, you will be able to create an aesthetically pleasing wall look. These corners have a neater and more stylish appearance than those finished with corners. Agree, it’s a lot more interesting than overlapping tile on tile or inserted plastic.
Disadvantages of tile trimming to form outside corners
At use of technology of edge trimming of a tile or a porcelain stoneware under an angle of 45 degrees there is a thinning of edge of a finishing material. As a result, its edge becomes very brittle and susceptible to breakage under external physical influences. Therefore, the use of this technology is not allowed when finishing steps and exterior walls in places with high traffic. In such cases, it is recommended to use special decorative plastic or metal corners.
The way to connect the architraves without trimming
Trims today often do not trim at an angle to then join together, and make the junction at right angles. This method of connecting trims does not require any special trimming, which is very convenient. In addition, this method looks more modern and attractive.
Trimming at an angle with a chair
If it is still necessary to trim at an angle to a particular part, it is worth stocking the jig. the simplest device, which looks like a small box. The wire has slots, which are designed for a saw or a long sharp knife. Of course, these cuts are made so that they form an even and accurate angle of 45 degrees.
In fact, the cross cutter can have a lot of slots at once, at different angles. It is convenient, because with one device, you can cut any parts at different angles.
Chisels that are adjustable are available for sale. Slots in such a chair can be adjusted, allowing the master to set such an angle, which is required at the moment. In particular, it is quite simple to translate slots of such a chair to the position of 45 degrees.
Now it is possible to trim the workpiece in an elementary manner. A baguette, a platband or a plinth is put into the chair, and then the saw is inserted into the slots, and the excess is cut off elementary. The angle turns out as a result ideal, exactly 45 degrees.
What to do if you do not have a jigsaw?? Very simply. It is necessary to make a template, on which it will not be difficult to transfer to the workpieces the necessary markings. As a template, you can choose a thick cardboard, or anything else that will be appropriate in this case.
Trimming details at an angle with a protractor
To angle the workpiece, you can use a protractor. It is a measuring tool, which is easy to use, and which is designed precisely to measure angles or to make the necessary markings on certain parts. Place the protractor on the workpiece, mark the angle and mark the pattern with a pencil. It is very easy to cut a piece at an angle based on the markings.
Using templates
If you do not have a protractor, a plane or ready-made corner elements, you will have to look for a suitable template. Of course the template has to have the right angle. It is attached to the workpiece and mark out the workpiece with a pencil. This is one of the easiest ways to achieve the desired result.
Trimming “on the spot”
The walls, floor and ceiling do not always have to be perfectly straight in practice. Most often they have irregularities. For this reason there is no need to trim the blanks at precise and accurate angles, because they will not fit perfectly anyway.
Instead it is sometimes convenient to cut the same ceiling plinth on the spot. That is, first gluing one baseboard plinth, trim it in the corner, and under it trimmed the second plinth.
Of course, a perfect cut of the workpiece is unlikely to be possible. However, if there is a small gap in the corner, it can always be filled with putty or gypsum plaster. No big deal.
How to cut the corner of a baseboard or baguette without a chisel
The repair of the ceiling is completed by decorating with the use of ceiling plinths. Their trimming is not difficult, but it requires some skill and accuracy. We will tell you how you can cut ceiling baguettes using a special tool. a plane. Since it is not available in all homes, consider also the alternative, in which you can do without it.
The top secret to cutting
The inside corner of the ceiling plinth is the key to everything. Professionals know that the ceiling plinth is cut on the outer edges and the front side (aka inside). To cut the ceiling blanks was more convenient, a plier is used. It is extremely important to choose a good saw that will cut corners quickly and accurately. You can take an ordinary hacksaw for metal.
Quality trimming ceiling plinth is not possible without the right choice of materials. If the walls in the apartment are not flat enough, a smaller material is suitable for docking in the corners. Due to the fact that it is quite flexible, the corners on the ceiling skirting boards are more accurate. How to cut a large skirting board? The task is simplified when the walls are perfectly flat.
The next point is how to cut the baseboard, depending on its location. The rule is very simple: the left is always applied to the left side, and the right. the right side. If you mix up the order of how to cut the ceiling plinth, then the joint will become a real problem.
Working with foam is easiest. Let’s look at how to trim the ceiling plinth according to all the rules:
- Having measured the corners of the walls, let’s get to work. If they are perfectly flat and are ninety degrees, you’re in luck. you just have to cut a corner of 45 degrees. The principle of working with the 2nd cut is exactly the same;
- But how to cut the corner of the ceiling plinth on the curved joints? The radius of the corner between the ceiling covering and the walls is divided by 2;
- Once again, focus on how to properly cut the corners of the ceiling plinth. The baguette for gluing on the left side has a characteristic cut on the right, but the right corner is cut on the left;
- An important question: how to cut the corners of the ceiling plinth inside and outside? The bottom edge always protrudes over the top, the opposite is true for the outer corner. Supple polystyrene foam and soft texture do the job. fitting such accessories is much easier. Trouble will have to do except with wooden or plastic parts;
- When the inner and outer corners of the ceiling plinth are ready, the strips are tried on the ceiling. They will need to be trimmed according to the direction of adjacency to the surface;
- If the rough docking was successful, the tack is glued or screwed to the wall and ceiling. Seams are securely sealed.
How to work with a jigsaw?
We told you how to cut a ceiling plinth correctly without any other tools. Now let us dwell on the technique of working with a jig, in more detail. Perform all actions in the same sequence. and the outer corner of the ceiling plinth will be perfectly flat:
- With the skirting board against the wall, measure the length you need;
- Place the skirting board in a jig, so that its position coincides with the position on the ceiling. Press it against the far wall;
- Hold the plank with the left hand. So that the cut accessory has no jagged edges and does not break, the saw is pressed with a minimum of force;
- To trim the counter part, repeat the procedure in the same sequence, but hold it with the right hand;
- How to cut the corners of the ceiling plinth, if it is made of wood? You proceed in exactly the same way, but since the wood is not as flexible, the edges are also trimmed at the end with a file;
- To exclude the wrong size calculation, start with the marking of the inner corner, and then move on to the outer. A severely cut outer corner may result in the fact that the length of the slat is simply not enough.
Using a computer program
To implement this method of marking pipes for cutting will require a computer with special programs. First, you need to make a drawing that shows the cross-sectional dimensions of the product, as well as the planned angle of cut. Need to get a virtual template.
Print it out on the printer. And here it is worth understanding that the larger the diameter of the pipe, the more sheets will be needed to print it. Then you need to carefully cut out the parts of the drawing from all pages and glue them together, the best way to do this is to use scotch tape. It remains to attach the template to the pipe and mark it.
This method of solving the problem is characterized by high accuracy. All necessary programs can be downloaded from the Internet, they are free to download and use. There you will also find a template for cutting pipes at an angle. It remains simply to print it out and cut it out. To make the marks, simply wrap the template around the pipe.
How to cut a profile pipe at an angle
Marking a profile pipe is different from a round pipe. Its manual execution can lead to a significant margin of error. The best way to solve the problem is to create a template for cutting from the same profile, but larger in diameter.
You need a small cut of the profile pipe. Mark a 45 degree angle on it using an angle gauge. Now, using an angle grinder, you must cut off part of the workpiece along the marked line. The edges of the cut should be sanded and defects should be corrected. Simply insert the original product into the pipe-cutting jig at an angle. Then it is necessary to draw a marking on the line of the cut of a larger profile. And then the pipe itself is cut according to it.
The text describes how to cut the pipe at an angle of 45 degrees. When the marking is already completed, it is recommended to use an angle grinder. Use it to make a straight cut. It can be replaced with a metal hacksaw. Still be able to cut the product by welding, but you need experience with the tool, otherwise there will be irregularities. “How to cut a pipe squarely. tools and cutting methods”.
Now in construction stores you can find special tools for cutting pipes. But it is easier and cheaper to make the template yourself.
When carrying out work on the installation of gas or water mains, it is often necessary to change the direction of the line, with the pipeline is cut and then welded at the desired angle. Most often the direction is changed to 90 degrees, and the question arises. how to cut the pipe at 45 degrees to accurately connect the joints when welding.
To cope with the problem at angles of 45 or 90 degrees of the cut edge is possible with the appropriate knowledge and techniques that will help to save not only time but also materials during the work. At other angles of rotation it is impossible to solve a problem with the help of a ruler and a sheet of paper. you will have to call for help the computer technology.
Characteristics of plastic corners
Plastic corners are a design that is flexible, durable and elastic material. Products are made of synthetic polymers that give corners a rigid structure.
All these qualities allow you to work with the material without fear of damaging it, which ensures quality repair. But that’s not the only reason why corners are so popular.
No special equipment is required for their fastening, any sharp object (knife or hacksaw) will be enough.
Advantages
- Ecological composition;
- Long service life;
- The presence of an external coating;
- Does not depend on the change in temperature regime;
- Does not require special care.
Application
- For mounting door and window recesses;
- For finishing arches;
- For closing inner and outer corners;
- To save the corners of walls pasted with wallpaper.
What corners can be
With the help of this design you can realize any fantasy idea. Since the corners are different not only in tone and shape, but also in application.
- Unsymmetrical product. Has an angle between the shelves of 90 C. Available in the following sizes: 1515, 2020, 2525, 3030, 4040 и 5050. When fixing the corners, they are cut at an angle of 45 degrees. Finishing with such a product always looks neat;
- Not symmetrical product. The angle between the shelves is also 90 degrees. Available in various sizes. Advised to use for arched structures;
- External and internal corners. The first have an angle of 90 and 105 C. When attaching a 90 C corner, one shelf is left on the outside, and when mounting 105 two shelves are left on the outside;
- T-corner. Necessary for hiding the joint transition of different materials. The product provides a smooth change of tones. Produced the following sizes: 1210, 1810, 2010 and 2210;
- Product with snap fasteners. Used to hide the joint between the panels, also has a protective function. The role of which is played by special tabs, equipped with snaps;
- F-shaped brackets. Necessary for angular and straight joints of plastic panels;
- Adhesive based product. Are characterized by high elasticity and availability of adhesive base. Universal in application. Help to avoid joints completely. Sold in large rolls of 50 meters.
The main thing in a nutshell
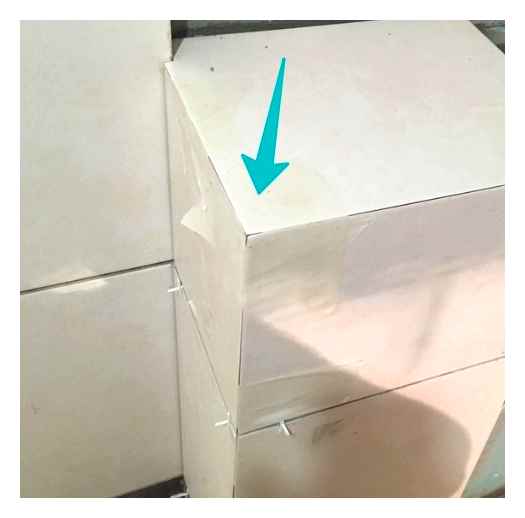
Sawing the edges on the tiles at 45 degrees is formed when facing structures with a right angle and an even curve line.
It is important when preparing the base to comply with all geometric requirements: 90 degrees, vertical and horizontal (less often diagonal).
To the front part of the tile is less exposed to processing to avoid chips, on the ends of the trim is performed with an indentation from the outer surface of 0.5-1 mm.
The corner is formed with maximum quality on an electric tile cutter by means of a diamond disc and water.
A more accessible way to file the tiles at 4 degrees. grinding the base with an angle grinder and a diamond disc and grinding nozzle.
Of hand tools for work can be useful file, tile cutter, glass cutter and abrasives.
The tile is laid with strict adherence to the thickness of the outside joint and its evenness, level with the reference to the rest of the tiling.
Write in Комментарии и мнения владельцев, what do you think. what approach is more rational: reliable and simple with the overlay of straight ends or aesthetically attractive and more complicated with filing the edges at an angle of 45 degrees?
The disadvantages of a corner on the tile, sharpened at 45 degrees :
The angle becomes more vulnerable to impact. Especially if it is on a passageway. It’s enough to hook the slope with an empty metal bucket so that the piece of the drained corner on the tile flew away. Increases the labor intensity of the work, and thus the price.
To catch such a corner can be anything, even a harmless belt buckle of a trouser belt:
Opinion of craftsmen on tile filing at an angle of 45 degrees.
It is also possible to prepare a 45 angle on the tile with an angle grinder. A lot of dust. The wrong quality. But really. The main thing is cheap and always possible.
It is especially important to mark the correct angle when laying decorative stone. Often the corner elements for such products are not provided or are not available. Cutting the stone at an angle of 45 degrees is the only way out of this situation.
Corner on decorative stone sharpened at 45 degrees.
Recommendations for cutting tiles at an angle with a machine
Professional tile cutters operate in the modes of wet cutting and sawing, in the absence of such an option, the work is done in the mask. The scheme of actions in general does not change:
- The desired cutting width is marked with a pencil (at all the products to be sawn at the same distance).
- The tile is placed on the platform of the machine, pressed down and slowly pushed towards the cutting disk.
- Superfluous material is beveled to the marked edge. using smooth movements, if necessary. in several steps, with removal of thin layers of ceramic.
- The cut edge of the tile is scraped with emery paper. If there is no machine sanding option and the volume is large, this step is worth doing with belt sanders.
If you want to cut the tile and then bark it out, the algorithm becomes a little more complicated. In such cases, the machine is first set in straight cut mode and only then in trimming mode. In order to maintain the integrity of the tiles, the cut trimmer line is pre-glued with painter’s tape, which is removed before trimming.
Production errors
In addition to cutting errors, it is worth remembering about the rules of laying such products. Angle-cut tiles are joined with a small (1-1,5 mm) gap, and must be grouted with color-matching compounds. Checking and adjusting the level is performed on each row, after laying the products on both sides of the tiled corner. The verticality of walls and structures is checked in advance, installing undercut tiles on uneven surfaces makes no sense.
Work on the preparation and installation of tiles requires professional knowledge and solid skills, and mistakes in their manufacture can lead to fatal consequences and large financial losses. The above recommendations about cutting the tiles into 45-degree angles show clearly that it is much easier and more profitable to address to a reliable specialist to perform this work than to do it by yourself and risk irretrievable financial loss in case of non-observance of the technology of the work.