Instructions: How to remove the chuck from an electric screwdriver
Some people are interested in how to remove the chuck from an electric screwdriver. It is required to perform preventive and repair work. By doing the necessary work with your own hands, you can save money. There are several types of cartridges, each of which has its own characteristics.
This is a hollow metal cylinder that contains a special ring with a regulating sleeve. This item fits directly on the shaft. The drill bits are fastened with a tapered or threaded surface.
To disassemble the chuck, a screwdriver, hammer and a few wrenches are needed. If there is a vice, it will be easier to perform the task.
Types of fastening
It is required to study the marking to determine the type of attachment. If 1. 6 B10 is stated, Morse taper is used. The numbers indicate the diameter of the shank and can be different.
Marking 1.0. 11 M12x1.25 indicates that a threaded mounting method is used. There is no fundamental difference in the use of the fastening method, it all depends on the convenience of the user.
Design and basic types of chucks
The chuck or head is a metal cylinder that is attached to the shaft of an electric screwdriver. Its task is to securely fix the working bits under the fasteners. The chuck is fixed on the shaft with a thread or a special cone. According to the type of attachment clamping elements are divided into:
The difference between the first two types is only in the way the bit is clamped. The quick-action chuck screws in and clamps the bit shank manually. In modern drills and screwdrivers, there are clamps for the fixation of shanks with a diameter of 0.8-25 mm.
The socket-type chuck consists of the following parts:
Chuck-heads are divided into two-coupling and one-coupling. The first type is used in screwdrivers with a locking. This makes it possible to rotate the clamping unit with one hand, because the second part of the body is fixed in place. With double-clutch cylinders, both hands are used.
The bit and drill bit are automatically clamped in the self-clamping sleeve during rotation. There is almost no risk of twisting the bit with this electric screwdriver. The device makes a clicking sound when loosening and clamping the jaws.
A cam chuck cannot be tightened by hand. an L-type wrench is needed. It is inserted perpendicularly into the slot. The toothed-ring chuck is said to be less easy to fit, but has a more secure grip on the bit. This is a type of cam-type clamping cylinder. Such a head consists of three basic elements. a cylindrical body, a rotating outer ring, and an inner cam mechanism. Made of solid steel, the mechanism is three cams that lock together when the ring is turned.
How to attach it to the shaft of an electric screwdriver
The chuck is attached to the shaft of the tool by means of:
- threads. For this, the threads of the cylinder and the shaft must match. The metal cylinder is screwed onto the shaft.
- fixing screw. It also needs to be tightened and the screw only increases the contact between the chuck shell and the shaft. It has notches for a Phillips screwdriver and a left-hand thread.
- Morse taper. One of the oldest ways to attach. The shaft of an electric screwdriver has a tapered shape, and the same groove is made inside the sleeve. When the outer and inner tapers meet, the head sits securely on the shaft.
Sizes and Breakdown
In order to choose the right variant for replacement, it is required to know its size. There is a special marking on the cone, where:
- The first numbers (separated by a dash) are the size options for the shank, which may be fitted to the product in millimeters.
- The letter and number next to it are the taper calibration. There are 9 different indicators.
- In some cases, after the letter on the cone, numbers in the form of “1×1” may be written (numerical values depend on the model), thus indicating the parameters of the thread. A value given in millimeters or inches.
Slightly different markings may be found on some products (e.g. 4. 15 mm ½. 22 UNF). In this case, it is implied that the figures 4. 15 mm is the diameter of the bits allowed for use, ½ is the thread size in inches, and 22 is the number of turns in one inch.
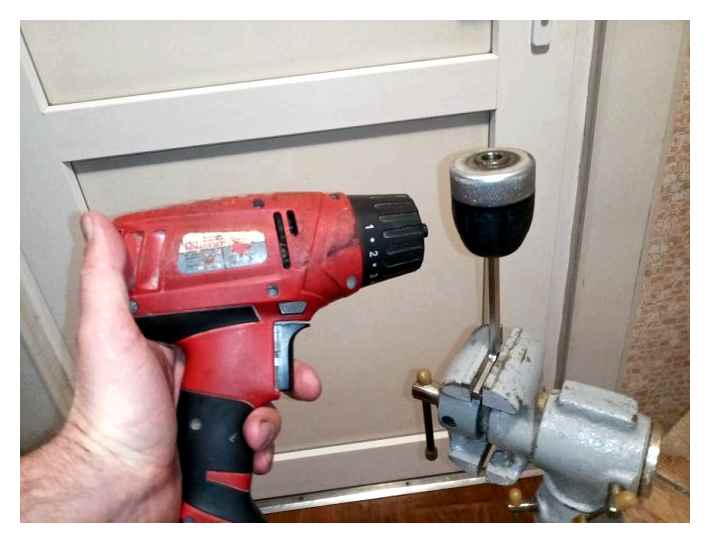
Vise may be needed in serious cases
The first mandatory step! Unscrewing the fixing screw
The first, indispensable step in the process of removing a chuck from most household screwdrivers is to unscrew the fixing screw located at the end of the spindle between the cams. This fastener is designed to prevent the quick-clamping unit from unintentional “twisting” during work with the load while working in reverse (counterclockwise) mode.
For example, when unscrewing old fasteners when you want to increase the torque. In all this the chuck can remain stationary, fixed with the bit in the work surface, and the spindle will make rotation “left” (counter-clockwise) and will unscrew the screwdriver from the fastening unit without any help.
- Spread the screwdriver jaws apart so that the tip of the screwdriver passes freely through.
- Unscrew the screw by turning it to the right, because it has “left-hand” threads.
READ How many volts does the battery charger on an electric screwdriver have to deliver?
Attention! The grooves on the screw heads come in various sizes and shapes (straight or cruciform). Therefore it is necessary to have screwdrivers with different tips.
Unscrewing the quick-action chuck from the screwdriver spindle If a fixing screw with a “left-hand thread” has been unscrewed from the end of the spindle, there is the option of removing the quick-action chuck from the screwdriver.
Because of the gap between the socket and the housing of several mm, it is not realistic to fix the spindle with a vice or pipe wrench. There are therefore several other ways to remove the chuck.
Removing the chuck from the screwdriver shaft
The disassembly is carried out with an L-shaped 10 mm hexagon wrench. The short part of the wrench is fixed in the chuck. Then the machine is turned on, the free end of the wrench should hit the surface of the table or workbench. It is removed by turning with a spanner and should then slip effortlessly off the thread.
Another way to change the chuck on a screwdriver. Cams are unclamped first. A screw may be placed on the bottom, this is an additional attachment for the shaft. Turn it clockwise. Then clamp the hexagon and twist it violently in the opposite direction. it must be released from the shaft. If it doesn’t give way, hit it with a hammer on the tip of the wrench.
If these methods do not work, you have to perform full disassembly, take out the gearbox and the fixture, together with the spindle. The pulled mechanism is fixed in a vise, the chuck is unscrewed from it with a pipe wrench. There are clips with a groove for an ordinary wrench, it facilitates disassembly, but such instances are rare.
On the Morse cone the part is knocked out of the body with a hammer.
To have a more complete picture of how to disassemble a screwdriver chuck, the video for familiarization is presented below.
Removing the chuck from a Makita screwdriver
Makita screwdrivers have a threaded mount and an auxiliary locking screw with a left-hand thread.
Follow the steps one by one:
- unscrew the screw to the right side;
- Press the button that stops the spindle;
- wrap the machine in a thick cloth and place it in a vise;
- lock the hexagon in the cams;
- by hitting the end of the wrench with a hammer to spin the chuck and remove it from the shaft.
If you know the principles of disassembly described above, then the question of how to remove the chuck from the screwdriver “Interskol”, “Bosch”, other popular brand, will fall away by itself.
How to use the wrench
It is possible to ensure a long service life of the tool if you follow the simple rules of operation:
- protect your machine from moisture;
- Be sure to adjust the tool before use;
- Always disconnect the battery before changing accessories;
- if not in use for a long time, periodically run the screwdriver to discharge the battery;
- have several spare batteries.
Chuck change in a screwdriver in the home workshop can be accomplished by any man. If you use the methods described above, you are guaranteed to be able to perform this operation quickly and with a minimum of effort.
How to remove and replace the cartridge
If you are faced with a chuck replacement, you should first deal with the way of fixing it. To carry out the procedure with a minimum of effort, experts recommend not overloading an electric screwdriver in everyday use. If you run the tool nonstop for fifteen minutes, the rotating parts can overheat and lock firmly into the socket. Then it will be more difficult to carry out the replacement. Experts recommend proven ways to remove the chuck, described below:
- Unscrew the threaded fastener by means of an L-shaped hexagon, which you are sure to find in every household. Then insert the hex socket (size 10mm) with its short edge into the chuck and press it firmly into the jaws. After that, start and instantly turn off the device at low speed, so that the free edge lightly hit the table, so the threads will loosen and you can unscrew the chuck.
- If the chuck is threaded with a locking screw, then:
- Unscrew the left-hand threaded screw in the clockwise direction.
- Insert the hexagon socket in the cams and use your hand or hammer to turn the hexagon socket counterclockwise. The chuck can now be unscrewed.
- If both methods do not work:
- Take the shaft on which the gearbox and the chuck are located out of the open housing. To remove the chuck you need to use a pipe wrench.
- To remove and change the Morse taper chuck you must have a hammer with which to loosen the shank from the housing seat.
Block: 4/6 | Number of characters: 1515
How to change a chuck on a screwdriver
The chuck on the tool “Interskol” is attached to the shaft by a thread and counterbolt, which must first be unscrewed by loosening the jaws with a wrench to get access to it.
On a Makita screwdriver, the chuck is also removed in the following order:
Unscrew it clockwise, releasing the jaws as far as they will go. After removing the screw you need to find an Allen key for eight and insert it into the shaft, clamping the cams afterwards. Then put the screwdriver in reverse and, holding the hexagon in one hand, press the start button with the other.
Note: The bit will turn and unscrew quite easily if it is not used very often and for a short period of time so that it does not become too tight. If it has been used for a long time, you have to use a little effort to unscrew it.
Once you have unscrewed the old chuck, it’s easy enough to install a new one. You need to switch the screwdriver to normal mode, when it rotates counterclockwise, put it on the shaft and tighten it with short rotations. Then tighten the counterbolt.
The “Bosch” screwdrivers have established themselves on the market as very high quality, because all parts of the tool are resistant to wear and tear and, importantly, are firmly fixed to each other. When dismounting the chuck, the last of these features can make it very difficult and stretch the process of unscrewing the fixing bolt, due to the fact that it is reliably sealed.
For this reason, you may need an electric wrench when disassembling the chuck on this screwdriver.
Block: 5/7 | Number of characters: 1732
Features chuck removal
The chuck can fall apart completely, becoming unusable. the jaws in it can no longer fulfill their purpose, it is impossible to clamp the drill bit. or it can become backlash. The unstable element does not hold the bit tightly. Drills constantly falling out when working.
There is a thread inside the chuck or a special cone for attaching it to the shaft. Structurally, the element is divided into three types:
Quick-action chucks are considered the most popular: the tail is clamped by manually rotating the sleeve of an electric screwdriver. The main difference between the types is that in one case the bits are fixed by hand, in the other. you can not do without a wrench. Manual clamps save a lot of time, because the user does not have to pick up a wrench. The main purpose of a chuck is to ensure tight contact between the working bit and the other mechanical parts of the tool. The key type copes with this better, so it is considered more reliable.
Quick-clamping
The design does not include the function of clamping the bit when twisting the chuck. the bit is not as securely locked in there, unlike the self-clamping type. A quick-clamp chuck consists of:
The quick-clamp type is divided into two other types:
If the user buys the first type, then in the box with a screwdriver should be a special lock. it allows changing the tool without turning the chuck. The two-move types allow the bit to be installed without additional attachments, which is more convenient in circumstances where there is a frequent need to change the drill. The accessory is removed by locking one ring of the chuck by hand and twisting the other.
Self-clamping
This type is noticeably different from the quick-change chuck. It’s all about an interesting feature that allows the bit to be additionally clamped while the electric screwdriver is spinning. You can distinguish between self-clamping and quick-clamping types by a characteristic click when relaxing or tightening the jaws.
How to remove the chuck
There are enough manufacturers of screwdrivers. each has little secrets for disassembling the chuck mount. However, the general design is the same. There are a few ways to take the chuck apart.
Hold the chuck by hand
There is always a screw inside the chuck. It should be unscrewed with a screwdriver to the right. clockwise, since there is a reverse thread. Insert a tool into the bore of the chuck. If the screw does not lend itself to the need:
When the latch succumbs, set the reverse and clamp the chuck. If you are going to pull it manually, you should choose a second speed. Next, with clockwise jerks it is possible to remove the chuck from the electric screwdriver.
Sometimes the head will not fit. Then switch to first speed, select reverse mode, and clamp the chuck with your hand. Then press start and lock head by hand. This is enough in 30-40% of cases, in the remaining 60% have to fiddle to dismantle the electric screwdriver.
The way to remove the disassembled electric screwdriver
Sometimes the gearbox of the tool fails. to repair it, the chuck has to be removed from the shaft. Process:
- Find and unscrew counterbolt inside the chuck.
- Prepare the head (19 mm in most cases, but sometimes you have to adjust the size individually).
- Put the head on the back side of the gearbox and fasten it firmly.
- With the other hand, gently unscrew the chuck counterclockwise.
All, by simple machinations it was possible to remove the element from the disassembled gearbox.
Using the hexagon
First, again, unscrew the screw inside the chuck. clockwise. Next:
- Clamp the hexagon with the jaws.
- Set the torque for the drill. it is recommended that the battery is clamped to maximum.
- Set reversing mode.
The essence of the method is that the hexagon should hit against something hard. This could be a table, stone, metal, etc. It is necessary to bring the tool to the chuck and press the start button. The hexagon will start to hit the surface and the chuck will twist from the shaft.
If it is jammed
Chuck in the screwdriver Elitech (Elitech), Flex PD 2G 18 volt, Bort, Vortex, Patriot, AEG BS D, Dexter, Makita DF 331 D and so on.д. can jam if the user has to unclench the cams to the maximum and then cannot get them back into place, no matter how hard they try. The maximum size of drill bit is inserted.
Cams cannot be opened to retrieve a chucked bit or drill bit if they are not squeezed evenly. This can cause the bits to wobble and the fastening will be unreliable.
the jaws rarely jam during the freewheeling motion when they are squeezed or unclenched. The cause is that chips, dross or debris got under the shaped part of the cams. To unclench, all this must be removed and cleaned.
Regardless of the reason for jamming, the first thing to do is lubricate the inside of the chuck. The correct, special grease is used for this. WD-40 is good. This multi-purpose grease is also applied to the surface of the cams. Leave it for 15 minutes, then carefully, without excessive force, tap the chuck and cams. If it is tapped with a simple hammer, it must be tapped with a cloth gasket, but it is better to use a rubber one.
If the bit jams in the chuck of some brands of electric screwdrivers, e.g. Bosch, the problem is solved by the use of two adjustable wrenches. But first of all it is absolutely necessary to lubricate the parts. Use one wrench to grip the base of the chuck and the other to gently twist the upper part. To avoid damaging anything, the procedure is performed with thick, soft cloth pads.
Disassembly of the quick-release head
Chucks type BZP or self-clamping can be dismantled only up to a certain stage, because further you can cause irreparable damage to the device. The disassembly proceeds as follows:
- Use a knife or flat screwdriver to gently ease the groove between the two halves of the plastic coupling apart around the circumference using undercutting movements. The main thing is not to damage the housing.
- As soon as the coupling has been disengaged, the lower part can be removed by hand.
- Then the cams are pushed apart as far as they will go and a long bolt is inserted into the cylinder.
- You hit it with a hammer until the upper half of the socket falls off.
- There is no need to disassemble it further. The cartridge has no case and can be greased in all places.
Reassembly is done in this sequence:
Groove for the corkscrew washer
A detailed disassembly of the quick-release cylinder is shown at
Disassembly and cleaning of the electric screwdriver AEG BSB18CBL
After a long and very dusty construction site, on this instance, almost all switches became very bad, namely: the directional selector, speed selection, torque setting and the main button. It was clear that it had picked up some dust, but there was no time to disassemble it. Now the repair is complete and long, winter evenings are coming, it’s time to disassemble and clean the tool.
Disassembly
This electric screwdriver is equipped with a brushless motor, and the disassembly is somewhat different. The thing is that usually the gearbox and the back cover in these models are attached to the end. You can only unscrew two screws at a time from the half you are going to remove, I unscrewed four at a time knowing that I would have to clean.
the back cover holds and centers the bearing (it looks non-standard, but I did not measure) you should pay attention to the smell of plastic from this place, because if the bearing is jammed, the plastic will begin to melt and stink. At the beginning there is a chance to save the cover.
As usual unscrew the self-tapping screws on the handle (they are all the same) and separate the halves. The picture was very sad, a lot of greasy dust, grease squeezed out of gearbox (not much). The wires are layed in the handle and filled with something like hot melt glue, but more plastic, to clean the engine and gearbox from the other side will have to dig out in a couple of places.
The other side is the same. Blow out, wipe off, and rinse with a brush with “universal degreaser”.
The grease in the gearbox is normal and it is there, I didn’t get into it. The gearbox is comparatively standard, it is easy to disassemble, but there was no sense, the screwdriver is about 4-5 years old, except last year it was used in normal conditions so the grease is alive there.
Assembling
We’ve washed and dried, then reassemble in the reverse order. All parts are inserted in the grooves and wires are put also in place. In fact, the housing castings are very correct, the chances of something going wrong or jamming the wire are minimal.
Another sticking part is the torque switch. Unscrewing the four self-tapping screws.
Remove the selector cover, clean out the grease and dust, it looks like an enormous amount of dust gets in there when drilling “over the head”, probably because of the removable chuck.
The lid itself can be washed in the ultrasonic, but I just cleaned it.
Pretty good model electric screwdriver, but because of the removable chuck design (orange ring to release the fastener) the dust is kind of focused and gets into the mechanism of the torque selector. Fortunately, it takes two minutes to disassemble.
This model has a version with a fixed chuck.
Another thing to watch out for is the plastic sleeve of the rear shaft bearing. If you smell plastic, not burning windings, stop working and touch the back cover, it will be warm. So the bearing is jammed and the seating could melt.