Assembling variants of homemade shredders for branches and grass
Owners of their own land plots are well aware that it is not just an opportunity to relax on the green lawn, bask in the sun or come with friends for kebabs and gather a rich harvest.
There is still work to be done here, and the care of the plot is multifaceted. You need to clean the area, plant plants, keep it clean, keep an eye on the trees and bushes.
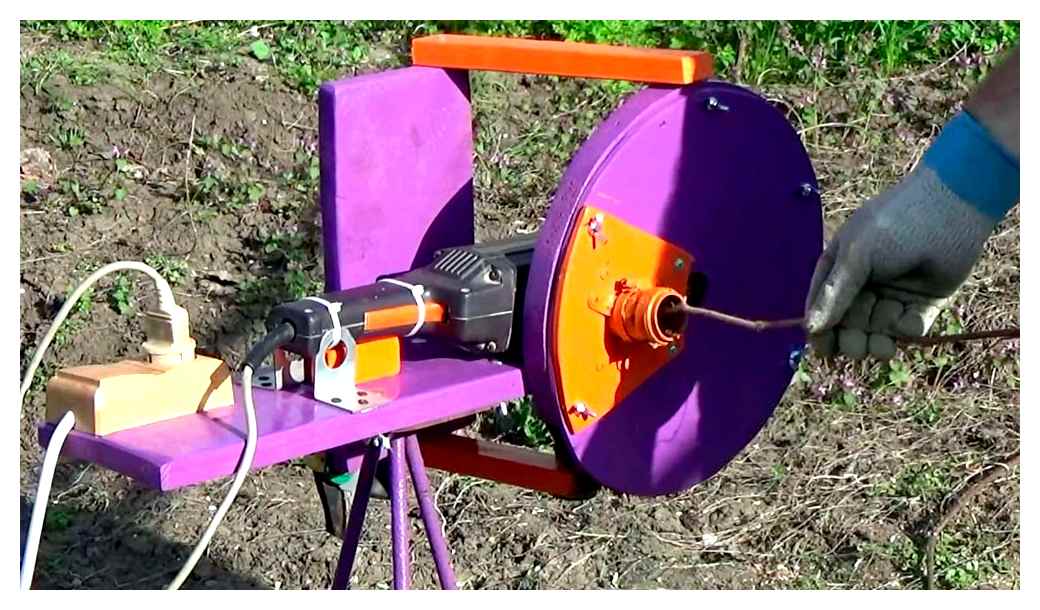
Therefore, a lot of natural debris in the form of branches and leaves is formed on the site. They should not be incinerated, because there is a heavy fine, and it is harmful. A good solution can be a homemade shredder.
Advantages of homemade devices
The shredder, also called shredder and chipper, performs several important functions. Namely:
- Shredded twigs can be used to make paths in the yard. You don’t have to walk in the mud and shine your shoes every time.
- Homemade shredder allows you to create a useful fertilizer. Crushed leaves and branches are ideal for compost.
- Such a device protects nature from pollution. No need to burn the trash. Just shred it, and it will decompose much faster plus benefit the plantings on the site.
- Homemade machines save the budget, and doubly so. No need to buy fertilizer in stores. Plus the assembly of the chipper itself can be practically free. Depends on what you have at your disposal.
Self-assembled branch chippers have several advantages over store-bought equipment.
- Most factory models have a plastic body. Looks good, but quickly loses not only its appearance but also its integrity. Plus, you can’t count on plastic in the winter. High probability of deformation.
- Problems with cutting tools. The factory blade is usually good for one season at the most, then you have to sharpen it or replace it. There are seldom spare knives in the set. Have to find, buy and install it separately.
- Narrow necks. Gardeners often note that factory crushers have a very narrow throat for loading raw materials. Have to slowly add branches and other debris, spend a lot of time on recycling. Homemade can be loaded conveniently and quickly in advance.
That’s why you should not think that free-assembled shredders have cost advantage. In addition to price, there are a number of other strengths.
General characteristics
Lawn mower includes the following assemblies:
In the process of selecting a lawnmower, you should also pay attention to the devices that are included in the kit. For example, some devices come with a knife and a special plug for the grass collector.
The motor
Lawn mowers can be battery-powered, gasoline or electric. The latter can operate on a domestic power grid and are designed for relatively small plots.
Battery type models are equipped with a battery. Using such a device, you will be able to process an area of 6 acres for one battery charge.
Motor power factor determines the speed of mowing. As a rule, such equipment is equipped with engines from different manufacturers. The American and Japanese motors are considered to be of the highest quality.
The low quality of Chinese engines is a banal and very common stereotype. Some Chinese manufacturers make motors according to the certificates of Japanese companies.
Wheels
Machines of different price range are equipped with different wheels: needle or ball bearings, bronze sleeves, etc. д. The higher the price of the mower, the more convenient it is to work, because such equipment is characterized by smooth running.
Also the usability depends on the diameter of the wheels. That is, the higher it is, the more comfortable it will be to use the equipment.
Grass collector
There are three varieties of grass catchers:
The grass catchers of the cloth type are very compact and light, but they must be washed from time to time. When the mesh is clogged, an air lock is formed, which can easily cause overheating of the engine.
Plastic grass catchers are made of high quality materials. If a hard object (stone, chip, etc.) accidentally falls into the. д. ), the housing will not be damaged in any way. The plastic container is very easy to clean. Combined versions are used in the most expensive devices. They combine the advantages of the above varieties.
By the way, you can also make a lawnmower yourself.
Advantages and disadvantages
The advantage of a homemade device, of course, is considered to be the saving of money. Necessary components can be taken from defective or obsolete devices, as well as from improvised devices. Another advantage is the pride of the doer, who managed to make serviceable and useful equipment.
The performance level of the device is directly linked to the motor capacity. The use of inexpensive steel alloy in the device, made by yourself, can spoil all the results. Specialists advise using high quality steel for this purpose.
In terms of functionality and ease of use, industrial equipment, of course, is much better than homemade. A factory-made lawn mower has several speed modes, it has adjustable blade height, and it makes much less noise.
Improving a home-made lawn mower, however, is quite possible. Experienced craftsmen also equip their devices with an adjustable handle, bumpers for insurance, etc. д.
Electric Lawn Mower
Parts of the lawnmower
To make an electric lawnmower with their own hands, the engine of any old device is used. Motors from small household appliances can not withstand prolonged work, overheat, can “burn out”. Even a vacuum cleaner motor is relatively weak, requires a ventilated housing, work intermittently when the motor sound changes. Comfortable operation requires a 1 kW motor or more.
Lawn mower blades can be cut and chiseled from solid steel, as a single element or as several blades attached in the center. Knife made of thin wires, or grass fishing line, as in an industrial hand lawnmower requires high power of the device, frequent change of nozzles. It is possible to use a round disc sharpened by your own hands. it is stronger, safer, more durable.
Handle for a lawnmower can be welded specially, or taken from an old cart, wheelchair. When choosing, the lightness of the elements is important. Using the entire frame from a wheelchair or cart simplifies the manufacturing process, but the elements must be strong, not rusty. In the absence of improvised means, the frame and handle can be welded from steel pipes.
It is better to lengthen the power cord so that it can be wound and unwound. Wheels are needed small, but the height to the center of at least 10 cm, for optimal placement of blades, comfortable movement around the site. If the wheels are too small, for example from a vacuum cleaner, you can increase the height for the blades, but they are not designed for the considerable weight of the metal construction of the mower.
Protective cover for knives is attached around the cutting elements, formed from a sheet of steel by your own hands or use a ready-made suitable element. It is necessary both for the safety of the mower and to protect the blades from hitting rocks or other hard objects.
Important! The elements for assembling a lawn mower with their own hands should not only be suitable, but also in normal condition, allowing for non-sparing operation.
Lawn mower assembly technology
How to make a lawn mower with your own hands? First of all a metal frame is made. The motor is installed in it, which is fastened with bolts. In the lower part of the frame, the cutting mechanism is attached, connected to the motor. The normal distance between the blades and the ground is 7 cm. The bag for collecting grass is fastened right behind the cutting mechanism, just like the industrial version.
A blade guard must be welded around the blades. The engine and the connection with the blade must be covered from the grass, while preserving the ventilation holes. The presence of ventilation is especially important for small engines.
The handle must be welded in a comfortable position at the right angle and normal length. Welding is the safest way to make the frame and mount the parts. But in the absence of equipment or skills in the work, you can assemble from prefabricated elements, joining bolts.
Important! Bolted connection is less reliable for lawnmower assembly, it must be checked and secured often.
Advantages of the design
Engage in the manufacture of home-made electric mower prompted several reasons:
- Low cost of the device compared to factory-made counterparts.
- Environmentally friendly electric motor. Lawn mower “with electric traction” does not produce harmful exhausts like gasoline mower.
- Low noise level.
- Easy to use: no need to store and periodically refuel.
- Compact size.
But you should also be prepared for some peculiarities:
- An electric lawnmower is not standalone: Its reach is limited by the length of the mains cable. But with the size of the lawn up to 12 acres, this disadvantage does not matter much.
- Limited power. Gasoline lawnmowers are usually more powerful, and the power of the electric version is also limited by the wiring capabilities.
- Risk of electric shock when working on wet lawn.
The homemade version is inferior to factory-made models in the following ways:
Construction from an angle grinder
There are quite a few ways to create such a machine. The easiest one is to bolt it to a pre-prepared platform or base.
The most common option is to assemble such a homemade machine using a baby carriage.
- Disassemble the stroller, but leave the base with wheels.
- Prepare a board that will lie on the axes of the wheels.
- Fix it.
- Attach the angle grinder to the board with ties or clamps.
- An angle grinder needs blades or fishing line for a trimmer.
- Attach the switch to the handle.
Such a construction can be equipped with a protective cover to prevent the grass from flying to the sides, or a container for collecting waste.
The self-taught masters of history have already come up with a lot of homemade machine models. They differ in form of assembly and complexity of design. advanced models have adjustable cutting height, etc. п. If you build your own mower, make sure that safety is paramount. One should set the on button of the machine in such a way that the machine switches off immediately after releasing it.
Lawn mower made of “Druzhba” chain saw
In order to learn how to make a mower with their own hands, sometimes you need a good wit. At scrap metal collection points you can always find a discarded frame from the corners. rare, but still possible to find the wheels on the hinge, preferably at an angle of 180 degrees. But even if you can not find such a frame, it can easily be welded from improvised materials.
The working shaft moves due to the belt transmission from the saw itself to the pulleys, on which the line for the trimmer is attached. This design will last for years without the need for additional maintenance. Such a variant is more difficult to make, because it has a two-wheeled frame and two rotary cutters. On the other hand, it has its own advantages, because its productivity is much higher than that of conventional self-propelled machines.
Self-made machine and ingenuity, of course, is a reason to be proud of your invention. But you should also remember that collective constructive solutions are always better reflected in the quality and safety of design.
The advantages of homemade machines include:
- Saving money on the purchase of the right materials at a low price instead of a new tool;
- Use a tool that has no marketable appearance but has not lost its functionality;
- self-assembly allows you to always improve the invention, as well as know its design perfectly.
The height of this model is not adjustable, so the lawn can not always be mowed evenly. And also the disadvantage is the lack of a tank for collecting the grass, which automatically increases the labor costs of a person. A heavy self-assembly tool can sometimes ruin a lawn with its weight. This is an objective factor in favor of choosing a factory model instead of self-assembly.
From a chainsaw
Homemade lawn mowers of the electric type can be constructed even from a chainsaw. It will require:
- The engine from the Druzhba chainsaw;
- A frame made of durable metal;
- protector (protective cover);
- blades;
- wheels;
- handles.
First you need to make a kind of cart, having welded to the ready frame a handle to control the mower, the wheels. Without changing anything in the mechanism of the motor, you need to install it on the cart (homemade chassis), having previously removed the “hand wheel” and screwed it to the handle of the mower. You will also need to increase the length of the fuel hose and gas cable. To place the shaft at the bottom, you need to screw it to the frame, using the hole on the gearbox. In addition it is necessary to use for fixing the flywheel housing stud. After strengthening the blades on the shaft, you can start working with the homemade tool.
gasoline mower
The device of gasoline lawnmower is not complicated. The design of this device differs from the electric version, because it will be a unit that works by means of circular rotation of the discs with cutting parts.
Homemade rotary mower is made from the rear axle of VAZ and consists of:
- Air-cooled gasoline engine (6.5 horsepower will work);
- discs (you can take special discs from an unused seeder);
- blades;
- metal frame (can be welded from a metal angle 44);
- 8 mm diameter mounting axles. 2 pcs.;
- handle (it can go into the supporting frame);
- bars;
- fasteners (screws and nuts);
- wheels (4 pieces).
To make a rotary (disc) mower, it is necessary to drill holes in each of the discs to attach 4 blades (the distance between the blade and its attachment must be 1 mm thicker than the blade). Having equipped the gasoline engine with the manufactured device, screwed the wheels to it and welded the entire structure into one piece on a metal frame, it remains to attach a handle to control the mower.
Grass trimmer from angle grinder. Instructions and diagram with explanations
Grass trimmer from an angle grinder. At any moment, the angle grinder easily turns into a mower. and vice versa.For the grass trimmer, you need to add an extension cord or a soft double wire with a 2.5 cross section, a socket. switch and fork. Cut the wire from the socket side of 30 cm and insert the switch (preferably from a drill. angle grinder of the same power) In my case, I will not use an angle grinder. That’s why I took away a part of the angle grinder body with a button. to reduce the dimensions.
The main thing is to cover all the holes for cooling. I sealed them with tape, and the body. the part of a plastic bottle.
Since the ventilation is closed, do not overload.
All parts of the mower are made of improvised means. the body and handle are taken from a heating tube 15. Mounting with an angle grinder steel plate from 2 to 3 mm. bent at an angle of 90gr., and welded to the tube at an angle of 45g. The handle (angle tube) 90gr. attached to the housing with a bolt thread M10 and can be adjusted to the height. the belt is hooked to it. All dimensions in the photo mounts are shown for the angle grinder with a wheel 180. Therefore, the bolt holes must be adjusted to the size of the angle grinder housing. Switch moved to the edge of the body, adding 1.5m. 2.5 cc copper wire., and secured with duct tape pre-insulated (inserted into the camera from a bicycle)
The most important and difficult part. In my case. this is a fishing line mount. It took me several months to test different versions of mounts. To get the desired result. The mount is made from two old diamond discs for stone. cut out the disc core with an angle grinder as in the photo.
Grind more corners then put this core of the disk on the grinder. Do not force the line and grind it on an emery stone to a circle of 90mm. 2 pcs.Mark the diameter of 50 mm. on one and drill holes as in the photo.Holes 4.5 and 3.5 are for a line of 4 and 3 diameters. You can drill and 2.5 for the line 2.5. Fasten the line for the trimmer as in the photo. line for the trimmer 18cm. insert into the holes and bend.
The long edge of the line should be between the two discs. To get the desired result we tighten the nut more forcefully (turn the nut upside down).
I added a speed controller, the mowing became much better. If the grass is young and the speed is low. do not strain the engine.
I also took out line fastening, what I described in the beginning. I left the standard factory-standard disk fastening and clamp the line to the trimmer
(Only the line for the trimmer should now be thick, ume 4 mm) otherwise it will be twisted.
Grass trimmer from an angle grinder
Summer is coming and the grass has grown a lot, while it is not critical, but we should already think about how to cut it. I will show you how to make a simple trimmer for grass from the angle grinder to cut the grass. precisely, it will be a special device, which will be installed angle grinder. After mowing, you can take it out and use it again. There’s not much point in buying a ready-made trimmer for grass if you need it only 1-2 times a season.
How to make a grass trimmer from an angle grinder with your own hands
The first thing you need to do is to make a bracket to enclose the body of the angle grinder. To do this, we take a steel plate and bend both sides along the body. I took the plate already bent on one side originally. Now I only have to bend the second edge.
There are threaded holes in the body of the tool on both sides. Into these holes is screwed the handle to saw from both left and right sides, the handle is made as a flip over one. That’s just for these holes and will be fixed trimmer bracket for grass.It is necessary to drill holes on the sides of the bracket, so that they coincide with the holes on the sides of the tool. Mark it with a marker.
Now the handle bar. It will be made of steel pipe. At the end of the tube we will make a bevel so that the handle is mounted at an angle. We mark out the line for the trimmer cut with a marker.
Now it’s time to install the angle grinder itself in the seat. To do that, we unscrew the protective ring.
To ensure that the grass trimmer does not touch the ground and was at a certain distance, the wheels will be attached to it. We can get them from an old and unnecessary baby carriage or any other cart. As a last resort, you can make one yourself out of wooden circles.I had the wheels with the brackets.
We put a wheel with a bracket and fix it all with a bolt. Tighten it well with a wrench. Do the same procedure on the opposite side.
It remains to make the cutting part. For this we take a piece of steel cable or a specialized kapron wire for trimmers. We put it crosswise through the jam nut, through the holes for the wrench.
Before I finish, I would like to say that an angle grinder is not designed for this kind of work. And if you want to repeat this homemade, you take full responsibility and use everything at your own risk.Be very careful when mowing the grass, high speed rotating steel wire is very dangerous. All manipulations with assembling or disassembling of the cutting part should be done only after pulling out the plug from the socket.But as a necessary tool and it may well be useful for you to mow the lawn in front of the house.
Materials and tools required
Even a person without special creative and working skills, who knows what a drill (screwdriver), a hacksaw (jigsaw/turn-saw), a ruler/ruler and a hammer can assemble such a home-made device, and has minimal skill in using these tools. In addition, to assemble this homemade device will be required:
- supporting wheels from a child’s bicycle (baby carriage), the need for which usually disappears at the moment when the child fully masters this two-wheeled vehicle;
- A strong and well-dried wooden bar 50×50 (at least 30 centimeters);
- Metal clamp for fixing the nozzle on the trimmer‘s grass trimmer boom;
- Fasteners in the form of long self-tapping screws or bolts with nuts and washers.
Such tools and materials are now available in almost every family where children grow up.
How to make with your own hands
Assembling the homemade grass trimmer attachment grass trimmer attachment with a bar treatment:
- cut from the bar blank in such a way that its size prevented the impact of the line from the grass trimmer on the wheels (usually enough 30 centimeters);
- we take a ruler in our hands and find the middle of the workpiece;
- we drill in the middle of a bar through hole with an angle of 45 degrees, which should connect the opposite edges of the workpiece (drill diameter in this case should be slightly smaller than a screw or bolt);
- In the middle of the clamp drill a hole for fasteners and screw this homemade bracket into the hole on the bar;
- screwed with self-tapping screws with washers to the ends of the bar wheels from a child’s bike.
For more convenient drilling the bar, we recommend “dented” the entrance edge with a hammer.
The replacement attachment for the grass trimmer is ready, and tests of this device have proven its effectiveness. You can now create a straight lawn with a pre-set grass height using a brushcutter. This adjustment can be made by sliding the nozzle on the tool bar. Of course, the grass trimmer “on wheels” will not be a full-fledged replacement for lawn mowers, but on small plots this device, which can be assembled in an hour, will be very effective. And your hands won’t get tired while working with a modified brushcutter.