The chain saw starter
The starter motor is one of the most important mechanisms in the construction of any modern chainsaw. It depends on it to start the engine of the tool in all weather conditions. Starter for chain saws has a simple design, it is easy to maintain and repair with your own hands. However, in order to fix the breakdown, you must first find the cause. This most often requires a complete disassembly of the original mechanism.
Most chainsaws have the same starter motor design. That’s why some stores offer customers a universal starters, which will fit into the models from STIHL, Husqvarna, Partner. Nevertheless, some differences from most of the starters have domestic chainsaws Ural or Lesnik.
As standard, the chainsaw starter consists of a number of parts.
A protective cover is built over all starter components. The original principle of operation of most starting mechanisms is also practically the same. In a special groove in the chainsaw body is a handle that holds the cable. When the handle is raised sharply, the latter is understood to be. At that moment, the ratchet is actuated and forces are transmitted via the reel to another slotted reel on the engine shaft.
When the standard cable is pulled, the chainsaw motor shaft starts to rotate, which leads to the compression of the existing fuel mixture located at that time between the cylinder head and the standard piston.
As the internal combustion engine cylinder volume increases, so does the amount of consumed fuel mixture, which is required for its future ignition. Accordingly, the operator of a high-powered saw needs to do more jerking than the owner of a low-powered household tool. To increase the speed at which the drum returns to its original position, manufacturers of powerful chain saws use elastic return springs.
How to put the spring on the starter chain saw?
To place the spring in the appropriate groove is quite a challenge. First you need to twist the part, returning it to its previous size. After that it must be inserted into the cavity of the regular drum hub. To tuck the spring into the chainsaw starter, proceed in this order:
- The outer end of the used spring must be fastened in the special limiting lug. In this case the second end using a screwdriver to set against the standard hole inside the lock;
- Next, the hinge, located on the inner end of the standard spring, should be aligned with the hole. This is best done with a screwdriver. When the ends are aligned, the disc must be lowered;
- After installing the disc, it is necessary to check that the dog of the chainsaw’s ratchet mechanism fits into its original place. Then you can assemble the ratchet in reverse order.
To wind the spring on the chainsaw starter, you need to consider all the available holes and notches. After installation, it will be necessary to tension the spring. Once the slack is eliminated, the spring will be left to tighten a few turns. this is necessary to maintain the required tension of the installed part.
Gas grass trimmer starter repair may be needed at the most inopportune time. There are two ways to solve this problem: replace the broken part or change the entire assembly. The latter option will cost more. Repair the device with your own hands Most cases Only a screwdriver with the appropriate tip is useful of tools. Repair does not take much time and does not require special knowledge. It is enough to know the device, mechanism of operation, aspects of assembly-disassembly of the starter on grass trimmer, To achieve a good result.
Internal combustion engine. this is basically the main part of the grasshopper. Its power lies in the range of 0.5-2.5 L.с. The movement from it is transmitted to the shaft located inside the hollow rod and then through a gearbox consisting of gears, already cogged or a blade (working body).
The hedge trimmers also have the following elements:
All parts of the lawnmower are shown in the photo below.
The grass trimmer starter is an integral part of starting the engine. This is shown separately in the 2 photos below.
Starters for different models of gasoline-powered mowers work on a similar principle: When you start the engine, the protrusions marked with the number 1 in the photo above are caught by the dogs 3. When the engine starts to run, they will return to their previous position due to centrifugal force. The lag 2 plays a similar role.
The process of resetting the parts of the mechanism is due to the presence of a spring wrapped around the axis. It unfolds when the rope is pulled. After releasing the cord, it is tensioned and coiled by the spring assembly. When starting an internal combustion engine, the trigger rotates its shaft until it.
Today, gasoline scooters are equipped with 2 types of triggers:
The first option is even more common.
Grass trimmer starter can work for a long time without failure. It is not possible to specify a continuous period of time. Everything is determined by the original quality of the device and compliance with the rules of handling.
Major malfunctions of grass trimmer starter
It is not difficult to find the cause of starter failure. There are a few basic options:
The starter mechanism can be broken. The consequences will be dire if the wrapped cable is wrapped around the flywheel of the internal combustion engine: then the spring will burst and the pulley will break. But such cases where full replacement starter units are very rare. In most cases, it is enough to fix a new spring or replace the cord to fix the mechanism.
The family Brovchenko. Installing the spring in the starter manual starter.
How to install the spring in the starter manual for gasoline grass trimmer? You can do it at home. Me
Diagnosing the chain saw starter
Due to prolonged use of a chainsaw, the starter mechanism comes into disrepair. After one or more jerks when pulling the starter rope does not turn the crankshaft. This problem may be due to the following reasons:
Before starting work on diagnosing and repairing the starter mechanism, it is necessary to prepare the necessary tools and accessories, which will significantly reduce the time for operations. These can include:
- A set of locksmith screwdrivers and a specialized set of brand-name tools included with the chainsaw.
- A sturdy cord to replace the worn out starter rope.
The first step in repairing a chain saw starter is to identify the nature of the problem. To do this remove the side cover on the side of the starter mechanism, unscrewing only a few screws. Depending on the starter manufacturer, this operation may require a utility screwdriver or a normal pliers screwdriver.
Next we examine the inside of the protective cover. If there are no cracks and chips of plastic, proceed directly to the diagnostics of trigger unit. Unscrew the central starter bolt and remove the spring. There should be no cracks or tears on its surface. To find yourself a similar force and number of turns of spring is problematic, so you need the help of specialized centers.
After removing the clamp and the chain saw starter spring, the pulley with the wound cord is available for disassembly. The integrity of the cord indicates that it is necessary to carefully review each of the parts of the starter mechanism.
Block: 2/4 | Number of characters: 1749
How to repair a chainsaw starter with your own hands
Partner Chainsaw Starter Repair / Broken Starting Cord
Broken cord
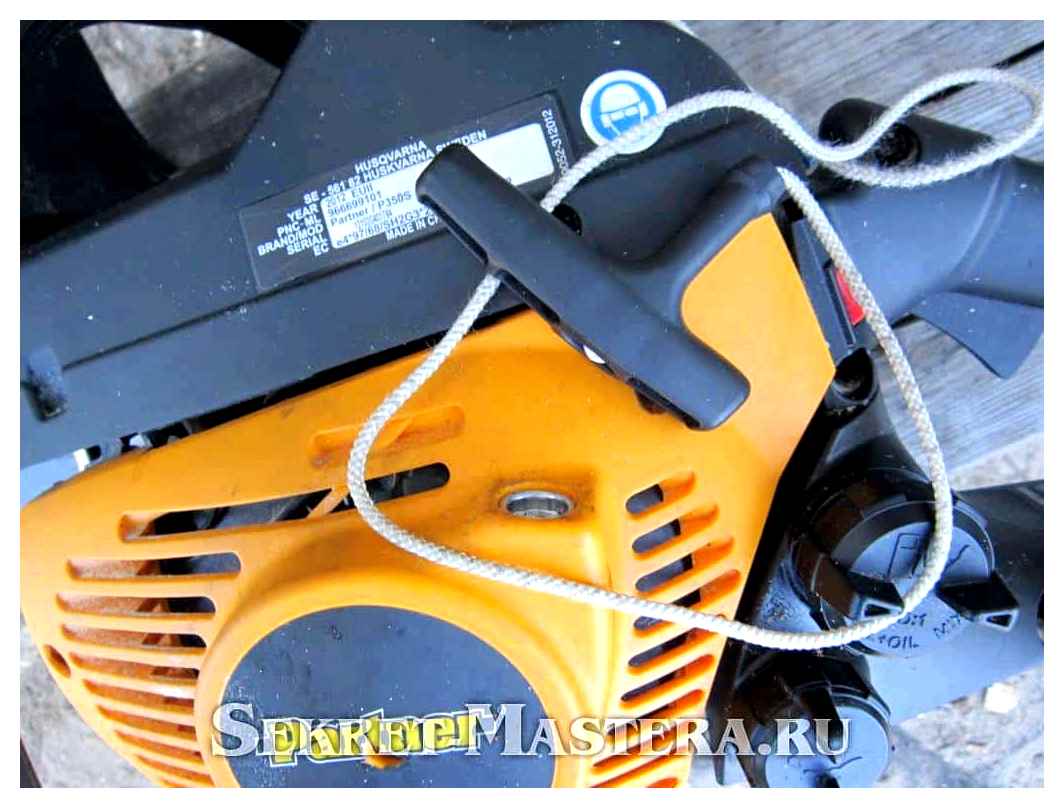
Presented chain saw starter repair after a broken starter cord. Without a starter cord, a chainsaw becomes completely inoperable, there’s no other way to start the tool. Repair considered the example of a chainsaw Partner P350S, tricky reliable starting this saw requires a minimum of 4-5 times to pull the starter cord to make the saw work, so I guess the first failure was a cliff cord. The cord does not break right away, first the protective cord sheath breaks and prevents the chain saw from starting. It is better not to wait for all threads to break and repair the cord in advance. It is not necessary to invent anything, the repair should not cause difficulties, but the exact observance of the conditions of assembly is obligatory. Step by step instructions with the scheme of actions with photos and video are given below.
Unscrew the three screws that secure the starter cover. The included spark plug wrench with a straight screwdriver will work for this process, but to speed up the work it is better to use a normal tool.
Remove the starter. Chainsaw is equipped with soft starter mechanism, it is located above the spool with cord.
Unscrew the screw that secures the soft starter and the starter reel. Be careful not to lose the washer!
Starter is removed. Remove the screw
Soft starter Soft starter coil removed
Prepare a cord of suitable diameter and a length of 1.2-1.3 meters. Use a kapron laundry rope for the repair :).
Melt the ends of the rope in the fire to prevent it from unraveling.
Tie a complicated knot at one end. The knot should be large in diameter, but when inserted on the spool, it should not protrude.
Tuck the cord into the spool hole. Do not wind the cord!
Insert the spool in place. Here you can make a mistake during installation. The spool has two splines, one of which should catch the spiral spring. Install the spool so that it fits snugly in place and the catch is in the slot. Checked by turning the coil clockwise and check if the return force appears.
Knot on the cord Cord secured Spring protrusion
Installing the soft starter. The protrusion of the mechanism should fit into the recess of the coil.
Fasten the set screw and washer.
Tuck the other end of the rope into the exhaust opening.
Installing the soft starter mechanism Screw the screw in
Tuck the cord into the starter grip. Tie a big knot at the end of the rope. With a small knot there is a chance the rope will slip and the whole cord will get tangled in the starter and you will have to remove the starter again. Check reliability of the assembly. See photo.
Cord in trigger knob Fixing knot on cord Screw in spiral
The most important point! Let the cord loop go inside the starter and start turning the starter mechanism clockwise without winding the cord! For this saw you need to make at least five revolutions. Fix the spool by hand. Tighten the hinge by the handle outward. Holding the cord and the mechanism, let the cord be wound on the spool. Watch video.
Install the starter motor in place and fasten it with three screws. The repair is done.
Renewed starter
A broken or damaged cord will take 15 minutes to repair using this step-by-step guide, which is faster and less expensive than calling a service center.
If the instruction helped you, tell us about it in Комментарии и мнения владельцев.
Block: 2/2 | characters: 3461
How to repair chain saw starter with your own hands
Partner chain saw starter repair / broken starter cord
Broken cord
Here is how to repair chain saw starter after breaking the starter cord. Without a starter cord, the chainsaw becomes completely inoperable, there is no other way to start the tool. The repair is based on the example of a Partner P350S chain saw, the tricky reliable starting this saw requires at least 4-5 times to pull the starter cord to make the saw work, so I guess the first problem was a broken cord. The cord does not break right away, first the protective cord strap breaks and prevents the saw from starting. It is better not to wait for all threads to break and repair the cord in advance. It is not necessary to invent anything, the repair should not cause difficulties, but the exact observance of the conditions of assembly is obligatory. Step-by-step instructions with a diagram of actions with photos and video are given below.
Remove three screws fixing the starter cover. The spark plug wrench and straight screwdriver are good for this, but you might want to use a real tool for a faster start.
Remove the starter. The chainsaw has the soft starter mechanism and it is located above the cord reel.
Loosen the screw that secures the soft starter mechanism and the starter coil. Be careful not to lose the washer!
Starter is removed Remove screw Screw is unscrewed
Soft-start mechanism Starter coil removed
Prepare a cord of suitable diameter and a length of 1.2-1.3 meters. I used a kapron clothesline for the repair :).
We are melting the ends of the rope in the fire, so it won’t unravel.
Tie a complex knot at one end. The knot should be large in diameter, but it should not protrude when inserted on the spool.
Tuck the cord into the spool hole. Don’t wind up the cord!
Reinsert the coil. There may be a mounting mistake here. the spool has two slits, one of which should correspond to the hook of the spiral spring. Install the spool so that it is firmly seated and the catch engages in the slot. Check by turning the spool clockwise to see if a return force is generated.
The knot in the cord The cord is fastened The spring is protruding
Installing the soft starter. The protrusion of the mechanism should fit into the notch on the spool.
Screw on the fixing screw and washer.
Tuck the other end of the rope into the outlet.
Installing the soft starter The screw is screwed on The cord is coming out
Tucking the cord into the starter handle. Tie a big knot at the end of the rope. With a small knot there is a chance the rope will slip and the whole cord will get caught in the starter and you will have to remove the starter again. Check the reliability of the knot. See photo.
Cord in trigger knob Locking knot Handle on cord Twist the coil
The most important moment! Let the cord loop go inside the starter and start turning the starter mechanism clockwise without winding the cord! For this saw you need to make at least five revolutions. Fixing the spool by hand. Tie the loop by the handle outward. Holding the cord and the mechanism, let the cord be wound on the spool. Watch video.
Install the starter in place and screw it with three screws. Repair done.
Renewed starter
Repairing a broken or damaged cord using this step-by-step guide takes about 15 minutes, and is much faster and less expensive than calling a service center.
If this manual was helpful, please tell us in the Комментарии и мнения владельцев.
Block: 2/2 | Number of characters: 3461
How to put the spring on the chain saw starter?
To place the spring in the appropriate groove is quite a challenge. First of all it is necessary to twist the part and return it to its original size. After that it must be inserted into the cavity of the standard hub of the drum. To put the spring in the chain saw starter, you need to act in this order:
- The outer end of the used spring has to be secured in the special limiting lug. In this case, the second end with a screwdriver will need to set against the standard hole inside the lock;
- Next, the hinge located on the inner end of the standard spring must be aligned with the hole. It is better to use a screwdriver for this. When the ends are aligned, the disk will need to be lowered;
- After installing the disc you need to check that the dog of the chainsaw’s original ratchet mechanism fits into its original place. Then you can assemble the ratchet in reverse order.
To wind the spring on the chainsaw starter, you need to consider all the available holes and notches. The spring must be tensioned after installation. Once the slack will be eliminated, the spring will remain to screw on a few turns. this is necessary to maintain the required tension of the installed part.
Typical breakdowns and repair of chainsaw starters
Before carrying out the repair, it is necessary to find out the causes of the breakage. Since the product is constantly exposed to dynamic and other kinds of loads, its failure is not excluded. Frequent problems with the starter motor are cable breakage, frayed or chipped splines on the ratchet drum, damaged springs, cracked sheaves and other problems. To determine why the saw won’t start, you’ll need to perform a proper inspection of the starter mechanism. Consider the main types of faults, as well as find out how to properly repair the product.
Replacing the cord
the starter cord is a strong rope, which is sufficiently resistant to wear, but even its technical properties do not save it from damage. The rope rubs against the recoil starter cover every time you start the engine, and this causes the cover to gradually wear and fray.
If the rope is pulled, you will need to disassemble the starter cover to replace it. After removing the cover, the drum should be lifted up, but only in such a way that it does not slip out of its seats. We recommend that you do this work with a partner who will fix the spring and you will replace the rope. Remove the remains of the old rope and install the new rope in the crank handle and groove in the pulley. After that the wire should be wound onto the roller, and finally the body should be assembled.
Good to know! Before fixing the cable in the crank, it is necessary to pass it through a corresponding hole in the starter cover.
How to replace the chain saw starter spring
If the spring is damaged, which is often the case with Chinese instruments, the mechanism can only be repaired by replacing it. But if it was damaged at the connection point, that is, the ear broke, then it can be repaired.
Repair of the spring is a heating of the place of destruction up to 600 degrees, then slowly cool it down to 100 degrees, at which time perform the wrapping of the end in the form of a fragment. In this way, it will be possible to avoid the loss of elasticity of the product, which will prolong its service life. Although most professionals simply replace the product with a new one.
The process of replacing the spring is carried out in the following sequence:
- Initially, the cage or drum of the mechanism is removed.
- There is a spring inside the drum. To remove it, you will need to fix its upper part, and then pull aside the starter handle.
- When the old spring is removed, you will need to install the new. At the same time it is necessary to carry out cleaning of the housing.
- When installing a new spring, it is necessary to insert it into the starter, and then get the tendril into the groove.
- At the end of the work you can put the drum and replace the starter cover.
The detailed process of replacing the spring is at
Replace the flywheel catches
If it is necessary to replace the handwheel pads or tabs, this is also easy to do. To do this, the flywheel must be disassembled, and then the doggies removed. Install new dogs should be only those that were originally (plastic or metal). This is very important, since the replacement of plastic dogs on the metal, will lead to accelerated wear on the flywheel. The details of the replacement chain saw starter paddles are discussed in the video below.
It is important to note that it is not necessary to have special skills or experience to repair the chain saw starter. All work can be done by yourself if you treat the repair process with responsibility. Timely preventive maintenance of the chainsaw will avoid breakdowns when working in the field.
Block: 3/3 | Number of characters: 3688
The trigger mechanism is disassembled to install new parts in place of the broken parts in the following sequence:
- unscrew the screw that secures the pulley with the starter cover with a screwdriver;
- remove the spring and the tabs;
- carefully remove the pulley (it is necessary to turn the head or work, previously wearing goggles and gloves);
- Determine why the trigger mechanism is broken;
- if the spring has collapsed almost completely, it is replaced;
- When the spring is out of the hook, it is installed in its original place, bending in front of the antenna (the photo shows the installation process);
- Once the spring plate is installed inside the groove, carefully screw it on.
Read it for yourself
To change the spring, the work must be done carefully and carefully: it can accidentally explode under the force caused by its actuation. Even if you carefully remove the roller, the spring band very quickly comes off the coil and can hurt your hand with its sharp edges.
Put in place immediately, the plate spring does not always work. Often slips, so samples need to be repeated to achieve the desired result.
What other types of starters are suitable for the power harvester?
Every owner of power tillers should understand that at the beginning absolutely all starters work perfectly and can please their owners with this state of affairs for about a year. But without periodic lubrication of the parts, checking them and commensurate force of the jerk, such joy will not last long. Take care of your starter, and it will respond to you with high performance and long life.
Design modification
Are there options to improve engine starting? You can replace the mechanical component with an electric starter, then the need to pull the handle with all its force will simply disappear. But this modification is not available for all models of power tillers with manual start.
Design of an electric starter.
In addition, the wiring diagram selected for installation will not fit every engine, so it is worth looking at other varieties of motor-block starter. One solution could be a mechanical spring mechanism.
Some stores sell a kit for modifying a Zubr power tiller. The old manual starter on a single-axle tractor is no longer needed, so it is simply removed. The installation of an analogue with a spring starting mechanism is suitable for replacement. After installation, it is enough to change the position of the handle, and the engine will start almost immediately. The mechanical starter, thanks to the work of the spring, begins to accelerate the engine shaft without a constant jerking motion. Replacement process takes no more than an hour.
The factory starter on a single-axle tractor starts the engine with just one movement at first. Such smooth operation of the mechanism can last a year, but the more often it will be used, the faster the breakdown will occur. To avoid this for as long as possible, it is worth checking the amount of lubricating fluid before starting, and not pulling hard on the handle of the cord. This will only reduce the likelihood of failure, but will not avoid it completely.
Main malfunctions of the grass trimmer starter
Determining the cause of a starter breakdown is not difficult. There are several basic options:
These parts are shown in the photo below.
It can happen that the starter mechanism is accidentally broken. The consequences will be dire if the torn cord wraps around the flywheel of a running engine: then the spring will burst and the pulley will tear. But such cases, when a complete replacement of the starter unit is required, occur very rarely. In most cases, to fix the mechanism, it is enough to put a new spring or replace the cord.
Why do we need a recoil starter?
WARNING! A totally simple way to reduce fuel consumption was found! Don’t Believe? A mechanic with 15 years of experience didn’t believe it either, until he tried it. And now he saves 35,000 a year on gasoline!
The electric starter is used as the main starter. However, do not forget that if the battery malfunctions, it will not be possible to start the equipment using the electric starter. This is what the manual version was designed for, as a back-up.
A prime example of the use of the manual starter. portable power plants. On them it is easier to use a manual starter, because it makes it possible to conveniently start the engine and operate the generator.
How to put the spring on the chain saw starter?
To place the spring in the appropriate groove is quite a difficult task. First of all, the part will need to be twisted, returning it to its previous size. After that, it has to be inserted into the cavity of the original drum hub. To refill the spring in the chain saw starter, you need to act in this order:
- The outer end of the used spring should be fixed in a special limiting ledge. In this case, the second end with a screwdriver will need to set against the standard hole inside the lock;
- Next, the hinge located on the inner end of the standard spring should be aligned with the hole. For this it is better to use a screwdriver. With the ends aligned, it will be necessary to lower the disk;
- After assembling the disk it is necessary to check that the dog of the chainsaw ratchet fits into its regular place. Then the ratchet can be assembled in the reverse order.
To wind the spring on the chainsaw starter, it is necessary to take into account all the existing holes and notches. After installation it is necessary to tension the spring. Once the slack has been eliminated, the spring should be wound a few turns. this is necessary to maintain the required tension of the installed part.
How to assemble the starter on a chainsaw?
After replacing the defective elements of the starter comes the turn of its reassembly. It is important to be as accurate as possible since the slightest discrepancy can cause damage to the trigger. The assembly of the assembly should be performed in this sequence:
- The original cable must be tucked into the factory coil hole. The cord does not need to be wound;
- Next, you need to insert the spool in its base place. At this stage many beginners make a typical mistake. There are 2 slits on the surface of the spool. One of these must have the original coil spring hitch. To do this, it is necessary to install the spool so that it stands firmly in its original place, and the catch caught in the slot. Correct installation should be checked by spinning the coil in the direction of the clock hand until resistance appears;
- Then it is necessary to install the device for easy starting of the chainsaw. In this case, the protrusion of the latter should be located in the recess of the installed coil;
- After that, you will need a screw and washer to fix the device;
- Next, the second end of the cord needs to be tucked into the special outlet hole;
- The next step is to tuck the cord into the starter grip. For this purpose, you will need to tie a medium-sized knot at the end of the cord. If it is too small, the cable will slip, causing it to quickly wrap around the starter drum;
- Then, it will be necessary to let the hinge inside the starter. Immediately thereafter, start turning the starter in the direction of the hand of the clock. The cord does not need to be wound. Next, it will be required to fix the spool by hand, and pull the loop out by the handle;
- After that you need to test the starter mechanism;
- If the assembly works correctly, you only have to install it on the instrument and fasten it with three screws.
Repair of the starter. the procedure is not difficult if you adhere to the correct order of action. It usually takes no more than 20 minutes to replace the starter cord. The main thing is to position the pulley and the drum correctly in relation to each other. Otherwise the starting mechanism will not work.