Making a hitch for a power tiller with our own hands
In some situations, it may be necessary to make a hitch for a power tiller with your own hands. A single-axle tractor is an indispensable attribute of any gardener-gardener. Buying a motocultivator is often accompanied by the purchase of related parts: trailer, dipstick, plow, harrow and other parts. In order to attach them to the machine, you will need a coupler. Now on the market, cultivators are represented by a huge number of manufacturers, but not every unit can be matched with a suitable spare part, so you can make the coupling yourself.
Tools and materials required
There is a certain set of tools that are needed to make a hitch, but they do not include anything exotic. Usually everything that is required for the assembly of such parts is in the household of any owner, cultivating his plot of land. The following tools will be required:
- welding machine;
- angle grinder;
- Drill or drill, drill bits on metal;
- tools for measurements (tape measure, ruler, angle);
- wrenches;
- fasteners (bolts, studs).
It should be emphasized that in this case it is very important that the holes you will drill in the part coincide exactly with the bolts and studs. backlash in diameter is undesirable, because it will reduce the service life of the used attachments and trailers. Thus during manufacturing it makes sense firstly to make in a detail apertures of smaller diameter (from 5 mm), and then to expand with wider drills (up to 12-16 mm, depending on diameter of bolts). such approach will accelerate and will facilitate this part of work, simultaneously allowing to align apertures as precisely as possible.
For the manufacture of the body you can use a channel of suitable size, and if such is not available, you can cut a part from a metal sheet.
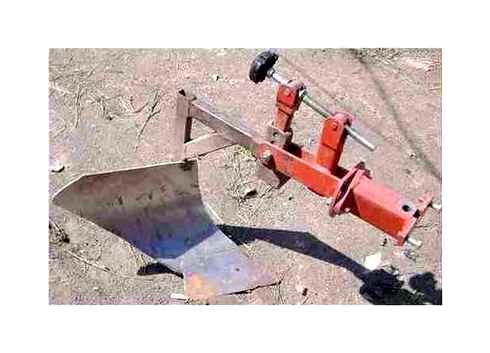
Adjustable coupling option is very convenient. such a design will allow you to attach attachments of different classes, generations and brands. Even if at the moment this design is not relevant, do not forget that in the economy may eventually appear different devices, and the possibility of easy aggregation of any of them will significantly expand the choice, allowing you to proceed only from the desired operating characteristics of the equipment.
How to make a hitch for a power harvester with his own hands: explain thoroughly
One of the important components ensuring reliable connection of a trailed implement with a power tiller is a coupling. There are different types of coupling unit. However, the most commonly used is the U-shaped coupling knot of a power tiller. This assembly is made, both industrially and independently. If the coupling to the tiller is made with your own hands, it should be strong enough to be able to withstand heavy loads.
Models and drawings of dozer blades for power tillers with their own hands
One can, of course, buy such equipment in specialized stores, but often owners of small agricultural machinery prefer to make it by hand. There is a lot of different information and drawings on this topic on the Internet. It allows you not only to make equipment with the necessary parameters, but also to save money considerably.
Brakes
To prevent the trailer from accidentally rolling on a slope and standing firmly on the road, a rudimentary braking system is provided for it. How to make brakes on a trailer to a power tiller? It is best to use a parking structure from a car or motorcycle and fasten the mechanism near the driver’s seat with bolts.
As in any vehicle, the braking system is a factor in road safety. You can make your own brakes, using a rope, a pull rod and a drum:
- A drum is attached to the hub of one of the wheels.
- They take a brake disk and weld a small piece of pipe to it.
- You put the mechanism on the axle.
- The brake pads with rope are fastened on the axle, and the rope is pulled to the lever near the driver’s seat.
Brakes are not usually applied on two wheels. One parking brake for a power tiller trailer is enough.
A hitch for a power tiller with your own hands
The big advantage of a self-made device is that the owner takes into account his needs and makes it based on the inputs he needs: the model of the tiller, the load, the parameters of the attached equipment.
But the first thing to consider is that the implement will always be subject to an increased load, so great care must be taken with its dimensions, construction and the robustness of all its parts. Correctly set parameters of the device will provide the most reliable aggregation with the motor-block, the necessary mobility of the unit and longevity of its use.
When deciding on the design, pay attention to the dimensions of your power tiller and the specifics of the attachment (the one you already have and the one you plan to buy). The primary objective is to ensure maximum compatibility of the machine with all necessary attachments and trailers. Ease of use and the possibility of combining it with equipment of different parameters is also important.
The main working part is usually U-shaped and serves as a bracket, which is attached to the power tiller through the holes in it. On the other side of it attaches the attachment stand.
Before assembling the hitch, carefully read the instructions
How to make a hitch for a power tiller by yourself
When working, the device will be subjected to a heavy load, so you should adhere to the recommended dimensional and strength characteristics of all elements of the assembly. In this case the following hitch qualities will be guaranteed:
- Reliable attachment to your power tiller.
- Fixation to attached implements.
- Ensuring stated service properties of machinery.
- Affordable price.
- Reliability, long service life.
Choosing a model, you should check the dimensions that the towbar of the motoblock and attachments (plow, trailer, harrow and others) have. The task of the master is to ensure full compatibility of elements, ease of operation and the ability to easily adjust the equipment to the specific task. The main part of the coupling is a U-shaped bracket. Through the holes on one side it is attached to the power tiller with the help of pins, on the other side the stand of the necessary attachments is fixed to the body of the device.

Tools and materials required
A person engaged in farming on the land usually has a sufficient set of equipment for making a hitch. The following tools will be needed for the job:
- angle grinder.
- Drill, drilling machine.
- Measuring tools: ruler, tape measure, square.
- Welding machine.
- set of wrenches.
It is important to accurately match the drill bits to the diameter of the studs and bolts. The absence of backlash will extend the service life of the attachment. The body can be cut from sheet metal or use a matching sized channel.
Preference should be given to a hitch with an adjustment mechanism. In this case, you can use attachments of different classes, from different manufacturers, achieving maximum efficiency in the work.
The photo below shows the universal coupling with threaded adjustment mechanism. A simple but effective device, which is not difficult to make your own hands:
Work with a metal drill will be easier and more productive if you make a pre-drilled hole with a smaller diameter. For example, a 5 mm drill bit is used first, and then a 12-16 mm drill bit to match the size of the bolt.
Making a universal coupler
Work must be performed on a level surface. A table of the right size or a workbench will do. Order of work is as follows
- Marking. According to the drawing the contours and dimensions of the elements are marked.
- Drilling. Use a drill or a machine tool. The accuracy of the holes is checked with a caliper, as well as a stud or bolt by inserting them into the seat. Both backlash and jamming of parts is eliminated. To facilitate the work and to avoid injury the holes are processed by countersinking.
- Welding. It is preferable to use electric welding. The metal is heated only at the joint and critically does not lose its properties. If a suitable channel is not found, then the construction is made of sheet steel of the required quality.
- Assembly. The bracket is attached to the channel with bolts. If an adjustment mechanism is provided, it is also fixed to the structure.
Necessary tools and materials
There is a certain set of tools that are needed to make a hitch, but they do not include anything exotic. Usually everything that is required to assemble such parts is in the household of any owner, cultivating his plot of land. The following tools will be required:
- welding machine;
- angle grinder;
- Drill or drill press,metal drill bits;
- Measuring tools (tape measure, ruler, angle);
- wrenches;
- fasteners (bolts, studs).

I must emphasize that in this case it is very important that the holes that you will drill in the part exactly coincide with the bolts and studs. a gap in diameter is undesirable, because it will reduce the service life of the hinges and trailers used. In this case, during the manufacturing process, it makes sense to first make smaller diameter holes in the part (from 5 mm), and then expand with wider drills (up to 12-16 mm, depending on the diameter of the bolts). this approach will accelerate and facilitate this part of the work, while allowing you to align the holes as accurately as possible.
For the manufacture of the body you can use a channel of suitable size, and if such is not available, you can cut out a part from a sheet metal.
Manufacturing of ridge plough power tiller || kalappai || agriculture tool || Building Strong
Very convenient option of adjustable coupling. such a design will allow you to attach attach attachments of different classes, generations and brands. Even if at the moment this design is not relevant, do not forget that in the economy may eventually appear different devices, and the possibility of easy aggregation of any of them will significantly expand the choice, allowing you to proceed only from the desired operating characteristics of the equipment.
Coupling to the tiller with your own hands
The U-shaped attachment is the basis of the hitch for the power tiller, so a channel of the right thickness and size will work perfectly to make it. This attachment is located under the tiller of the power tiller.
When making a hitch mount with your own hands, you need to drill a few holes to fix the bracket and the fastening pin in them. That is why the holes must be of the right diameter. The pin must also be made of high-strength steel.
To attach additional attachments to the power tiller you will need a bracket. The long end of the bracket should be positioned either downward or upward, so that there is no interference with the connected equipment. At the same time, the end of the bracket must not touch the surface of the soil to be worked.
When making a homemade hitch, we used a standard sample. Often additional attachments are used to the motoblock, with non-standard types of coupling. To connect them to the tiller, you must either buy a special adapter, or make an adapter with your own hands. Generally U-brackets.