How to mount a rotary mower on a single axle tractor
When talking about a rotary mower, we mean a device that is used to mow the vegetation that grows in fields and meadows. These can be crops or weeds, which must be gotten rid of if herbicides are not used.
This is the closest name to the earliest perception, giving the idea that its principle of operation lies in the functionality of the discs on it, with the help of which the mowing.
There are three main ways to connect a rotary mower type with a power tiller:
Similarly, there is a division of this type of mower by the way in which the cutting devices are positioned in relation to the machine on which they are attached:
All about how to make an electric lawn mower with their own hands.
Looking here you can see the video mini-tractor from the power tiller Neva.
Single axle tractor with haymaker
So, as a result of long choice torment and search of compromise it was purchased:
On the motorcycle has already been reported here, I will not repeat. The engine is marvelous, the quality of assembling of all the rest. Soviet. In particular, after 5 minutes of work with a whistle blew out a bolt that secures the shaft of the engine pulley. The good thing is that there was a shield. And after 10 minutes of work was lost knob from the shifter, stupid unscrewed despite the found traces of glue But found Then another peel off the rubber with the right handle well, and so on. In general, you need to glue everything and tighten. The main complaint. a bolt that attaches the handlebar to the tiller, according to the designers idea, should provide easy repositioning it on the side to go sideways from the tiller. In fact, it turns out that the entire handlebar is attached to the base with a bolt that has a nut screwed to the middle, t.е. just pressed it in. You have to pull it up all the time. I’m thinking of re-cutting the threads on the bolt to pull it through this assembly and tighten with the nut on the bottom. Of course it will be harder to change the wheel, but it is not a good idea to keep tightening it all the time.
Now for the mower. I’ve found out straight away that the shaft on which the tensioner is installed is not parallel to the main structure and as a result after the tensioner is installed the roller distorts the belt trajectory. Fixed by bending tensioner detail on which the roller is installed. Let’s go the first belt was killed in about 15 minutes The worst thing is that even a slight loosening of the belt due to its overheating leads to the fact that it is already impossible to use it, because its tensioning is performed by the tensioning roller or by moving the mower itself to one “hole” on the console. As a result, the belt is pulled and the tensioner is no longer enough, and the relocation of the mower leads to the fact that even with the tensioner lever lowered, the belt is still stretched, and start the engine together with the “connected” load I something I did not want to try, in my opinion this is wrong. Change of belt, try number 2 Mowing like a tank, cuts everything and everything, but if the grass is dense or dead, it’s better to mow in small squares, t.к. on the mower’s frame there is a whole pile of tangled grass collecting, which firstly, prevents the blades of grass from rotating, and secondly, knocks and crushes the grass laterally from the mowing. I’ve got used to it this way. I make cuts, like “glades” through 5-7 meters, then I reverse and mow perpendicular to these cuts to dump into them what has gathered on the frame. As a result in this approach, with very uneasy bumpy grounds, dense grass and in some places already fallen down for 2 hours I have mowed about 6 hectares, with pauses on belt cooling (it was the last, and to a city 150km) and scattering of mowed grass.
Summary: in general I am satisfied, despite the above drawbacks. If I had mowed a couple of weeks earlier it would have been a lot easier.
Description of rotary mower for power tiller
Speaking of a rotary mower, we mean a device with which to mow vegetation that grows in fields and meadows. These can be crops or weeds that should be gotten rid of if herbicides are not used.
This is the name closest to the quickest perception, giving the idea that the principle of its operation lies in the functionality of the discs available on it, with the help of which the mowing.
The rotary mower type is connected to the motoblock in three main ways:
Similarly, there is a division of this type of mowers by the way in which the cutting devices are located in relation to the machine on which they are attached:
All about how to make an electric mower with their own hands.
Looking here you can view a video of a mini tractor from a power tiller Neva.
General rules and recommendations for connection to a power tiller
Assembling a mowing unit for your power tiller is a responsible task that requires an attitude of care. But even a successfully made mechanism may not work as expected if the mechanism is not properly mounted to the power unit.
Recommendations on how to make a correct connection:
- Shift the power unit into reverse;
- Connect the mower to the PTO through the connection in the coupling socket;
- The trailed implement should be secured with a spring pin;
- The mower blades must be protected by guards;
- Start mowing at low engine revolutions;
- When driving during mower operation avoid sudden maneuvers and turn the machine smoothly without jerking.
When choosing to make your own mower of any of the presented types, first of all pay attention to safety of use. these are devices of high risk and may cause irreparable harm to health if used incorrectly or if safety measures are not observed. Also check the technical condition of all components of the machine during operation.
General rules and recommendations for connection to a power tiller
Self-assembling a mowing unit for a power tiller is a responsible task and requires the proper attitude. But even a successfully made machine may not work as expected if the machine is not mounted correctly on the powerpack.
Recommendations on how to make the right connection:
- Switch the power unit into reverse;
- Connect the mower to the PTO through the connection in the clutch socket;
- Drawbar hitch must be secured with a spring pin;
- Mower blades must be protected by guards;
- The mowing process should be started at low rpm;
- When driving during mower operation avoid sudden manoeuvres by turning the machine smoothly, without jerking.
When choosing to make independently any of the presented types of mowers should be guided primarily by the safety of use. these devices are high-risk and can cause irreparable harm to health if used improperly or failing to comply with safety measures. Also check the technical condition of all components of the machine during operation.
Principle of operation of the rotary mower
The mower is put into operation by the transmission of a power tiller, as well as by the movement of the wheels of these units. The design of the rotary mower consists in fixing the support wheel and one or more discs to the metal frame. When the land wheel starts moving, the cutting units start moving, and they also start mowing.
Different models have from one to three cutters on the metal frame. They can be attached in various ways, but the main advantage of increasing their number is to increase the productivity of the unit as a whole.
Rotary mower equipped with two or three blades, working with a tractor or tiller, and working on fairly large areas of agricultural land. the output speed also has a positive effect on the mowing speed.
Several key factors shape the performance of a rotary mower:
- the cutting height of the vegetation;
- productivity (this figure is based on the area of cultivated land during the implementation of works);
- the rotation speed of the cutting unit.
How a rotary mower works
The mower is put into operation by means of a power unit transmission, as well as by means of movement of the wheels of the said units. The design of the rotary mower consists in fixing the support wheel and one or more discs on a metal frame. As the support wheel starts moving, the cutting units are set in motion and mow.
There are from one to three cutting devices on a metal frame in various models. They can be attached in different ways, but the main advantage of increasing their number is to increase the productivity of the machine as a whole.
A rotary mower equipped with two or three knives can be powered by a tractor or tiller and cover large areas of agricultural land. The presence of several cutting units also has a positive effect on the speed of agro-technical processing.
The characteristics of the machine are shaped by several basic indicators:
- The cutting height of the vegetation;
- Productivity (this figure is made up by calculating the area of cultivated land during the implementation of works);
- The rotational speed of the cutting unit.
The rotary mower’s range of application
A mechanized farmer is faster and more productive and has more time to do all the necessary farming work, whether it’s cutting perennial grass for livestock or harvesting wheat. With the right steel helpers, you can not worry about disruption of the forage harvest or spring crops before the rainy season. Rotary mowers are perfect for:
At the same time, this agro-technical device helps to achieve the following important factors
- The result is the highest possible productivity and economic efficiency;
- A machine which is hard-wearing, light in weight, easy to operate and easy to manoeuvre;
- achieving a high quality of cut hay and grass that does not get damaged by the root system while the machine is working.
Description and principle of the seeder for power tillers.
On this page you will find reviews of the VIKING power tiller and how it works.
This link will tell you where you can buy an electric cultivator.
Materials Needed
As the starting materials are chosen:
- Seed drill discs for planting cereals, 2 of them.
- Chains from chain saw gearbox.
- Metal blades (8 pcs.).
- Tire.
- Coulter.
In addition, you may need bolts, nuts and other small parts, which are usually in the garage of any owner.
A segment mower
In order to make their own hands quite functional and working segment mower, you should take a metal pipe with a rectangular cross section 1200h50h15 mm or a piece of ordinary cloth mower for grass, and drilled at the same distance twelve 10-mm sockets for the installation of mounting bolts M8. A 890 mm long strip of metal guide bar with teeth and blades mounted on both sides of a rectangular tube is subsequently attached.
The blades have backs with segments and drive arm rims. Suspension arms and skids are mounted on both sides of the pipe. The support wheel is mounted on the mower’s chassis. The working part of the segment mower is driven by the universal joint shaft of the power pack used.
Drawing of a segment mower
High quality mowing of fresh cut vegetation without crushing it is possible with the segment mower. Here is a video of the machine in action.
Making a hand-held segment mower
If you plan to make a manual haymaker in the form of a segment device, you should use metal bars with the dimensions 15x50x120 mm. Holes are drilled in each of them to install the bolts. To the latter you attach the guide rail, its length should be 90 cm. The blades are on either side of the cutter bar. To the ends of the latter the skids and clamps are fixed.
In the lower part of the frame it is necessary to fix a wheel, which you can borrow from a baby carriage or a child’s bicycle. The cutting part of the manual haymower will be powered by a power tiller. However, even if you assemble the machine correctly, you must follow the recommendations for installing the equipment in any case.
The single-axle tractor must be set in reverse. The coupling unit is placed in the hitch socket. You have to secure the connection with the spring pins, otherwise the drawbar won’t work. The blades of the mower should be protected with a hood when installed. The weights on the wheels should be removed, because they are not needed for mowing the grass. Start the mower by engaging the clutch and engaging the clutch at minimum rpm.
Rules for installing self-made equipment on a single axle tractor
Even if assembled correctly, the mower will still not produce the desired result if its connection to the power unit is performed incorrectly. When installing homemade equipment, there are certain requirements that must be met:
- Switch the single-axle tractor into reverse mode;
- any connection of the equipment to the PTO must be made by fitting the coupling assembly into the coupling socket;
- secure the hitch using a pin with a spring. If the spring is missing, it may cause failure of the hitch;
- when installing it is necessary to cover the blades with a protective cover;
- grass mowing should be started at low revolutions with the clutch engaged;
- when working with a mower all turns must be done accurately, without sudden movements, taking your time.
Whichever type of equipment, rotary or segmental, to your power tiller you prefer, for self-made, the assembled device must be completely safe for the one who drives it and for those around. As the device operates with a fairly high speed, then with unreliable mounting the disk with blades, snapped, can cause serious injury to you and those around you. Therefore, deciding to make their own hands such equipment, it is worth well weigh your strength and decide whether you have enough skill and experience for such work. It is quite possible to buy a ready-made device and save your time and effort.
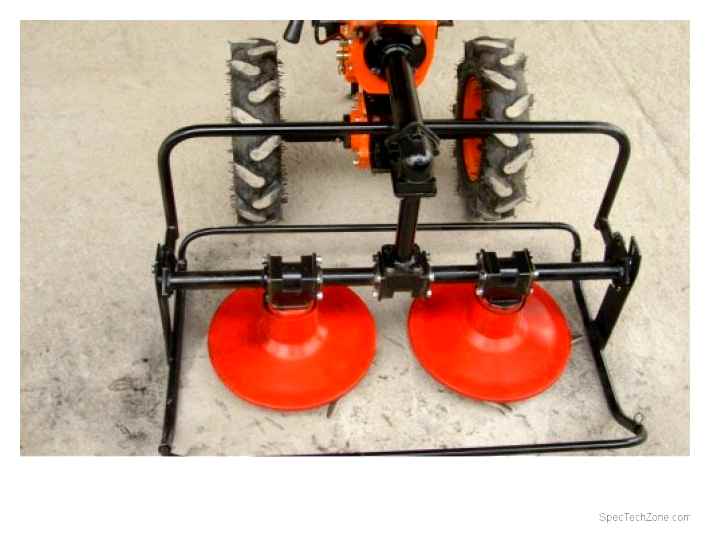
Rotary mower Zarya
Since a large number of different attachments fit to the Neva motoblock, it is not only manufactured by Krasny Oktyabr.
Plant “Kaluga Engine” offers its model of rotary mower. Zarya.
It has a slightly different design. It has two discs with blades on the frame.
At the manufacturer Neva you can even buy separate couplings to install Zarya mower, they look like this:
That is, outwardly it looks like a segment mower. But instead of two rows of blades, it has two discs of blades. The blades are spaced far enough apart for the knives to work the whole surface.
This model has the same disadvantage as the segment mower. It is not designed for use on an uneven surface.
Here is how the work with the mower Zarya:
Technical specifications
- The maximal cutting speed is from 2 to 4 km/h.
- Blades rotate between 2,000 and 2,400 rpm.
- The maximum height of grass for mowing should not exceed 1 meter.
Block: 4/7 | characters: 1032
How to install?
The most popular rotary mowers are attached to Salyut with a special hanging element included in the delivery set. To install the equipment, you need the following.
- Fasten the hanger with bolts, nuts and cotter pins.
- Check fasteners for firm seating.
- Check smooth operation by manually turning the drive train.
- Carry out a test drive by moving the transmission lever to the operating position. After the belt has been tensioned, the cutting elements should start to rotate. At the beginning the mower should be operated at low rpm.
When installing the attached equipment on the frame of the power tiller it is very important to take care that only original components and parts of the construction are used. If your “Zarya” mower is installed on the “Salyut 100” power tiller, it is attached to a special pin in the front part of the machine.
Self-propelled mower-carrier with their own hands
With a self-propelled mower, you can easily get rid of grass that has a wide stem. Let’s consider the peculiarities of making a machine.
Materials and Tools
To assemble the haymaker you will need:
- a frame made of metal angles;
- 4 wheels;
- Metal sheet or plywood (size 80x40cm);
- 2 tin cans;
- 8 metal discs;
- 4 blades;
- bushing;
- drum;
- bolts;
- conveyor belt.
Did you know? The wider and bigger the wheels on the mower, the less they damage the lawn and leave no marks.
With the materials listed above in hand, you can begin assembling the device with a standard set of tools.
List of steps
See instructions for assembling the mower:
- Place the sheet metal on the frame.
- Place two cans without lids and bottoms on the frame. Place the metal discs instead of the bottom, with the outer ones 20 cm in diameter and the inner ones 17 cm.
- Join the discs together in pairs: bolt them together.
- Fix the blades to the discs so that the distance between them is the same to allow them to rotate freely.
- Insert the bushing into the drum part, fasten it firmly to the frame.
- Place a sheet made of steel corners on the frame.
- Join the drums together. You’ll need a conveyor belt for this.
- Attach the lower hub to the drum, and attach the corners to the latter.
As the final step, check that the blade is secured to the tractor and mount the machine on the single axle tractor.
Competent mounting of the mower on a single-axle tractor
A newly purchased product must be installed correctly on the machine to provide the right performance and quality of execution. Let’s consider the approximate order of assembly and installation on the example of the rotor version:
- Check the delivery set (from model to model the set may differ, but, as a rule, it is a drive belt, frame, connector, fasteners, rotor cover, hydraulic hose, support skids, hydraulic cylinder, drive belt tensioning system, rotors with blades, spares);
Mount the frame to the mounts of the power harvester so that it makes 45 degrees with the vertical plane and so that the slotted parts look up;
We suggest you read How to impregnate plywood for moisture resistance
Put the rotors on the frame so the blades are at the bottom. It’s important that they are fully seated on the spline;
Attach the rotor cover to the same slot;
Fix it with the cotter pins and nuts;
Mount the tensioning system by removing the cotter pin and unscrewing the lock nut on the pulley. The next step is to carefully knock out the pulley so that the key is not lost. If the system is properly installed, its handle will point upward and be secured with bolts from the spares;
Next fix the skids on the frame with bolts from the spare parts kit so that their concave part faces inwards;
Put the frame rings out. they must be on the outside of the frame of the power tiller. After that connect it to the second mower;
Put the drive belt on the pulley as you drive. It is important that the single axle tractor and the mower remain aligned;
Then mount the hydraulic cylinder. hydraulic hose system (if the connection is planned on the power tiller).