angle grinder out of a drill. it’s that simple
In order for you to have an angle grinder from a drill, you must first of all decide on the power of the tool, that is, to understand what kind of metal you are going to cut. Of course, for regular use, such a variant is not the best, but if you need to go to any object to perform minor works, then such a versatile tool can easily fit in a bag or backpack. Based on this, we can conclude: to make an angle grinder out of a drill is possible, but for use in special cases.
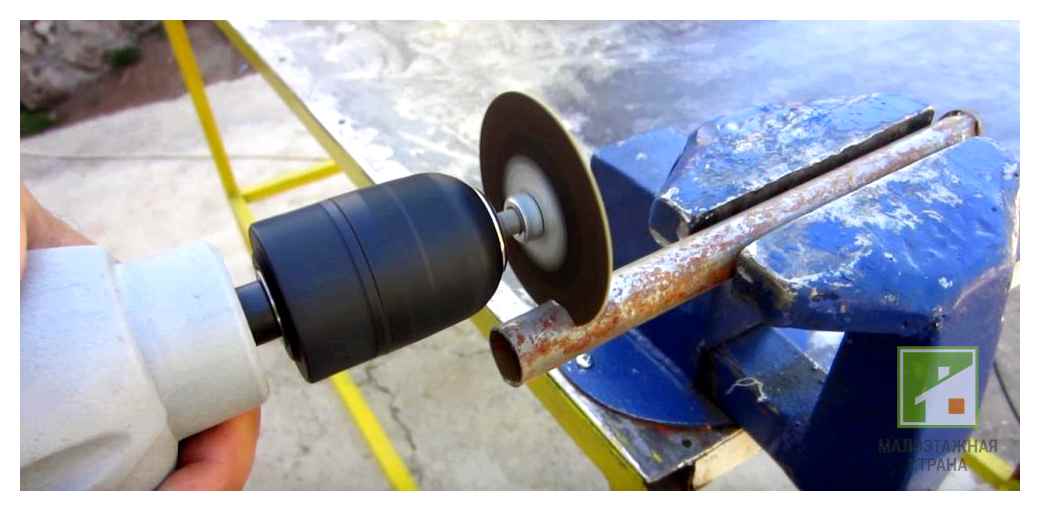
The shaft for the disc is clamped in the chuck and if you remove it, you will be left with a full-fledged screwdriver Source tehnika.expert
Note: you should not forget that using a drill instead of an angle grinder is almost impossible in hard-to-reach places.
Step by step assembly and parts selection
So, if you have conceived to make an angle grinder out of a drill, then decide what you intend to cut, that is, it will be a sheet metal or rebar, and how thick they will be? For a steel rod, if it is, of course, one-time chopping work, it is enough power of a cordless drill (electric screwdriver), as shown in the top photo. Only for thick metal, one millimeter or more, you’ll need a corded drill with a capacity of not less than 700-750 W. The fact that corded power tool has a more rpm motor than an electric screwdriver and the latter you will have difficulty even cutting a fifty corner.
If we talk about the electric screwdriver, the drill-angle grinder here will cause problems not only because it has a motor with low speed, but also the fact that the battery at high loads will run down very quickly. The best batteries of such models as “Makita” or “Bosch” are not a panacea for continuous use either. For example, if “Makita” in normal mode can be used at the site without recharging for a whole day, then as an angle grinder it will suffice for no more than a couple of hours. But it’s up to you, and we’ll talk about the device for fixing the saw blade.
Factory parts for the locking device
Of course, the angle grinder from the drill will turn out very well, if you buy a drive shaft and a nut with a flange under it in the store. But such parts, only modified, it is not difficult to make yourself, if you are a turner or you have a good acquaintance who has such a specialty. But first let’s analyze the purpose of each part using the top photo as an example.
- In the center you see the drive shaft on the angle grinder from an ordinary drill, which will be clamped and cutting or grinding disc. The factory version provides slots and/or grooves for fixation of the lower flange and a thread for the clamping nut-washer, which, in fact, can also be called a clamping flange.
- On the left lies the bottom flange, which simply slips over the grooves or splines of the shaft, so it rotates with it. The flange has a shoulder of a certain diameter on which the disk is put. In the assembly this flange acts as a reducer. an adapter from one diameter to another. Thanks to this the saw or grinding disc is perfectly centered when turning.
- On the right you see the clamping nut on the angle grinder from the drill, but it is also made in a special way. In the center there is a groove that corresponds to the diameter of the small reduction. It’s to hold the disc precisely, but it doesn’t have to rest on the seating tab.
Note: all additions with reduction lugs and holes are necessary here because the drive shaft thread is M14 and the disc inside diameter is 22.23 mm.
The purpose of the special clamp
The capability of this assembly depends on the type of chuck, which is an important component. It connects the drive unit with the tooling in the form of a drill or any attachment. Its main parameter is the diameter of the shank and the drill bit.
Tail bits are usually available in sizes from 10 to 18 millimeters, so they can be used in all sizes of equipment. The drills used in them have a section of 4 to 80 millimeters, with slight deviations in both directions, depending on the chuck model.
The dimensions also affect its weight: approx. 200 to 600 grams.
The usual drill clip is suitable for the drill, which is quite sufficient to hold the rotating drill bit, because this device changes only the direction of the chuck movement and the number of revolutions.
Unlike in a drill, the torque is not transformed into rotation only, but also into a simultaneous reciprocating motion. The chuck must therefore be able to withstand both the torsion itself and the axial load. That’s why an ordinary collet head is not used here, and a special universal clamp is needed.
Tool chucks
There are several ways of clamping the drilling or chiseling equipment in the tool. They have a different application method and design. Their frequency of use also varies depending on the model.
Self-clamping device
The name of the chuck speaks for itself. No special wrench or additional tools required to clamp the drill bit or drill. Tool bits are changed at high speed. Press the spring-loaded housing with your hand and pull out the old drill bit, and replace it with a new one.
There are two types of these tools: with one sleeve and with two sleeves. If a double clamp is installed, the second hand should hold the lower part of the clamp. The disadvantage is the insecure fastening. When the drill bit is pressed or jammed hard, it starts to rotate. Despite this, such a device is used at home and in production. where in the process of drilling you have to change the tooling many times.
Drill bit adapter
This device will help when you do not have a drill at hand, and to make a hole with an ordinary drill is simply necessary. Such an adapter to the peorator for drilling is inexpensive and represents the usual collet chuck with a shank. That extends the capabilities of the core drill itself. Almost every modern model allows you to install such an adapter.
However, there are small caveats. When drilling with such an adapter, accuracy will suffer a little due to the fact that the speed of rotation is quite high, and the nozzle will wind up. In addition, you need to calculate the size of the adapter for the strength of the peorator. If you put a stronger adapter on a weaker tool, you can put the drill out of commission.
Drill setting with a wrench
Such chuck is also called toothed chuck because of its appearance with serrated hooks, or cam, because the process of fixation is similar to compression of the fist. Clamping is done with a special key. The method is quite time-consuming, not only in terms of tool change. The chuck itself can’t be changed quickly, because a special chuck wrench is needed for it. But the clamp is the toughest and most reliable, supports maximum size drill bits. The shank is also suitable for all types of power tools.
The most reliable key-type clamping elements are produced by Hortz from Germany. Professional size chucks are marked with the marking Pro. Matrix and Ataki are not bad at all.
Types of quick-release chucks
Such chucking has been developed in Germany by engineers of Bosch, and since 1980 it was completed with their torches. They are currently available on most models of these power tools. Steck-Dreh-Sitzt translates as “put in, twist, fit”. From these German words comes the name of a whole class of fast-action keyhole chucks for SDS rotary tools.
They, in turn, are divided into subclasses. depending on what their diameter is.
The most widespread products are SDS-plus type. Drill bits with a shank of 10 millimeters and a diameter of 40 mm go in. The drill bit itself for the chuck has dimensions from 4 to 26 mm and a maximum length of 1 meter. This type of quick-release tool holder is suitable for light and medium-sized torches designed for an impact load of 5 joules. That’s powerful enough for your home office and construction crew’s needs.
Seat 18 millimeters characterizes SDS-max quick-action chucks used for heavy tools weighing more than 5 kilograms. Working diameter up to 60 mm, depth of head. 90 mm. The method of using such a tool is more powerful. the impact force increases to 30 joules. An auxiliary slot ensures that the bits and accessories stay firmly in place.
SDS-top and SDS-quick peorator chucks are used less frequently. The first is designed to drill holes with a diameter of 16-25 millimeters and a fit of 40 mm. The shank has a diameter of 10 millimeters. This type of quick-change chuck was seen as a transitional chuck between the classes.
The second was developed in 2008 and is designed for fixing drills with a diameter of ¼ inch.
Element fastening method
The cartridge is attached to the shaft of the drill by two methods. a tapered combination and a thread. In practice, there are devices with metric or inch thread, and on the body of the product, even on the smallest one, there is necessarily a marking. This type of indicator is considered a key international and is used in all devices of foreign manufacturers.
The second method uses Morse cone, which today is often called a tool cone. The rod has a conical part at its end, on which the device is attached, and you only need to add a little tension for a tight connection.
The marking is as follows: B10, where the letter indicates the taper and the figure shows the diameter of the cutter’s tail. This type of attachment is the same for all drills.
Problems with component operation
The Interskol or Bosch drill modifications often have the drill bit or other attachments attached to the chuck with a cam device: 3 or 4 cams reliably hold the cutting mechanism, they can only move along the axis of the drill shaft. The quick-action chuck can be adjusted manually. The most complex structures are regulated by keyed devices. Chuck replacement on an Interskol drill is quite simple.
Repair of any kind of device is carried out as follows: remove the device from the shaft, the same actions are necessary when the drill is stuck, as it can be removed only after the complete removal of the cartridge.
It happens that the malfunction is detected when the chuck rotates in relation to the shaft of the device. The reason for this action is that the threaded part of the device is broken or the planting taper is sagging. The way out of this situation is to replace the tapered cartridge with a working analog.
How to remove the old chuck
Chucks that are fastened to the spindle with a thread are normally secured by a left-handed screw for extra security. For this reason, you should first remove the chuck by unscrewing this screw. Before it can be unscrewed, the path must be cleared to it. To do this, the cartridge jaws need to be retracted as far back as possible.
If you now look into the chuck, you can see a screw head for a Phillips or star screwdriver in the center of the bottom. To prevent this screw from being unscrewed, it is made with a left-hand thread. So it should be unscrewed by turning the screwdriver to the right side, preliminarily clamping the assembly in a locksmith’s vice.
Probably, the screw splines over the years of operation are clogged and in order to seize them with the screwdriver bit, you should at the same time easily tap on it with a pair of pliers or a hammer until you feel the hook.
After removing the left-hand threaded screw, insert the hex wrench into the chuck and tighten it.
Clamp the free side of the hexagon in the jaws of the vice and use a suitable socket wrench to unscrew the nut on the drill with which the chuck is attached to the spindle of the tool.
After that, you can release the L-shaped hexagon from the vice and by turning it to the left, unscrew the clamping unit from the spindle shaft completely.
How to remove the quick-action chuck from a threaded drill
The peculiarity of the thread connection of the chuck with the shaft is the left thread of the fixing screw. This is done so that when you rotate the drill bit and “digging” into the material, the shaft simultaneously tightens the chuck mount. Consequently, the answer to the question of how to remove the self-clamping chuck with a drill of this type is simple. you need to rotate the chuck, firmly holding the body, in a clockwise direction.
Usually just turning is not enough, you have to knock on the joint so that the thread, strongly tightened, loosens a little and makes it possible to freely scroll the joint.
Drill chuck: how to change, disassemble, unscrew
An electric drill is an indispensable tool attribute of both the home handyman and the professional. Without this tool it is difficult to perform any works connected with production of anything as well as assembly, disassembly and so on.
Breakdown of a drill, even of a famous brand, eventually happens at some point. And one of the most widespread variants of breakage of this power tool is a failure of a chuck: both key, and self-sealing.
Causes of drill chuck replacement
Sooner or later any detail, assembly or any mechanism become unserviceable.
In modern drills, such as Makita, Interskol, Bosch and so on, the attachment of a drill and other cutting tools, as well as all kinds of attachments is carried out by a cam-type device.
The cam mechanism is a 3 or 4 cams, through them and the tool is held in the chuck of the drill.
If it is a quick-action device, the mechanism is tightened by hand, and if it is a key-action device, it is tightened with a special wrench.
There are also collets, but they are more for use in production for metalworking. They clamp all kinds of tools needed for the work.
- Run-out during rotation. This indicates worn cams or front bearings on the shaft.
- Turning on the shaft. Damage to the thread if the chuck is threaded or if the tool cone is worn out.
Runout is a harmful and unsafe phenomenon, it can be characterized as follows:
- The cutting tool in the drill is not holding up well, or any of the accessories.
- Drill bits jam (if taper is worn).
- Bore holes become irregular in shape.
- Drill bit shanks wear out.
How to remove the chuck from an electric drill
The chuck can be attached to the spindle in the following ways:
- Taper mount. When using Morse taper (tool taper). In this case the shaft is in the form of a cone, well ground and requires minimal force to fit it. Example of marking: B10, where B is a taper symbol and the number 10 is the diameter of the cutting tool shank. Such fastening is most common in screwdrivers.
- Threaded mount. There are metric and inch threads. If the chuck is marked M13, it is a metric 13 mm thread. If it is an inch, UNF with a diameter of ½ inch.
However, to keep the user 100% safe, the manufacturer of imported drills also fixes a chuck with a screw that serves as a stopper and securely fixes it to the shaft.
The screw has a left-hand thread and very often, when the drill is repaired by inexperienced people, the slot on the screwdriver screw is torn off by ignorance, believing that there is a standard right-hand thread. so you must unscrew it clockwise.
Knowing the design features of your own drill, to remove the chuck does not seem to be a big problem.
To change this item you need to prepare the following tools
- Pipe wrench
- Medium sized hammer. Approximately 400-500 grams.
- Wrenches.
- A caliper. 2 or 3.
- Screwdriver with the necessary shape and cross section of the blade.
- Personal or velvet file.
- Sandpaper.
These are the minimum tools required. It is very possible that during the work you will need something extra.
Threaded connection
The procedure for disassembly:
- Unscrew the setscrew counterclockwise.
- Unscrew the chuck in the same direction. If there are grooves on the shaft use wrench for fixation.
- If the drill is jammed, tap the cams from top to bottom with precise and light hammer blows.
- Reinstall the assembly in the reverse order.
Fix the part of the jig on which the cams are located using a pipe wrench (gas wrench). turn the shaft. The cartridge should unscrew easily after such “persistent” intervention.
Joining with a tool tip: Dismantling step by step
This dismantling is done with a hammer and a hammer made of non-ferrous metal: brass, bronze, aluminum, copper. However, hammers of this type can still be found.
Soft metal does not cause damage in the form of chipping and distortion.
It is necessary to perform the following steps:
- Hold the drill with the handle upwards.
- On the back of the chuck, gently tap with a hammer all around the circumference.
- After the device is dismantled, the cone must be ground with a fine emery cloth. Remove larger dents, if any, using a file.
- Insert new cartridge into its usual place and hammer it down with a wooden hammer (mallet).
For older drills, made during the Soviet period, another method is applicable. In them, on the shaft, there is a fairly large gap between the tool body and the chuck, and on the shaft there are flats.
Locksmiths usually did the following:
Of course, it is not the safest way, taking into account that a key can fly off on an unplanned trajectory and injure a locksmith. There is also a variety of drills, where a slot is made in the body, into which a wedge is inserted for knocking out the chuck. Such drills can have two tapers: one in the chuck and one in the drill. These tools are distinguished by their impressive size and weight.
Taper drills are considered to be more accurate in responsible drilling because the Morse taper is made with a high degree of precision.
over, a conical chuck can be removed with a puller, because every such drill, which does not even have a threaded hole for the locking screw, has a through hole.
And if you use a puller with a central stud and place it in this hole, you can also remove the firmly attached chuck by gripping its mating part with what has hooks in the form of powerful hooks.
For example bearings are removed with this type of puller.
Replacement in Interskol drills
The Interskol drill is very comfortable, has an ergonomic handle. Low price is also a frequent reason for its choice by customers.
The main points in a nutshell
Different chucks for drills and rotary tools are available.
There are two ways of fastening the chucks to the shaft of the power tool: by threaded connection or by tapered connection (Morse taper).
The disassembly of the clamping devices is done in the same sequence as the installation.
Know the procedure is necessary not only to replace or repair a faulty chuck, but also for its periodic maintenance and inspection.
Main types of clamps
There are two main types of clamps for the drill:
Jaw chucks, which are installed on modern drills, allow to make a reliable fixation of the device with the shank diameter of 1-25 mm. This type of device has practically no disadvantages, of which the most significant is the rather high price.
The most popular clamping device installed on modern drills is the BZP, i.e. a quick-action chuck. It takes only few seconds to fix a tool in a socket, and no special key is needed. The toolholder is locked in place by manually rotating a mandrel, which has a knurled outer surface to engage the tool in the desired direction. To adjust the mechanical action on the tool shank, this type of clamp has a locking device.
Serious disadvantages of the DHDs include:
- Fast wear and tear of its elements.
- Insufficiently reliable fixation of drill shanks with large diameters, resulting in turning of the tool in the course of work.
On the other hand, toothed products provide a secure hold. The only significant disadvantage of these devices is that they require a key, which is easy to lose. However, you can save yourself from this problem by securing this part to the drill wire with insulating tape or rope.
The Mini drill clamp is very popular and can be mounted on compact drilling devices. Mini drills are preferred by master jewelers. The mini-jaw is part of the quick-clamping category. Primarily made of brass and used for clamping tools with a shank diameter of 0.1 to 4.5 mm.
Tooth-ring
Classic, refers to clamping devices of cam or collet type. They clamp tools with a round shank and cylindrical workpieces for further processing. The main elements of cam-type clamps are as follows:
- Cylindrical body.
- An adjusting ring or sleeve that rotates on the outside of the housing.
- The collet or cam mechanism in the inner part of the housing.
Collet mechanism elements are made of hardened steel, and the mechanism consists of three identical cams, which come close to each other when rotating the sleeve or adjustment ring, ensuring the reliability of shank clamping. In the first models, the cams came together by rotating the adjusting wheel, but now this role belongs to the adjusting sleeve.
Place the clamps on the drill shaft with one side, and insert the tool with which the work is carried out with the other side. Clamping jaw chucks are mainly used for clamping in them:
A way to disassemble the chuck
The clamp with the threaded connection is removed, taking into account the left-hand thread.
The threaded element is located on the inside of the unit and the clamping jaws are thus first widened as far as possible to provide access to the locking screw which can be unscrewed with a normal Phillips screwdriver. In drills without this screw, the chuck is twisted off the shaft without the preparatory work described above.
The left-hand threaded screw that secures the chuck can wear out later on. To restore the reliability of the connection, it is recommended to do the following:
These actions will not damage the drill’s mounting assembly and will allow the clamping tool to be clamped more accurately and securely on the drill.
A threaded chuck can be replaced with a 14 wrench. In order to avoid mistakes, it is recommended to read the theoretical material and watch the corresponding video.
To replace a worn chuck, the old chuck is removed from the drill and a new one is installed. Both regular and mini-drill chucks with threaded and tapered connection are installed.
When replacing on drills with threaded chucks, it is important to consider the markings that look like this:
The interval 1.5-13 indicates the minimum and maximum diameters of the cutting tool. The new chuck should have identical markings to the previous chuck.
Design and features of a toothed chuck
The classical drill chuck refers to a cam-type or collet-type chuck. In them you can clamp not only various tools with a round shank, but also workpieces of cylindrical shape for their further processing. The main design elements of clamping jaw chucks are:
- cylindrical shaped body;
- adjusting ring or sleeve rotating on the outer surface of the housing;
- Cam or collet mechanism mounted on the inside of the tool body.
Design of a cam (toothed-ring) chuck with a key
in its turn the collet mechanism, whose elements are made of hardened steel, consists of three absolutely identical jaws that move one toward the other simultaneously by rotating the adjustment ring or the collet sleeve, thus reliably clamping the tool shank. In the early mechanical drill chucks, the jaws of the collet were brought together by the rotation of the adjusting wheel, nowadays an adjusting sleeve is used for this.
One side of the drill cartridges is installed on the shaft of the used equipment, and on the other side the tool with which the machining will be performed is inserted into them. Jaw chucks are mainly used to hold the following tools in them:
The cam chuck of a drill is designed for clamping bits with a cylindrical or hexagonal shank
How to remove the chuck with threaded connection
The question of how to remove the chuck from the drill, which is fixed at her by means of a threaded connection, occurs with home masters often enough. To remove such a chuck it is necessary to take into account that it is installed with a non-standard left-hand thread.
The threaded element of the clamping device is located in its inner part, so you must first maximally expand the clamping cams, which will provide access to the fixing screw, which is unscrewed with an ordinary Phillips screwdriver. In drills without such a screw, the chuck is simply twisted off their shaft without the above-mentioned preparatory work.
The head of the fixing screw can be a cross, with a straight slot, under the hexagon or even “star”
The left-hand threaded screw that secures the threaded chuck to the drill can wear out over time. To restore the reliability of such a connection, you can perform the following steps:
Such actions will not damage the fastening assembly of the drill, but will allow you to fix the clamping device on it more accurately and reliably.
The screwdriver chuck can also be replaced with a 14 mm open-end wrench, which makes the process much easier. In order not to make mistakes when you are going to disassemble the chuck of this type, you can first get acquainted with the theoretical material on the subject and watch the appropriate video.
Fields of application of angle grinders
At first glance, this “application” may seem quite unnecessary, because it has very limited functionality. But is it so?? There are ways to use an angle grinder with a chuck.
- Drilling in hard-to-reach places is possible thanks to the angle grinder gearbox. For an angle grinder complete with a chuck requires much less working space, compared to a drill.
- If you have a speed regulator, you can attach an electric screwdriver bit to the chuck, which also makes it possible to reach hard-to-reach places.
- clamping socket wrench holder in the chuck you get a pretty good wrench. A speed regulator is a must.
- If you fix an abrasive burr in the chuck, you can perform cleaning in hard-to-reach places. It is noteworthy that this device will work much more efficiently than a simple drill. In this case it is the high RPM that decides everything, you can use the device without RPM regulator.
- If you attach a flexible hose with a collet under the cutters you get a powerful drill. You can mount the cutter bits directly in the chuck, without using the flexible extension.
- It is also possible to use this chuck for fixation of a wood securing router. There are a few options: a) you can additionally make a movable baseplate. as a result, get a full-fledged manual running-in machine; b) in addition to the above improvements, you can rigidly attach the angle grinder chuck upwards. get a stationary milling machine. 10 thousand. RPM is the optimal speed for the milling machine.
- Clamping the diamond cutter can be used to process stone, but then the rpm setting is definitely needed.
The listed applications are not the limit. This is where the craftsman’s ingenuity comes in first. But as you see, a speed regulator is very useful for this arrangement. Often the controls installed on angle grinders do not provide stable operation of the power tool at low speeds. It is advisable to buy a universal regulator (dimmer), combined with a power outlet. All the more so because this device is not expensive. For those who are good with a soldering iron and have a basic knowledge of electronics, there are many simple and original circuits. At times, self-made products by their indicators are much superior to products from the Celestial Empire.
Chuck for angle grinder, use of adapter
Angle grinder (angle grinder) has become an integral part of both home workshops and large enterprises. It is not surprising. High performance, broad functionality, high RPM on the spindle and relatively low weight made the angle grinder a leader in processing metal and other materials.
But progress continues to be made. New devices for extending the capabilities of the device constantly appear on sale. One of these adapters allows you to install a chuck on the angle grinder. What to get out of it and how to use such a tool safely, it is proposed to consider in more detail in the context of this article.
- Design of the adapter
- Chucking the chuck on the angle grinder
- What you need to know about angle grinder in order to use it with a chuck
- Areas of application of the angle grinder
- Safety precautions
Areas of application of the angle grinder
At first glance, this “application” may seem completely unnecessary, because it has a very limited functionality. But are they? Here are some ways in which you can use the angle grinder with a chuck.
- Drilling in hard-to-reach places is possible thanks to the angle grinder. The angle grinder with chuck requires much less working space than a drill.
- If you have a speed regulator, you can attach an electric screwdriver bit to the chuck, which also allows you to get to hard-to-reach places.
- By clamping a socket wrench holder into a chuck we get a pretty good socket wrench. Speed regulator is a must.
- If you attach an abrasive burr in the chuck, you can blast hard-to-reach places. It is noteworthy that this device will work much more efficiently than a simple drill. In this case high rotational speed is decisive, the device can be used without a rotational speed regulator.
- If you fix a flexible hose with a collet for engraving cutters, you get a powerful drill. Handles engraving bits directly in the chuck without the need for a flexible extension.
- You can also use the chuck to hold a woodworking router bit. There are several options: a) you can additionally make a movable base plate. as a result we get a full-fledged manual grinding machine; b) in addition to the above improvements, you can rigidly fasten an angle grinder chuck upwards. you get a stationary milling machine. 10 thousand. RPM is the optimal speed for a milling machine.
- Clamping the diamond cutter, you can process stone, but then you definitely need to adjust the speed.
The listed applications are not the limit. This is where the craftsman’s ingenuity comes into play. But, as we see, the speed regulator is very useful for this design. Often, the controls installed on angle grinders at low speeds do not ensure stable operation of the power tool. It is advisable to buy a universal regulator (dimmer), combined with the supply socket. The more so that this device is not expensive. For those who are good with a soldering iron and have basic knowledge in electronics, there are many simple and original circuits. Sometimes self-made products in their performance are much better than the products from the Celestial Empire.