How to sharpen a metal drill with an angle grinder
Sharpening of metal tools allows you to fully restore their performance. The operation can be performed with the use of various auxiliary devices.
How to properly sharpen a metal drill bit and not to spoil the cutting surface of the product will be discussed in the publication.
Signs of dull metal drills
Sharpening should be started only if there are clear signs of blunting of the cutting edge.
Among the main manifestations of the ailment are the following:
When drilling metal with a sharpened drill bit, there is a high-frequency sound from the rubbing of the working edge against the workpiece. Therefore, if there is an increased noise, you should postpone the work and start sharpening. If you continue drilling metal, the cutting tool will heat up to too high a temperature from excessive heat.
Before the signs described above, the lack of spiral chips can be evidence of a decrease in sharpness of the drill bit. Such a sign is not always possible to detect in time. If the drill forms too fine a chip during operation when properly fed, it is recommended that you immediately begin debugging the tool.
How to sharpen a metal drill bit
Correctly chosen device will significantly reduce time costs and perform the work as accurately as possible. Learn how to sharpen a metal drill bit on a sharpening tool below.
Besides the basic unit with an electric motor and a wheel, you need to buy special appliances to hold the drill in a stationary condition. Such stands allow you to control the angle and feed of the tool during turning.
Many fixtures allow you to deburr metal cutters with diameters from 3 to 19 mm. For turning spiral drills, you can use special machines that have a built-in electric motor and feed mechanism.
Unlike using an ordinary sharpener and holder, the professional technique can cost tens of thousands. Therefore, if sharpening drills is not a profession, you can get by with the above described tandem of sharpening wheel and holder, or perform tool dressing by hand.
It is possible to sharpen the drill with a file without any experience. The main thing is to choose the right file. Given the fact that even cheap drills are made of high quality cutting steel, it is necessary to pick up a diamond-coated emery board. Besides the file, you need to prepare a vice, in which the tool should be fixed.
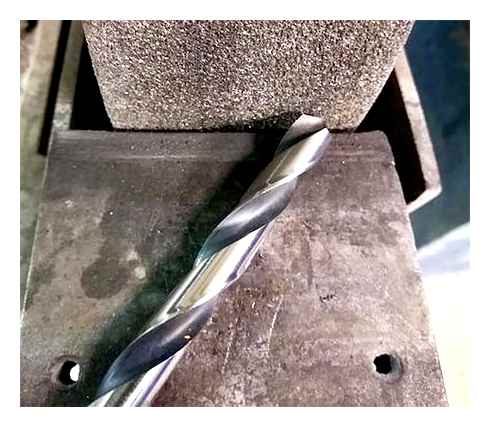
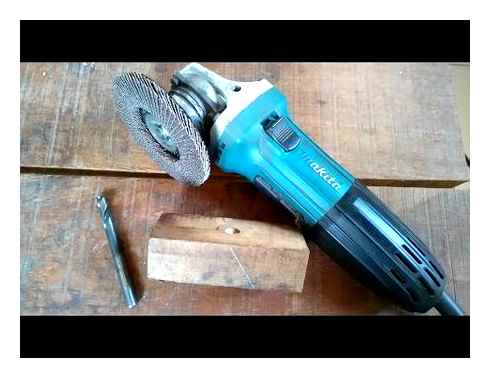
To avoid wasting time and effort on the manual method, you can use an angle grinder with an abrasive wheel.
Drill sharpening with an angle grinder
Grinder is available in almost every home workshop, so the method will be one of the most budgetary.
In addition to an angle grinder with a grinding wheel for work necessary to prepare a vise in which to hold the drill while sharpening. The room where the tool is debugged should be bright so you can monitor the process of removing metal from the cutting surface.
How to sharpen a drill bit with an angle grinder
Debugging is carried out in this sequence:
- Place the drill in a vise in a vertical position;
- The angle grinder is used to remove part of the back edge to eliminate all traces of wear;
- the cutting edge is sharpened at an angle of 120 degrees.
in order to avoid overheating of the drill bit during turning, the contact between the grinding wheel and the metal should not last longer than 2 seconds. Repeatedly removing a small amount of metal from the working edge makes it possible to adjust the tool to the desired angle.
to measure, it is advisable to make a plastic template, which will help control the angle of sharpening.
Drill bit sharpening with a sharpener
It is possible to determine the amount of damage to the cutter and to adjust by eye after many years of practice.
In other cases, a drill bit holder can be installed close to the emery wheel. The fixture must be strong so that the fixture will not shift during the job. If the sharpening machine is fixed to a wooden base, the mounting of the retainer still needs to be done with a bolted connection.
To sharpen: The tool is firmly clamped in the holding device, the motor of the sharpener is switched on and the drill comes into contact with the sharpening disc for a short time at a pre-selected angle.
- If there are nicks on the surface of the cutting product, the damage must be removed evenly on both sides before deburring it.
- Care should be taken. Large-diameter products heat up from contact with the abrasive wheel to high temperatures, which reduces the mechanical strength of the metal.

Sharpening with a drill bit
Without the sharpening machine, using a special attachment on the drill, it is possible to perform the operation qualitatively and with less time.
You can buy the nozzle in any specialized store, but the device can be used only for sharpening medium-diameter products. Most of these bits allow you to effectively sharpen tools with diameters from 4 to 10 mm.
For beginners, this is the preferred method. Drill bit sharpening is carried out as follows.
- Install the nozzle on the drill;
- The drill bit is inserted into a hole with a suitable diameter;
- The drill is switched on and the workpiece is sharpened on one side;
- Turning the drill bit by 180 degrees the opposite edge is sharpened.
To use the device effectively, consider the following features:
- Only slightly blunt tools can be sharpened with a drill bit. If there is deep damage to the cutting surface and when the drill has overheated, this is not the way to restore the product.
- The sharpening angle is fixed in these units. Therefore, to restore drills for working with non-ferrous metals you will need to buy an original device, or refinish the products with a file.
Despite some disadvantages of such design, its use allows to simplify and accelerate the process of restoration of cutting edges, and the low cost explains its popularity.
How to sharpen small items
Unfortunately, to sharpen the thin drill bit using mechanized methods, including nozzles on the drill, is unlikely to succeed. All work on small-diameter pieces should be performed manually.
The first attempt may fail, so you should first choose an inexpensive thin drill in need of restoration and perform the operation on it. Also for the work you will need a small diamond nail file and spectacles with 4x magnification.
The process takes place in this sequence:
The whole operation is performed “by eye”, it is important to use magnifying glasses and a powerful lighting device.
If the first attempt is unsuccessful, you should know that any skill can only be developed over a certain period of time. If unsuccessful, do not give up trying to learn a useful skill like sharpening fine drills with your own hands.
Sharpening products of other designs
In addition to twist drills, other designs of drills are used for metal work. The following tools can be sharpened at home.

Cone drills
You can sharpen a step drill bit using an ordinary file. The cutting edge of the product is sharpened at a right angle.
If a tapered drill bit is blunted in a limited area, sharpen it within the damaged area.
Drill bits
When deburring crowned tools, a special device is used and it is necessary to know at what angle the metal should be removed from the cutting surface. Taking into account all the difficulties and time costs to perform the procedure, it is better to turn to experienced craftsmen for sharpening.
Metal drill sharpening: how to correctly sharpen a drill at home
It is impossible to qualitatively perform metal machining (including drilling a hole in a metal part) without using a tool whose mechanical characteristics and geometrical parameters correspond to the required values. That is why the question of how to properly sharpen a metal drill bit is relevant for home craftsmen who often work with such tools, which wear out (naturally) during operation.
Sharpening a metal drill bit with a special tool makes it a lot easier
Drills designed for metal work must be sharpened much more often than those for woodworking. When processing such a soft material as wood, drills are practically unsharpened and can be successfully used for a very long time, fully retaining their original characteristics. This is not the case with drills that are used to drill holes in metal parts. The condition of these drills must be monitored constantly and measures must be taken immediately if their working part is subject to wear.
There are a number of signs that a metal drill needs sharpening:
- The squeaking and humming noise produced by a worn-out tool;
- Severe heating of the drill bit during use;
- poor quality of the holes you create.
A drill with different cutting edge lengths has only one side working and chips are coming out in one spiral groove
a worn drill bit is not only inefficient but also unsafe. At any time, such a drill bit, the working part of which is under considerable stress, can break, and its individual fragments, flying in different directions at high speed, can cause serious injury.
Practical training
If you feel that you are not sharpening your tool properly, you should practice more. You can do this through a lot of practice. take some drill bits that you no longer use and try to sharpen them properly. By trial and error, you can learn to perform the procedure perfectly.
Tool sharpening is not a difficult process, although some people think otherwise. Many online resources provide detailed descriptions and even show the steps of the process. Here you can watch a video that shows exactly how to sharpen a drill bit.
The video shows how to sharpen the tool correctly. If you follow the man’s instructions you will be able to do the job well. The tool should turn out the same way it was purchased. Only if the procedure is done correctly will you be able to use it the same way as before.
If a mistake is made, the drill will have to be thrown away. But everyone makes mistakes, so do not get upset if you cannot sharpen the tool right the first time. Every person learns from his mistakes. The main thing is not to abandon the work you have not done because you can not do something.
In order to learn how to perform the action in the best possible way, try to get involved in the process as much as possible, understand how it works. Only competent thinking about every detail can lead you to success.
How to properly sharpen a metal drill bit: ways and rules of sharpening the tool with video
A blunt instrument can and should be brought back to sharpness. Therefore, we will tell you how to properly sharpen a metal drill bit: processing methods, to what geometry to bring and so on. As a result, you will know what to do to fully restore its characteristics and use it again. Agree, this is much more practical than buying a new one right away.

Attention, as soon as you notice that the cutting edge has lost its original profile, you must immediately stop the technological operation. Because its edge has heated up and become soft under the influence of friction forces, and continuation of work will cause even greater deformation, already critical, after which recovery will be impossible.
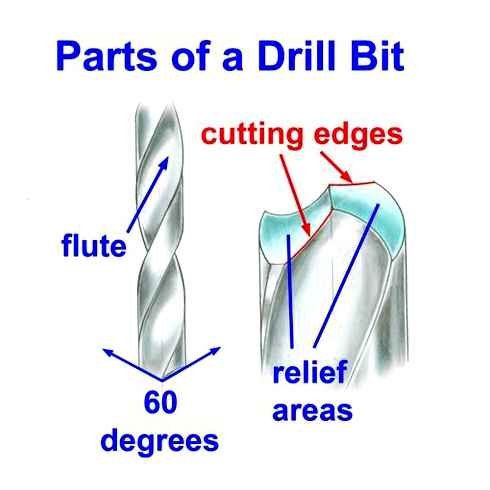
- Vertex angle. Located in the middle of the cutting edges and is the tip of the drill. The value of such angle varies depending on what metal is to be drilled. The angle of 118 degrees is considered the most universal. It is useful for soft materials, including soft metal. For metals that are dense and strong, the angle is over 135 degrees.
- Rear peaks. Pass behind the cutting edges, bending and forming a gap of 8 to 15 degrees for the universal versions.
- Crosspiece. In essence, it is an isthmus connecting two cutting parts. The main function of the bridge is to center the drill bit as it enters the metal.
- Spiral troughs. Necessary to reduce friction, act as a heat sink and guide.
- Spiral troughs. Diverting channels for the drilled hole contents.
- Shank. The connection point between the drill bit and the drill bit.
Spiral and back angles can be considered as separate parameters:
- The angle of the helix is variable, and varies depending on the type of metal for which the drill is selected. Large corner turns are good for softer metals that give long chips. Small-angle spirals are useful for hard metals and small chips;
- Rear angle. Its dimensions range from 7 to 17 degrees and depend on what metal is to be drilled.
Can a pobedite drill bit be refurbished?
The hard soldered metal tool can be sharpened in the same way as a normal, small-diameter tool. by sharpening the backside surface. The material should be removed all the way down to the bit. If the insert has worn down to the surface of the mandrel, it is best to also grind the front part until the center of the notch is thinner. The work must be performed with the utmost care so as not to cut unnecessary valuable metal.
During processing, you must monitor the heat of the cutting tool, because an excessive increase in temperature can lead to cracking or breaking of the plate on the contour of the solder. Any kind of liquids can be used for cooling, e.g. clear and cold water. But if the metal is already reddish in color, do not cool it down forcibly: the tool is sure to crack.
The sharpening process
Drill bit sharpening must be done in a certain way. Start by holding the tool with the left hand at the front (working part). Firmly grasp the shank with the right hand. Start the disc rotation on an angle grinder or a machine tool and gently (without a lot of pressure) bring the back part of the cutting edge of the drill bit to it.
Important: during sharpening, drill bit should be periodically cooled.
While continuing to gently press the bit against the disk, turn it with the right hand to sharpen the back part. All the while, check the correct inclination of the drill bit. Also take care that the cutting edges are the same length and sharpened at an identical angle.
How to sharpen the drill bits
How to sharpen a drill bit the old tried and tested way
Over time, drills become so dull that they become impossible to work with. Most people just take and throw away drills, buying new ones. But true masters of their craft will not do so, because with the use of a sharpener, or even without it, you can give a dull drill a second life.
In the household, as a rule, drill bits of small diameters, up to 16 mm are used. To sharpen such drills is not difficult, but how to do it correctly, you can learn from the article.
Choosing a tool base for sharpening
It doesn’t take much to sharpen drill bits at home. A simple electric grinder, better known as an “emery board” is enough. In this case, the power of a simple household model is enough, and there is no need to bother searching for some professional device. The optimal size is the one that allows you to install sharpening wheels with a diameter of 200 to 300 mm.
The sharpening wheel itself can be diamond or elbor. the best choice. But if they are not available, the more usual silicon carbide will do. Those who do not know a thing about grinding wheels can be guided by the color of the stone. Gray or greenish is good for pobedite. Red and white are not suitable.
Pobedite itself tolerates intense heat well. But the solder used to attach it to the drill bit body and the steel it is made of do not tolerate overheating during sharpening. Therefore, you should take care to cool the drill bit beforehand. That is, prepare a small container with water.
Winner does not like thermal shocks as well as most hard materials. That is, when dipping the heated pobedite tip of the drill bit into the water, it may be destroyed, cracked. To prevent this, the drill bit to be sharpened is first cooled in the air when heated and only then dipped in water. The duration of exposure to air depends on the intensity of heating and the size of the drill.
By the way, if you are not sure if it is safe to set the critical temperature point for water cooling by yourself, it is better to do without it at all. only cool regularly in the air. This method does, however, delay the sharpening process.
The difference between the auger and the drill is simple: the deflecting spiral does not start immediately at the cutting edge, but slightly later